
As of September 30th 2026, to allow clients greater control over their data retention when it comes to Bot conversations, we’ve introduced a feature to allow clients to dictate their own data retention period for their Bots.
This is an optional feature that any client can either choose to utilise or not. If the feature is enabled via the Authoring Settings menu, clients can configure a data retention period (e.g. 90 days) and after which, the conversations of that Bot will be deleted automatically.
Please note the following important factors:
-
The data retention period works for each individual conversation - this does not mean that all conversations are deleted after a defined period but instead, starts a count for each individual conversation, after which, each conversation that falls within the configured period will be deleted automatically - eliminating the need for manual deletion actions. The deletion threshold is calculated based off of the last received message, not when the conversation was initiated.
-
The retention setting only deletes conversation data - any analytics Snapshots used for reporting will be unaffected as they rely on aggregated data.
-
If a conversation is deleted, it is not removed from any analytics totals. Analytics metrics are calculated from a separate database of aggregated tables and are not affected by conversation deletion.
-
Conversations, when deleted, are deleted in full. There is not currently a way to delete specific data from conversations without deleting the full conversation (this may change in future).
-
The feature needs to be enabled for each Bot individually - configuring a data retention period for one Bot does not configure the setting for all Bots you may have in your environment.
How to enable the feature
Step 1: Navigate to the Bot authoring settings, located in the top right corner of the screen (see below). Click “Settings” to open the authoring settings menu.

Step 2: The first screen of the authoring settings menu will show you the “General” tab and its associated options. Scroll down to the bottom of the screen until you see the “Data Retention” setting (see below).
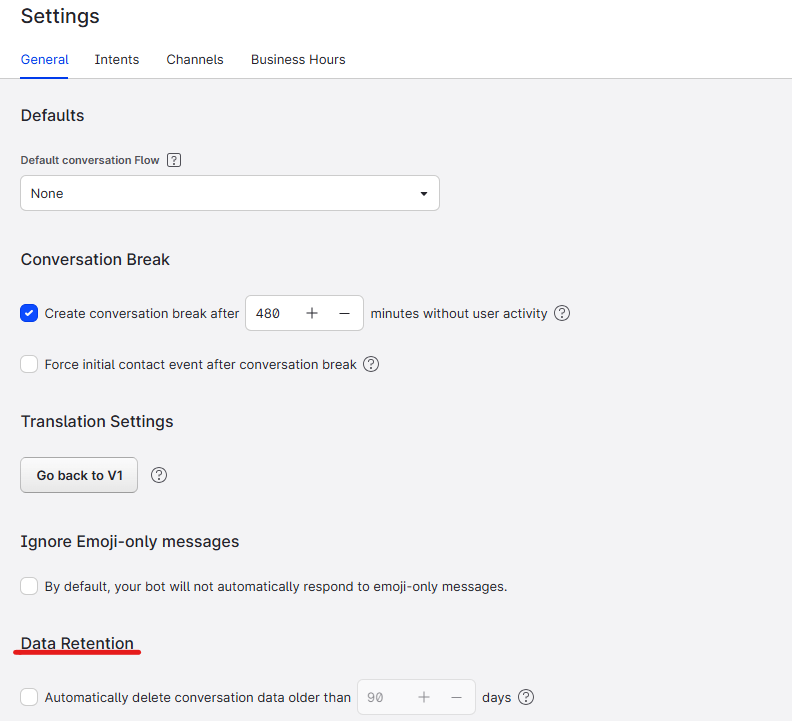
Step 3: Click the checkbox located to the left of the setting to enable it. This will enable the date selector box to the right of the setting. By default, the system provides a 90 day retention period however, users are able to increase or decrease the retention period as they desire by using the “+” or “-” buttons.

Please note: for the sake of analytics reliability and Bot performance data , we advise not to reduce the retention period less than 30 days.
If you have followed these steps, the Data Retention setting should now be working automatically. If at any point you wish to disable the feature, simply un-check the checkbox of the setting.