Application programming interfaces (APIs) enable interactions between multiple software systems. Emplifi Bot supplements its self-service capabilities by using APIs to request information from other applications, which the bot can then use in a conversation.
On the APIs page, you can add custom APIs for your bots. For more information, see Conversations.
This page is unavailable on the Social Chatbot interface.
Accessing the APIs page
-
From the Application Bar, click Your Company Name.
-
Click APIs.

APIs page layout
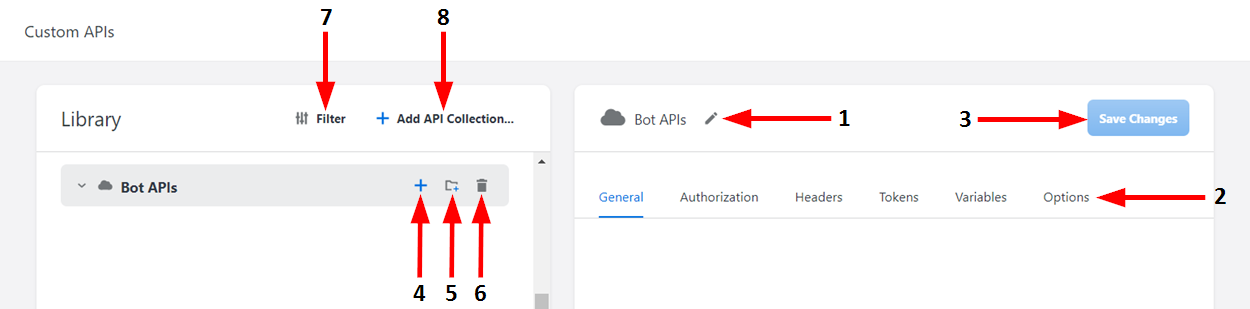
Buttons
|
Number |
Name |
Description |
|---|---|---|
|
1 |
Rename |
Click here to enter a new name for the API collection. When you are finished typing, click Enter to save the name. |
|
2 |
Tab Bar |
Click any of these tabs to open them and configure their respective settings. |
|
3 |
Save |
Click here to save the changes you have made to the API collection. |
|
4 |
Add Request |
Click here to create a new API request within a collection. |
|
5 |
Add Folder |
Click here to create a new folder for organizing the contents of a collection. |
|
6 |
Delete |
Click here to delete the selected item. |
|
7 |
Filter |
Click here to open the Filter menu, where you can search the API Library for items or filter items by API Collection, Request, or Folder. |
|
8 |
Add API Collection |
Click here to create a new API collection. In the dialog window that displays, you can either create a new API by selecting "Empty API" or use an existing API as a template. |
API collections
An API collection is essentially the top-level folder that contains all the API requests associated with a configured API.
Creating an API collection
-
Click the + Add API Collection button.
You can either create a new API by selecting "Empty API" or use an existing API from this page as a template. -
Double click the NewCollection field to rename your newly created collection.
-
Click the Add Request button to create requests within the API collection.
-
Click the Add Folder button to group the requests by folder within the API Collection.
API collection tabs
Once you create an API Collection, use these tabs for configuration.
General
You can add an image to identify the API collection, as well as a description of the collection.
Authorization
Select the Authorization type from the drop-down menu and complete the corresponding Authorization options.
Currently, the available Authorization types are:
-
Bearer Token
-
Basic
-
OAuth 1.0
-
OAuth 2.0
Headers
You can use the Headers tab to add Headers to the API Collection, which can then be inherited to the specific requests. To do so, click Add, then fill out the Key and Value fields that appear.
You can also add headers to the requests without adding them to the collection.
Tokens
You can use the Tokens tab to obtain an access token for the API Collection. To do so, click Get New Access Token. To enter the appropriate information in the displayed dialog window, refer to the documentation of the API that you are connecting to.
Variables
You can use the Variable tab to configure collection-level variables if all API requests within your API collection have common attributes (such as an authorization token or a base request URL). Setting variables at the collection level makes it easier to maintain the requests within your collection if any of those values change.
Once you have configured the API Collection, you are ready to build API Requests.
API requests
An API Request is a specific call made to an API to get a certain set of data. In Emplifi Bot, an API Request includes:
-
The standardized body of the request
-
The variables that Emplifi Bot will fill in to make the request specific to the conversation
-
The response returned by the API
-
The pieces of the response that Emplifi Bot should use going forward in the conversation
Creating an API request
-
Hover over the API Collection and click on the Add Request button that appears.
-
Double click on the NewRequest field to change the name of the API Request.
Testing the API request
You can use the Request section to test that the request is working properly. To do so, select the type of request, followed by the Request syntax.
There are five types of requests:
-
Get
-
Post
-
Put
-
Patch
-
Delete
In order to determine which type of request you should use, refer to the documentation of the API that you are connecting to.
API request tabs
Once you create an API Request, use these tabs for configuration.
Authorization
You can either choose to inherit the Authorization from the API Collection, or select the Authorization type from the drop-down and complete the corresponding Authorization options.
Currently, the available Authorization types are:
-
Bearer Token
-
Basic
-
Auth 1.0
-
Auth 2.0
Headers
On the Headers tab, click Add to add Headers to the API Requests.
You can also add headers to the requests without adding them to the collection, or inherit headers from the collection.
Configuring the API request
You can configure the following sections using the specified API's configuration documentation:
-
Body: Once you select the API Type from the drop-down, the editor formats based on the selection.
-
Header Outputs
-
Body Outputs
-
Test Inputs
For each of the items above, be sure to make the outputs and inputs descriptive enough for the administrator configuring the bot conversation.