
Flow Automations are available to all new clients. Existing clients may also gain access upon confirmation with their CSM.
Emplifi Flow Automations are configurable automation flows powered by the Emplifi Platform Intelligence Engine. Each flow is represented as a flowchart with at least one trigger node and one action node, while condition nodes are optional.
Flow Automations are available for only Community, Care cases, and Care messages.
Use Flow Automations to automate complex content operations according to your business needs. Consider the following examples:
-
You can create flows to escalate incoming Community messages to Care, set their case priority, and respond with automatic messages.
-
You can create flows for Community that send automatic replies when a new message arrives or when a specific content label is applied to a message.
-
You can create flows for Care that update case fields and case priorities whenever the sentiment of a case changes.
Each flow can manage branching, multiple triggers, conditions, and actions. Also, the actions of one flow can cause the triggers of another flow to react on your account. This allows you to automate complex use cases.
Teams and Flow Automations
This section applies to accounts with Teams enabled.
Each flow is scoped to a specific team. The team scope determines which resources are available when building the flow — for example, only managed profiles assigned to that team appear in the flow editor.
Access and Permissions
Access to Flow Automations is controlled through team permissions. There are two permission levels for Flow Automations:
-
View — Users can see flows assigned to their team but cannot create, edit, duplicate, or change the state of flows.
-
Manage — Users can create, edit, duplicate, and activate or deactivate flows assigned to their team. Manage permission includes view.
Users without either permission do not see Flow Automations in their account.
Platform admins can view and manage all flows across all teams, regardless of which teams they belong to. When building or editing a flow, platform admins can only select resources from the currently active team, even when working with a flow that belongs to another team.
Team permissions for Flow Automations are configured in Settings → Teams → [Team name] → Product access. For more information, see Govern Access to Account Resources Using Teams.
Team Scope
When a flow is created, it is assigned to a team. This team scope is set during flow creation and can only be changed from inside the flow canvas — it is not editable from the Edit flow modal.
To change the team scope of an existing flow:
-
Open the flow canvas by clicking the flow name.
-
Click the team icon next to the activation toggle.
-
Update the team scope and save.
Deleted Teams
If a team is deleted while flows are still assigned to it, those flows are automatically invalidated. Platform admins can still see these flows on the Flow Automations homepage, with the team displayed as Deleted team. Users who were accessing that team can no longer see the flows, only Platform Admins can see and manage these flows.
Flow Automations Homepage
For Accounts without Teams enabled, only Administrators can access the Flow Automations homepage.
By default, the Flow Automations homepage (Settings → Automation → Flow Automations) lists all of the flows that have been created within your account.
You can use the search to find flows by their name or content source (for example, search for care or community).
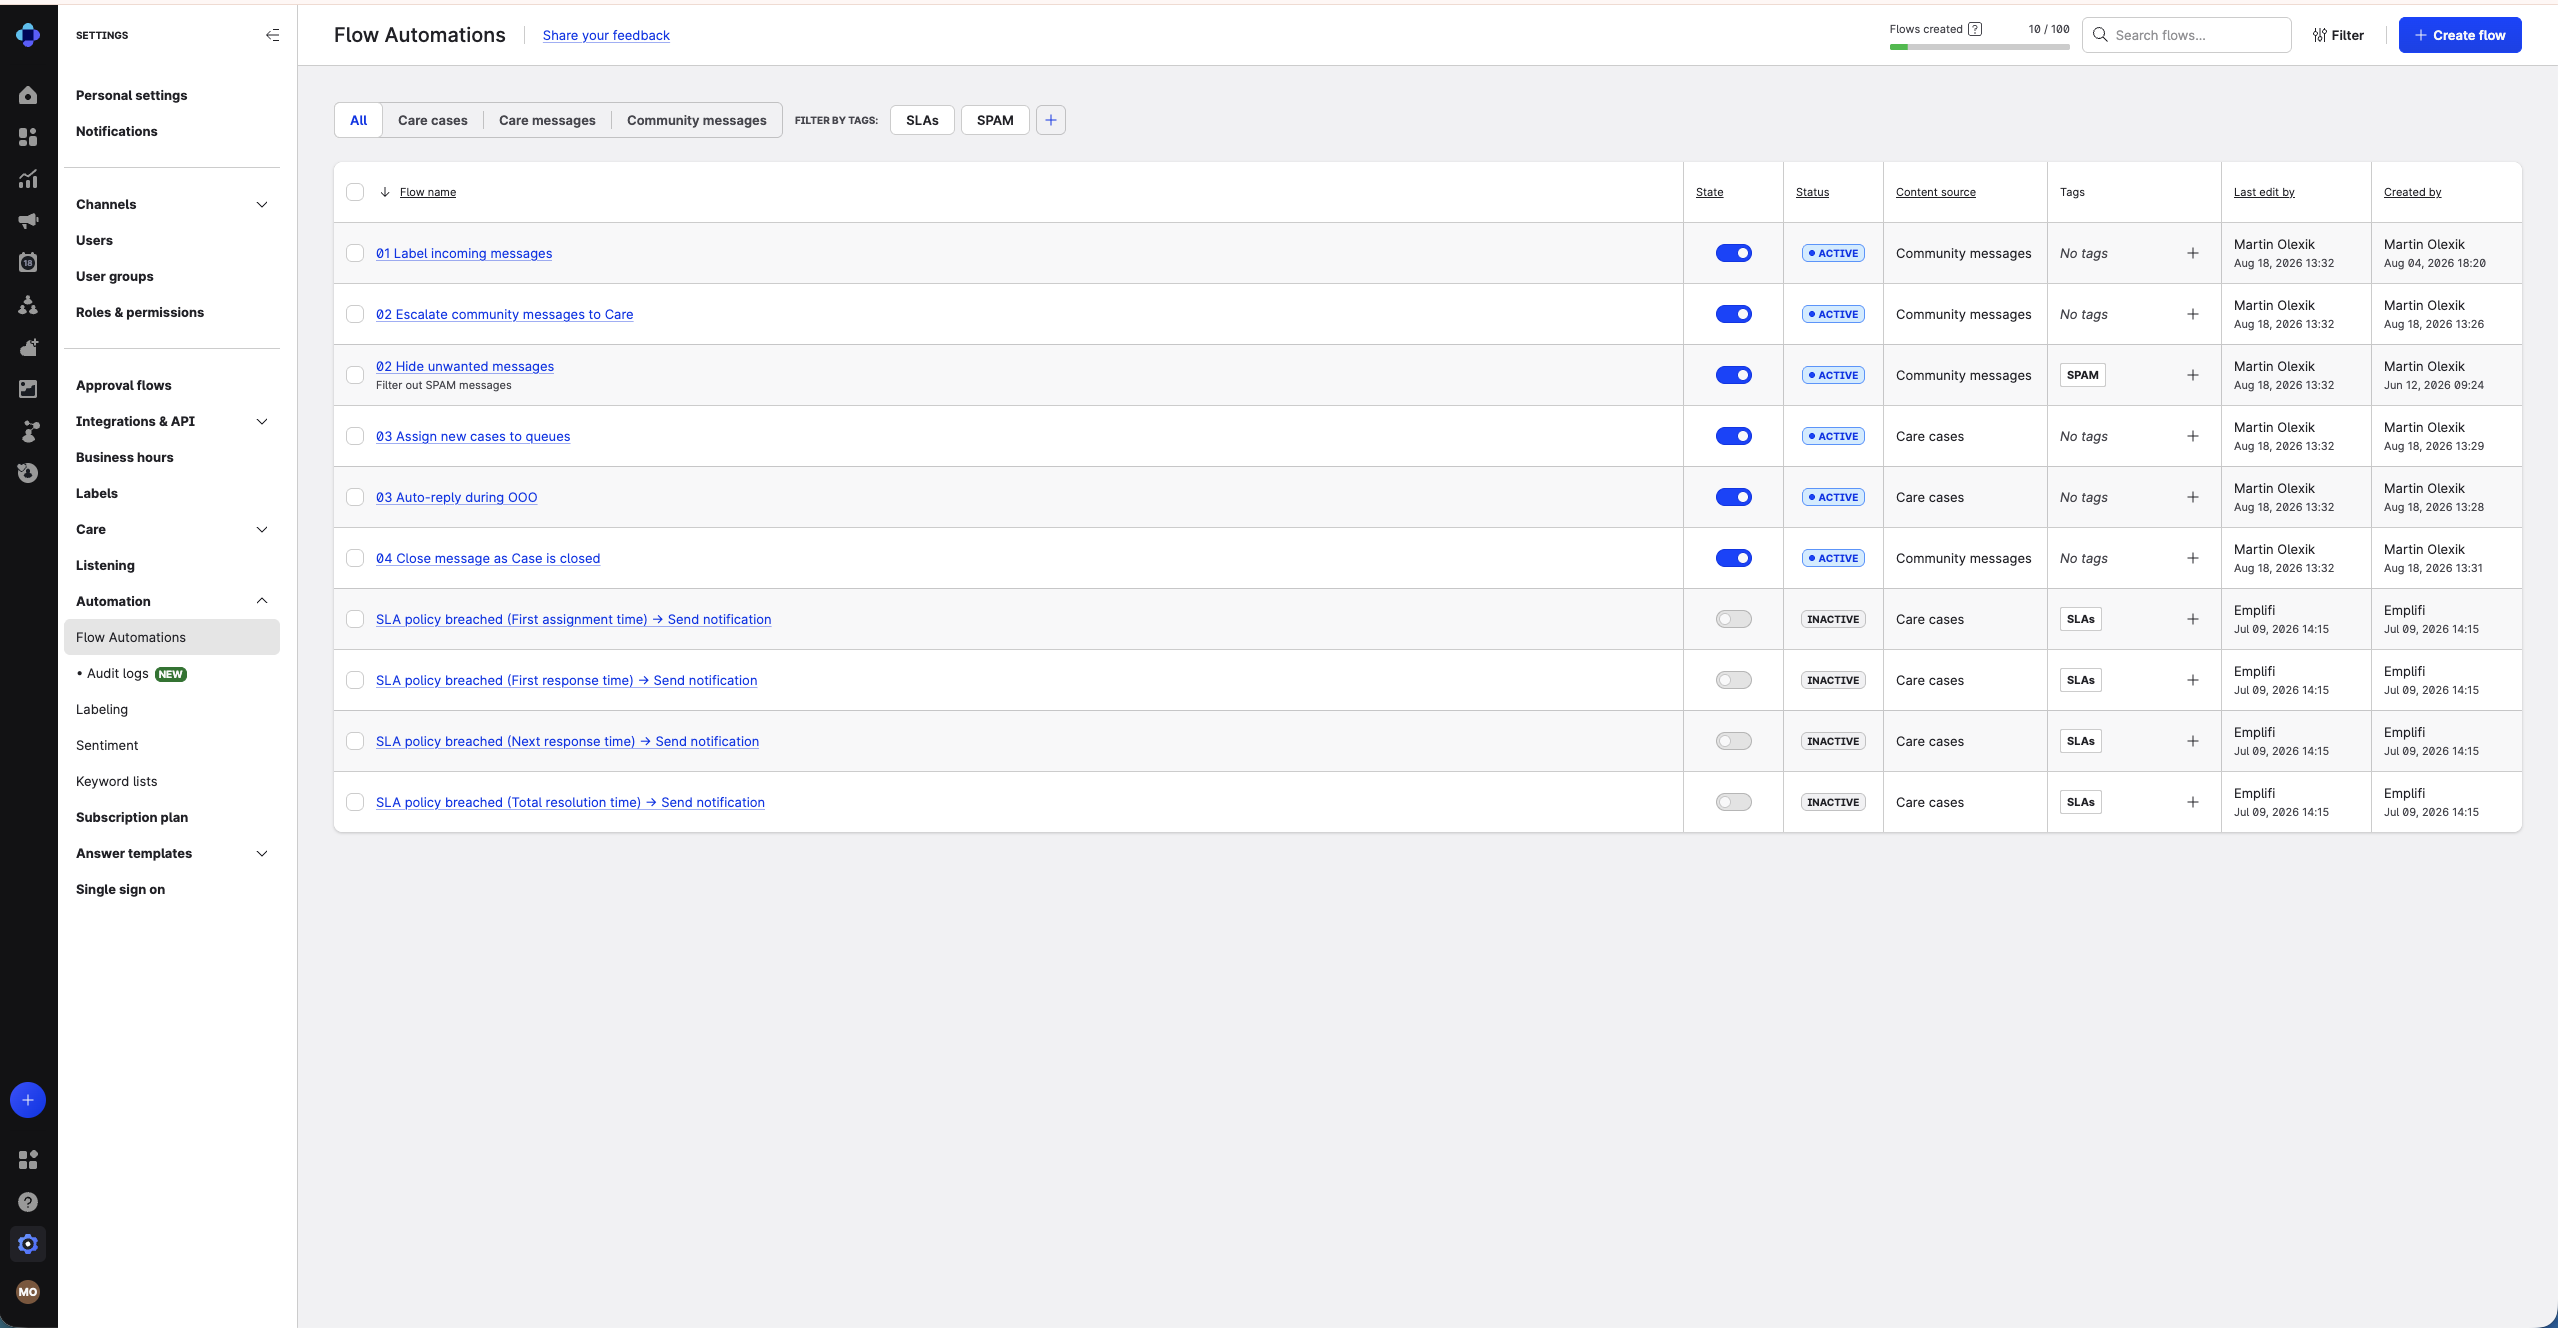
The following details are available in a table on the Flow Automations homepage.
When a user does not have permission for a resource within a flow, they see a View-only badge next to the name of the flow. Until that user has permissions for the resource, they are unable to edit or change the state of the flow.
-
Flow name
The name of the flow and a clickable link to the flow canvas. -
State
The switch to turn the flow on or off.-
Active
The flow is turned on. -
Inactive
The flow is turned off. This is the default for new flows.
-
-
Status
The current status of the flow.-
Inactive
The flow is turned off and not running on your account. -
Active
The flow is turned on and running on your account without any errors. -
Invalid
The flow is turned off and in an Inactive state because it contains critical errors that make the flow inoperable. Once the errors are fixed, the status will change to Inactive after you save the flow. Invalid flows cannot have an Active state.
-
-
Content Source
The source of the content for the flow.-
Care cases
Care cases are the content source for the flow . -
Care messages
Care messages are the content source for the flow. -
Community messages
Community messages (Ad comments, Comments, Direct messages, Posts, Mentions, Reviews) are the content source for the flow.
-
-
Tags User-defined labels assigned to the flow. Tags help you organize and filter your flows. See the Tags section below for details on creating and managing tags.
-
Last edit by
The name and date of the last user in your account to do any of the following actions:-
Edit
-
Change the flow state
-
-
Created by
The name of the user who created the flow and the date it was saved.
Tags
Tags are user-defined labels you can assign to flows to help organize and filter your Flow Automations list. You can assign multiple tags to a single flow.
Create a tag
-
In the Tags column, click the + button next to the flow you want to tag.
-
In the tag selector, click Create tag.
-
In the Create tag/s modal, enter the tag name. Tag names can be up to 50 characters. To create multiple tags at once, paste a comma-separated list of names.
-
Click Create.
The new tag is created and assigned to the flow.
Add or remove tags on a flow
-
In the Tags column, click the + button next to the flow.
-
In the tag selector, select the tags you want to assign or deselect any tags you want to remove.
-
Click Apply.
Delete a tag
Tags can be deleted only from the filter side panel or the tag selector.
-
Open the filter side panel by clicking Filter at the top of the Flow Automations homepage.
-
In the tag selector, find the tag you want to delete and select the delete option.
Deleting a tag removes it from all flows it was assigned to.
Filter flows by tag
You can filter the flows list by one or more tags using the tag chips displayed above the table or the filter side panel.
-
Quick filter — Click any tag chip displayed in the filter bar above the table to filter the list to flows that have that tag assigned.
-
Filter side panel — Click Filter, select one or more tags from the tag list, and click Apply. To remove a tag filter, click Clear in the filter bar or deselect the tags in the filter side panel.
Filter
The filter lets you narrow the flows table on the Flow Automations homepage based on which components a flow uses. For example, you can filter for flows that include the Community Label Content Action.
The filter matches the component only. You can’t filter by component configuration details, such as which profiles are selected or which content labels are applied.
Search
Search allow you to easily find your flows based on keywords included in the title or description.
Flows created
The Flows Created section displays your current usage of Flow automations. There is a limit of 100 flows per account; please contact your CSM if you require a limit increase.
Next steps
Before you start designing your flows, we recommend that you dedicate your time and effort to understand the user interface, flow components, and the underlying logic behind Flow Automations.