On the Messengers page, you can configure the chatbot messenger interface that users interact with on your company's website. In addition to customizing the messenger with your company's logo, font, and colors, you can also add content like direct links and videos.
This page is unavailable on the Social Chatbot interface.
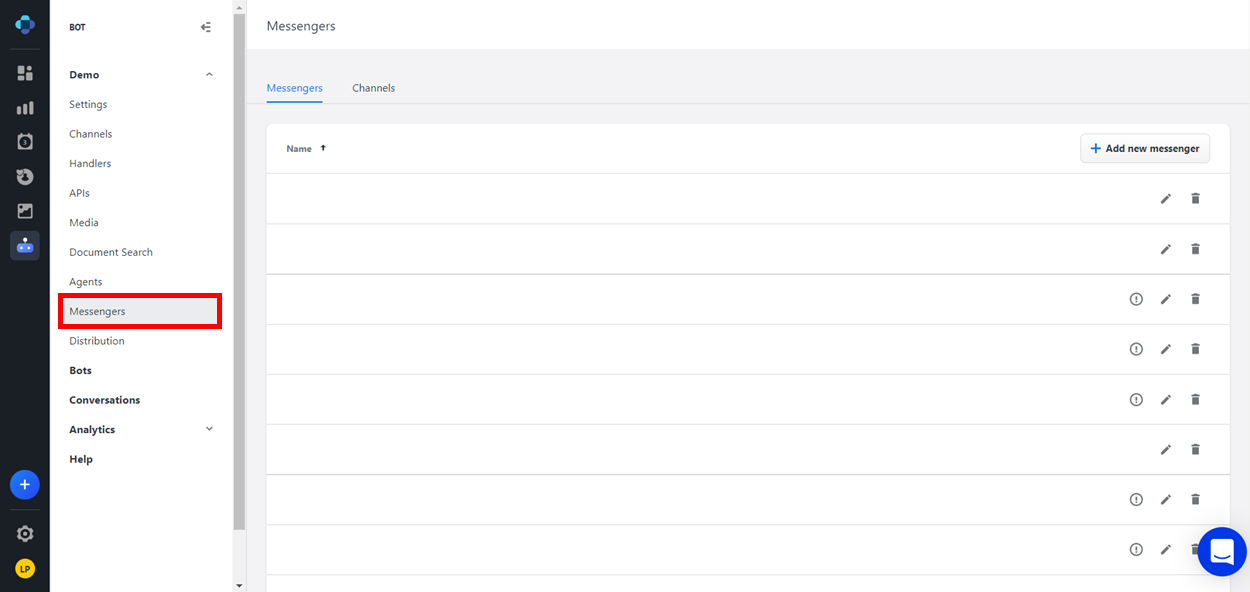
Accessing the Messengers page
-
From the Application Bar, click Your Company Name.
-
Click Messengers.
Messengers Page layout
Messengers tab
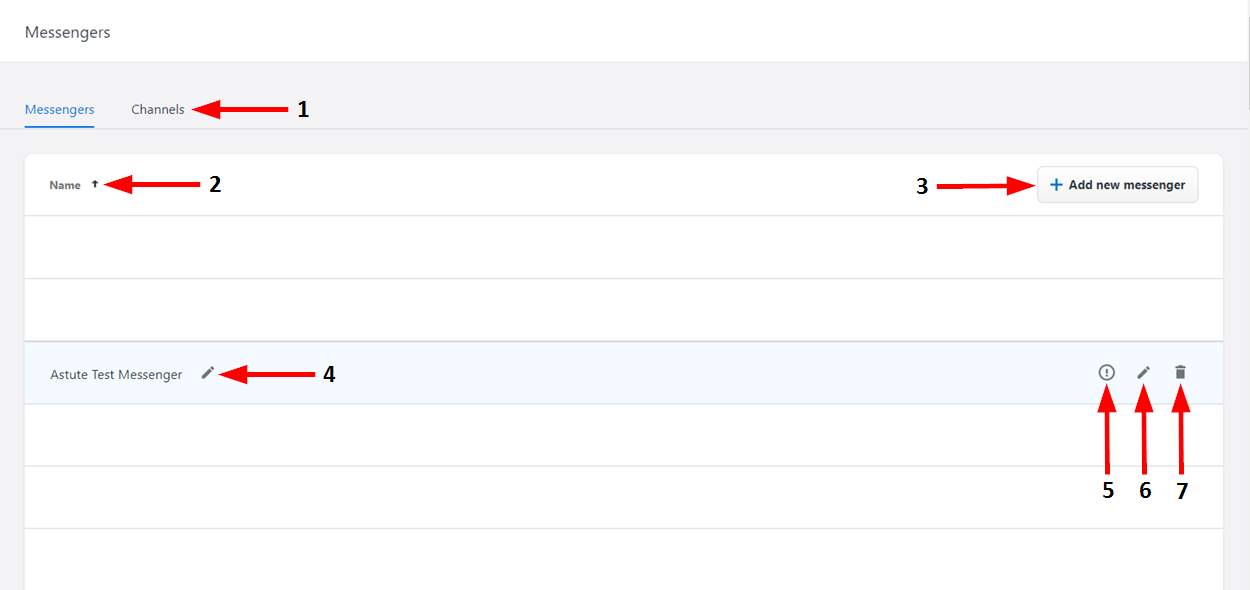
The Messengers tab displays a list of your company's messengers. Here, you can configure each messenger that will be placed on your website.
Buttons
|
Number |
Name |
Description |
|---|---|---|
|
1 |
Channels Tab |
Click here to open the Channels tab. For more information, see the "Channels Tab" section below. |
|
2 |
Sort By |
Click here sort the list of messengers in alphabetical or reverse-alphabetical order. |
|
3 |
Add Messenger |
Click here to create a new messenger. |
|
4 |
Rename |
Click here to enter a new name for the messenger. When you are finished typing, click Enter to save the name. |
|
5 |
Publish Messenger |
Click here to publish any updates that you have recently made to the messenger. |
|
6 |
Edit Messenger |
Click here to open the Messenger Configuration window. For more information, see the "Configuring Your Messenger" section below. |
|
7 |
Delete Messenger |
Click here to delete the messenger. A dialog window will display to verify that you want to delete the messenger. |
Channels Tab
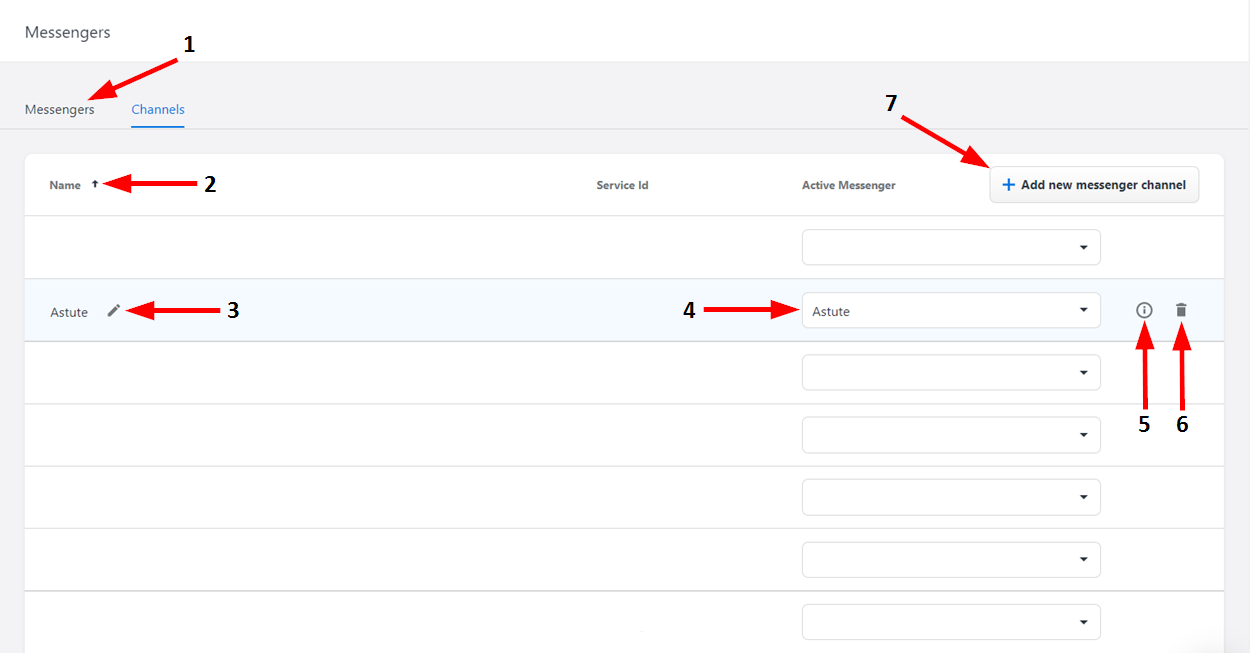
The Channels tab displays a list of the company channels that your messengers operate on. Here, you can generate the scripts that are used to add a Messenger to a website.
Buttons
|
Number |
Name |
Description |
|---|---|---|
|
1 |
Messengers Tab |
Click here to open the Messengers tab. For more information, see the "Messengers Tab" section above. |
|
2 |
Sort By |
Click here sort the list of channels in alphabetical or reverse-alphabetical order. |
|
3 |
Rename |
Click here to enter a new name for the messenger channel. When you are finished typing, click Enter to save the name. |
|
4 |
Active Messenger |
Click here to open a drop-down list, from which you can select the messenger actively operating on this channel. |
|
5 |
Channel Information |
Click here to open the Channel Usage dialog window, where you can find the script block to add to your page in order to include this messenger channel on your website. |
|
6 |
Delete Channel |
Click here to delete the channel. A dialog window will display to verify that you want to delete the channel. |
|
7 |
Add Channel |
Click here to create a new channel. |
Configuring your Messenger
To configure your messenger, first go to the Messengers tab. Find the messenger that you would like to configure and click its Edit button. The Messenger Configuration window opens.
Before you begin editing in Messenger, you can use Emplifi Bot's media feature to upload any URLs for images or font files that you would like to use in your chatbot. For more information, see Media.
Messenger Configuration Window layout
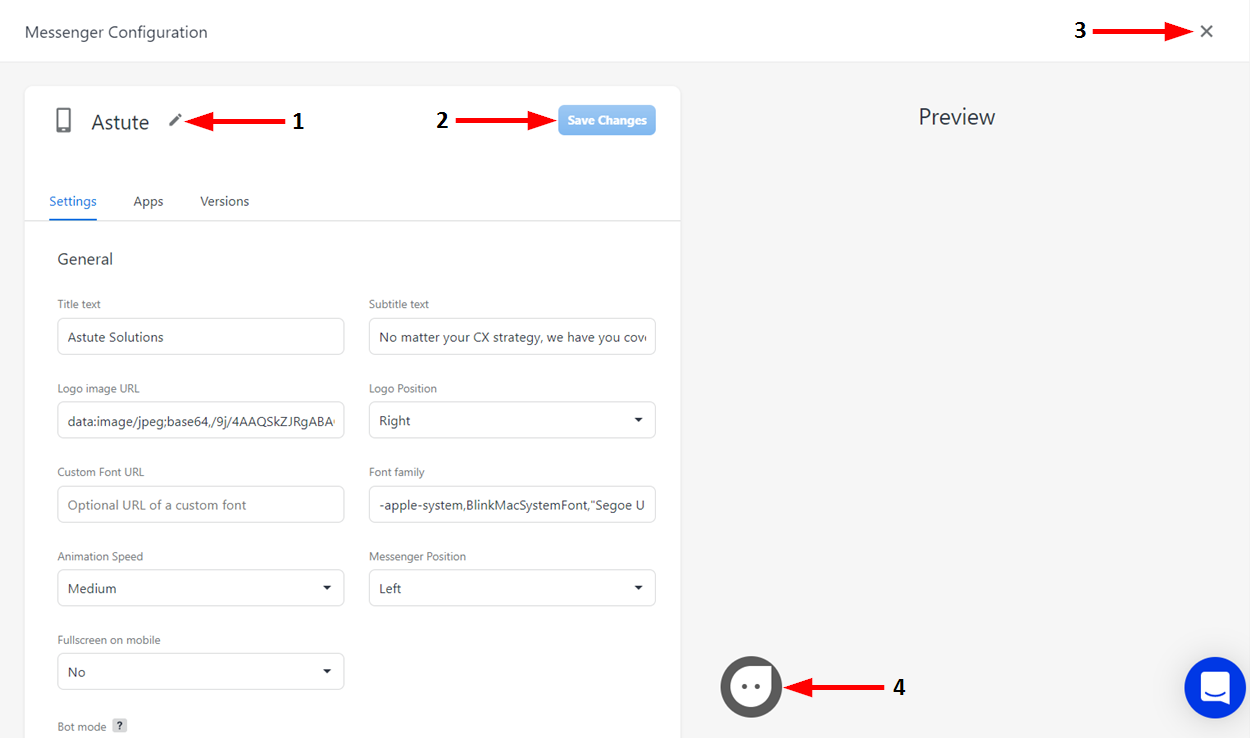
Regardless of which tab you currently have open on the configuration window, your messenger chatbot appears in real-time on the right side of the page. This allows you to preview your edits as you make them, before you save and publish your messenger.
Buttons
|
Number |
Name |
Description |
|---|---|---|
|
1 |
Rename |
Click here to enter a new name for the messenger. To save the name, click Enter or click outside the text field. |
|
2 |
Save |
Click here to save the changes you have made to the messenger. |
|
3 |
Exit |
Click here to close the Messenger Configuration window and return to the Messengers page. If you have made any unsaved changes to your Messenger, a dialog window prompting you to save your changes will open. |
|
4 |
Close Messenger Preview |
Click here to close the preview of the messenger on the right side of the window. The dark Close Preview button will be replaced by the light Open Preview button, which you can click to reopen the messenger preview. |
The Messenger Configuration window contains three tabs: Settings, Apps, and Versions.
Settings
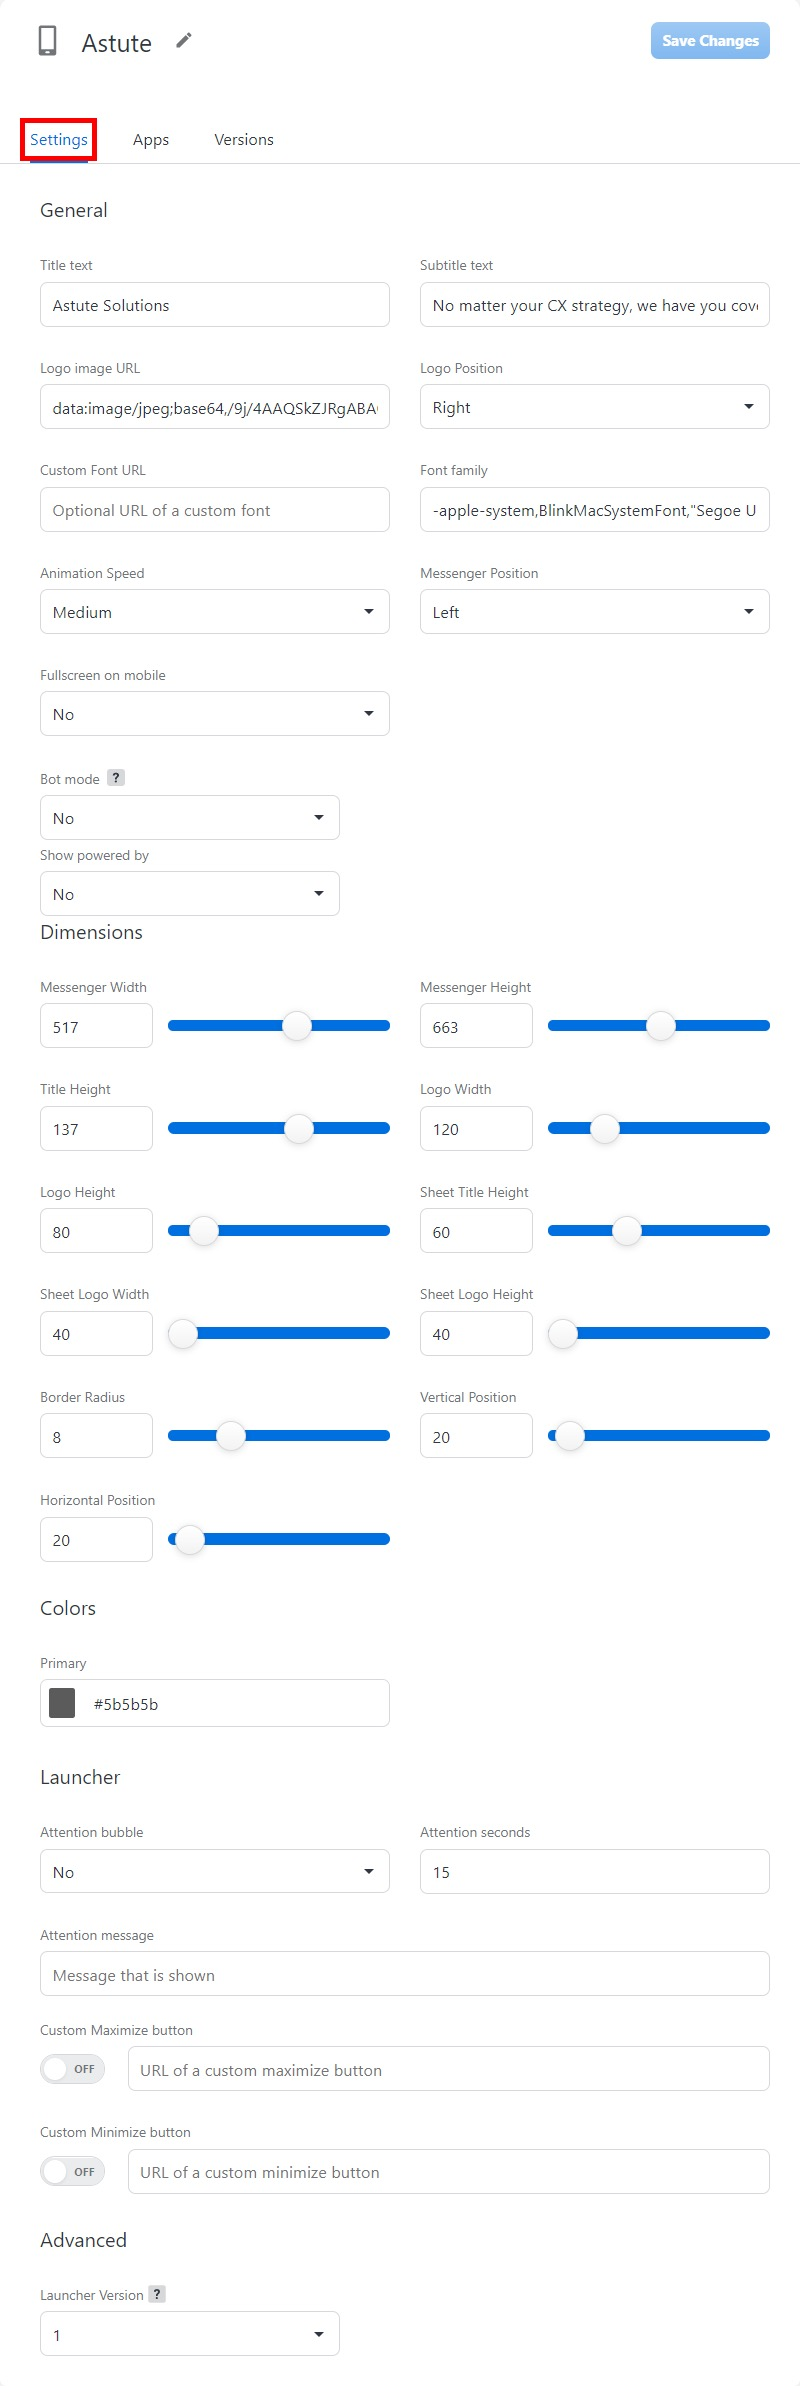
The Settings tab allows you to manage the style of your messenger. It contains five sections: General, Dimensions, Colors, Launcher, and Advanced. When you are finished configuring your messenger settings, click the Save button.
General Section
Here, you can configure your messenger's:
-
Icon
-
Title
-
Subtitle
-
Logo
-
Logo Position
-
Fonts
Your Emplifi representative should have already set up the fonts for your messenger. However, if you need to make changes, please contact Emplifi for assistance.
-
Animation Speed
-
Messenger Position
Dimensions section
Here, you can use the slider tools and text boxes to configure the width and height of all the elements in your messenger. To do so, either use the appropriate slider tools, or enter a pixel height into the appropriate text box.
When configuring your messenger's dimensions, remember to account for its appearance on all types of screens (e.g. desktop, tablet, smart phone, etc.).
Colors section
Here, you can configure your messenger's colors. You can click on the color codes to access a color wheel, or you can simply enter the hex codes for your desired color.
Launcher section
Here, you can configure the visual elements of your messenger's launcher, including the bubble that gets the attention of users, and the buttons used to minimize/maximize the messenger.
Note: Images for the minimize/maximize buttons must be hosted at a URL. The easiest way to do so is to upload your images to Bot and use the direct links that are subsequently associated with each image. For more information, see Media.
Advanced section
Here, you can select which version of the "Launcher" JavaScript widget to use on the website hosting the messenger. Hover over the Info button to display more information.
Apps

The Apps tab allows you to manage the content available to users in your messenger.
Buttons
|
Number |
Name |
Description |
|---|---|---|
|
1 |
Save |
Click here to save the changes you have made to the messenger apps. |
|
2 |
Add App |
Click here to add an app to the messenger. |
|
3 |
Move Up/Down |
Click to move the app up or down in the messenger display. |
|
4 |
Configure App |
Click here to open the app configuration window, where you can adjust the settings for the app. For more information, see the sections about each app below. |
|
5 |
Delete App |
Click here to remove the app from the messenger. |
There are four types of content apps that you can add to your messenger: Bot, Knowledge Base, List, and Video.
Bot

The Bot app allows users to interact with a conversational Bot within the messenger.
On the Bot app, click the Configure App button to open the Bot Configuration window.
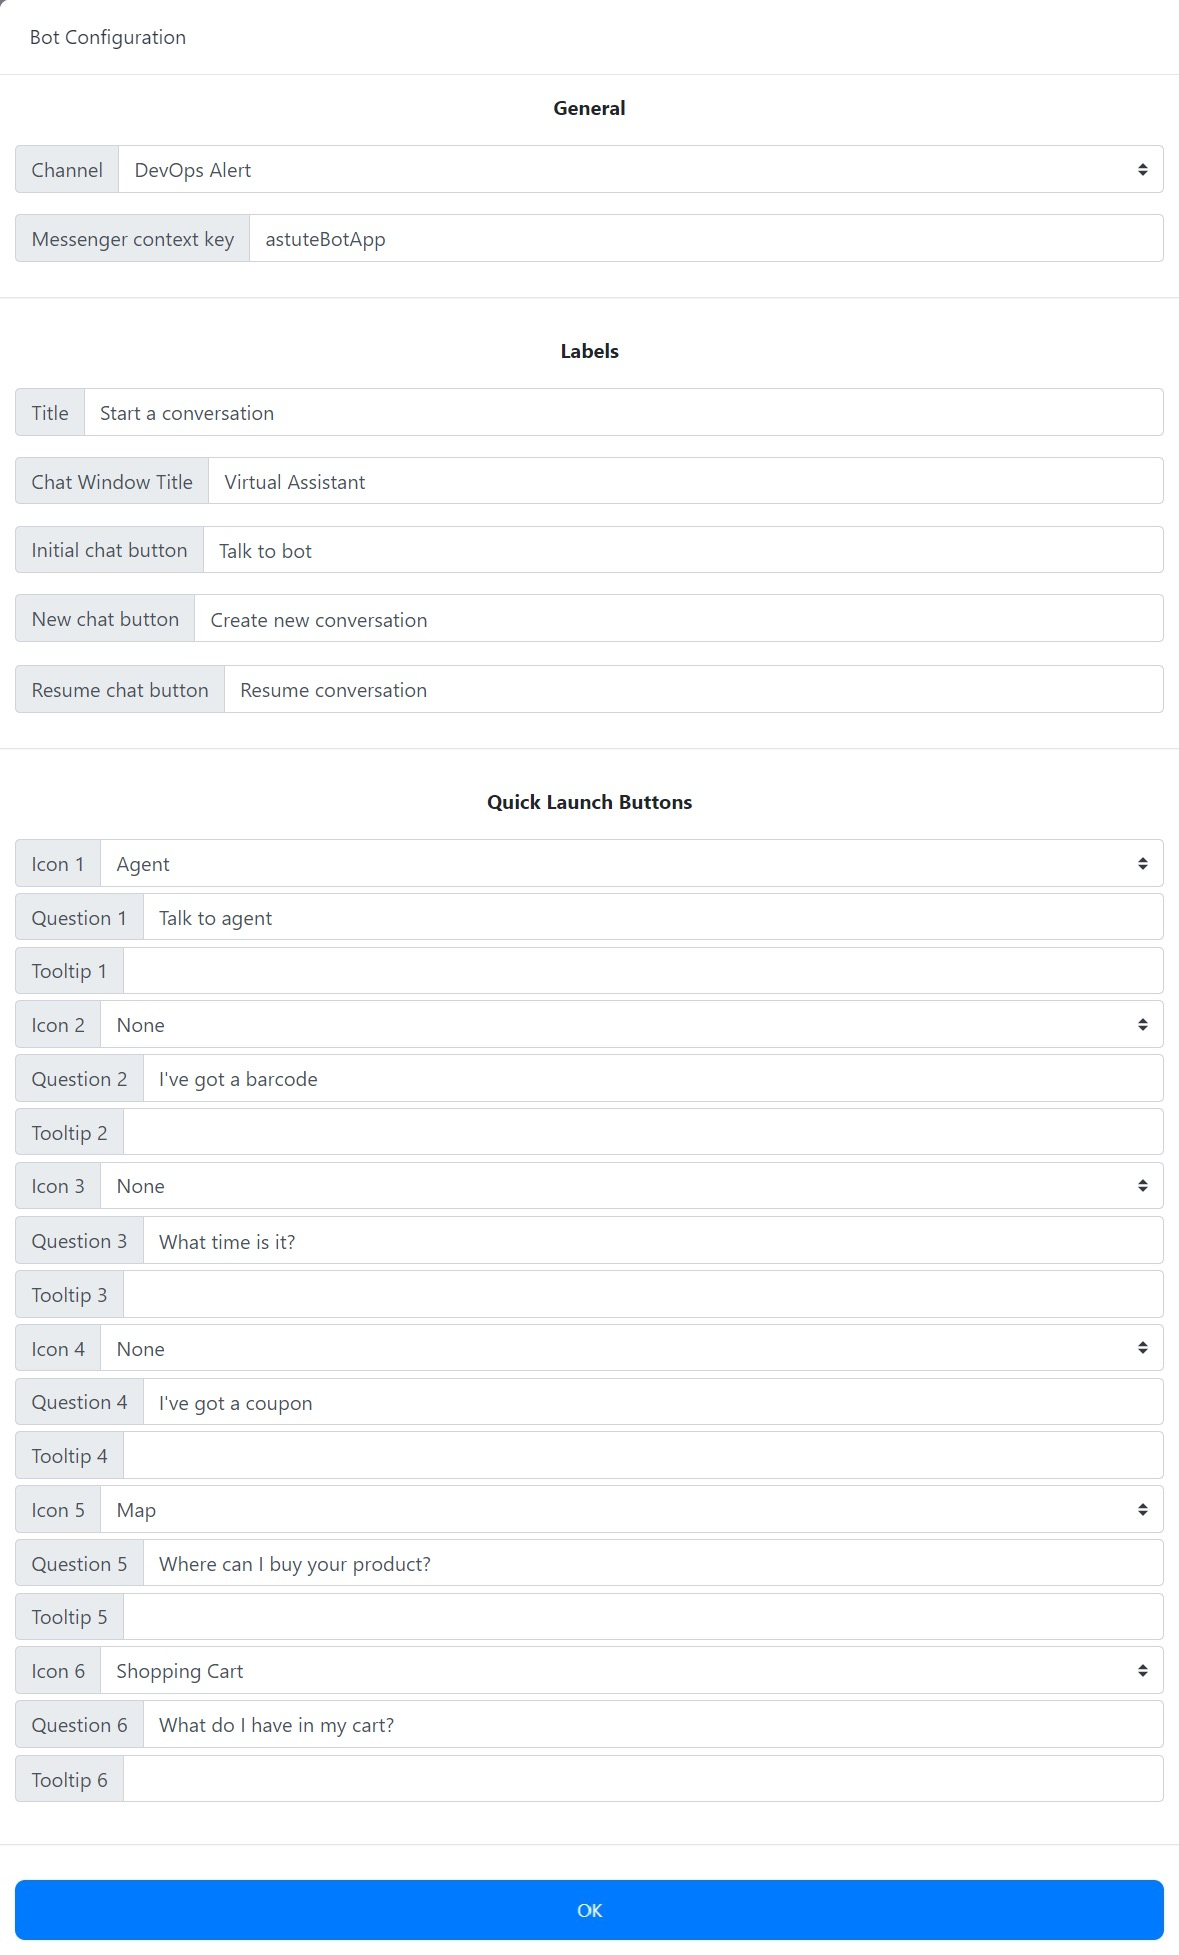
General
-
Channel: Use the drop-down to select the bot webchat channel that will be displayed when a user starts a conversation with the bot.
-
Messenger Context Key: Enter a string to specify certain website-level settings for the Bot app.
This field is only relevant if you have multiple Bot apps in a single messenger.
Labels
-
Title: Enter a title to display above the Bot app within the messenger.
-
Chat Window Title: Enter a title to display on the chat window during a bot conversation.
-
Initial Chat Button: Enter text to display on the button that initiates a bot conversation.
-
New Chat Button: Enter text to display on the button that starts a new bot conversation during an existing conversation.
-
Resume Chat Button: Enter text to display on the button that resumes an existing bot conversation.
Quick Launch Buttons
-
Icon: Enter a name for the specified quick launch button.
-
Question: Enter a question to associate with the icon and which triggers a certain action from the bot when the user clicks the icon.
-
Tooltip: Enter a tip describing the icon's function which appears when the user hovers over the icon.
When you are finished configuring the Bot app, click OK at the bottom of the window.
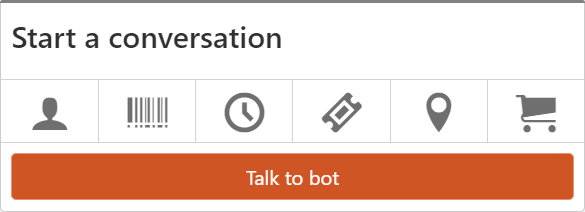
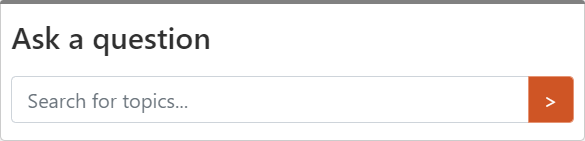
The image below demonstrates how a configured Bot app might appear to the end-user:
Knowledge Base (KB)

The Knowledge Base (KB) app links to knowledge base articles from Emplifi Knowledge in order to better assist customers when they have questions.
On the KB app, click the Configure App button to open the KB Configuration window.
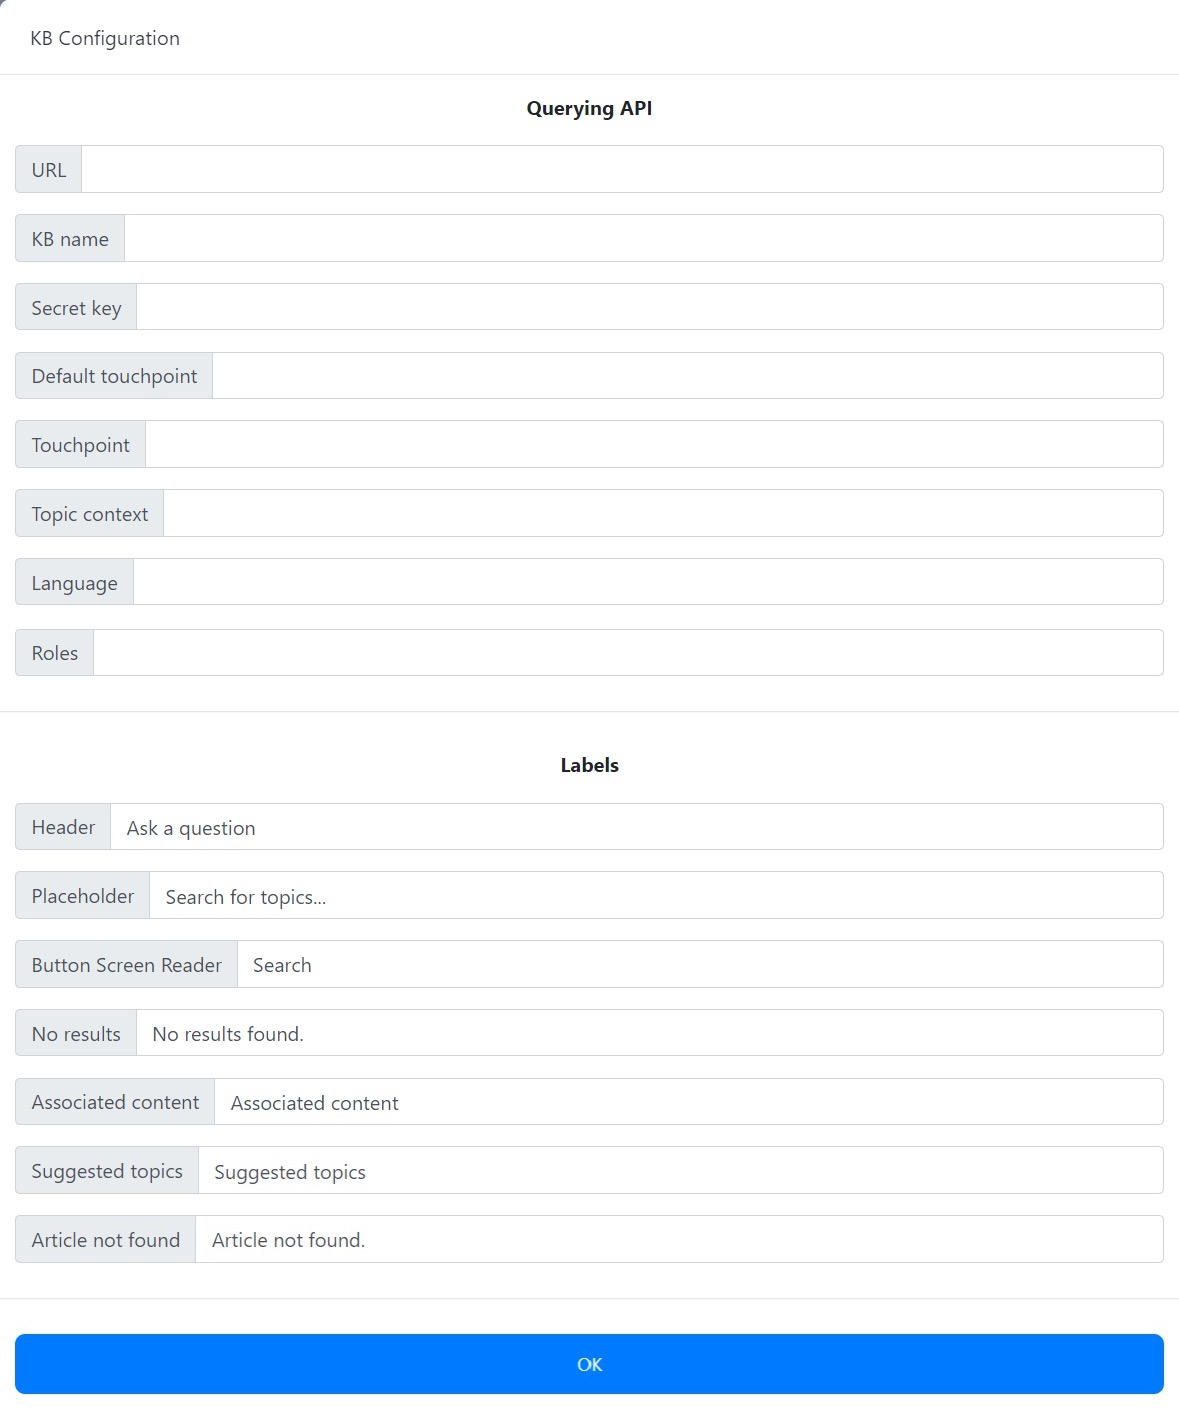
Querying API
-
URL: Enter the URL address of Knowledge Base's API.
-
KB Name: Enter the name of the Knowledge Base.
-
Secret Key: Enter the secret key for the Knowledge Base's API. For more information, refer to the documentation of the Knowledge Base's API.
-
Default Touchpoint: Enter the secondary Touchpoint that you would like the Knowledge Base to return a response from in the event that the primary Touchpoint returns no response.
-
Touchpoint: Enter the primary Touchpoint that you would like the Knowledge Base to return a response from.
-
Topic Context: Enter the context that the Knowledge Base is permitted to show topics from.
-
Language: Enter the language in which the Knowledge Base operates.
-
(Privileged Area) Roles: Enter the privileged area roles that the Knowledge Base interface is permitted to use.
Labels
-
Header: Enter a header to display above the Knowledge Base app.
-
Placeholder: Enter placeholder text to display in the Knowledge Base search bar by default.
-
Button Screen Reader: Enter text to be read by screen readers when the user hovers over the Knowledge Base search button.
-
No Results: Enter text to display when a Knowledge Base search yields no results.
-
Associated Content: Enter text to display when content associated with the selected topic appears.
-
Suggested Topics: Enter text to display when topics are suggested based on your searches.
-
Article Not Found: Enter text to display when a Knowledge Base article cannot be located and loaded.
When you are finished configuring the KB app, click OK at the bottom of the window.
The image below demonstrates how a configured KB app might appear to the end-user:
List

The List app allows you to add customized content containing images and/or links to various places on your website, or to any external places you desire. Lists can contain up to ten items.
On the List app, click the Configure App button to open the List Configuration window.
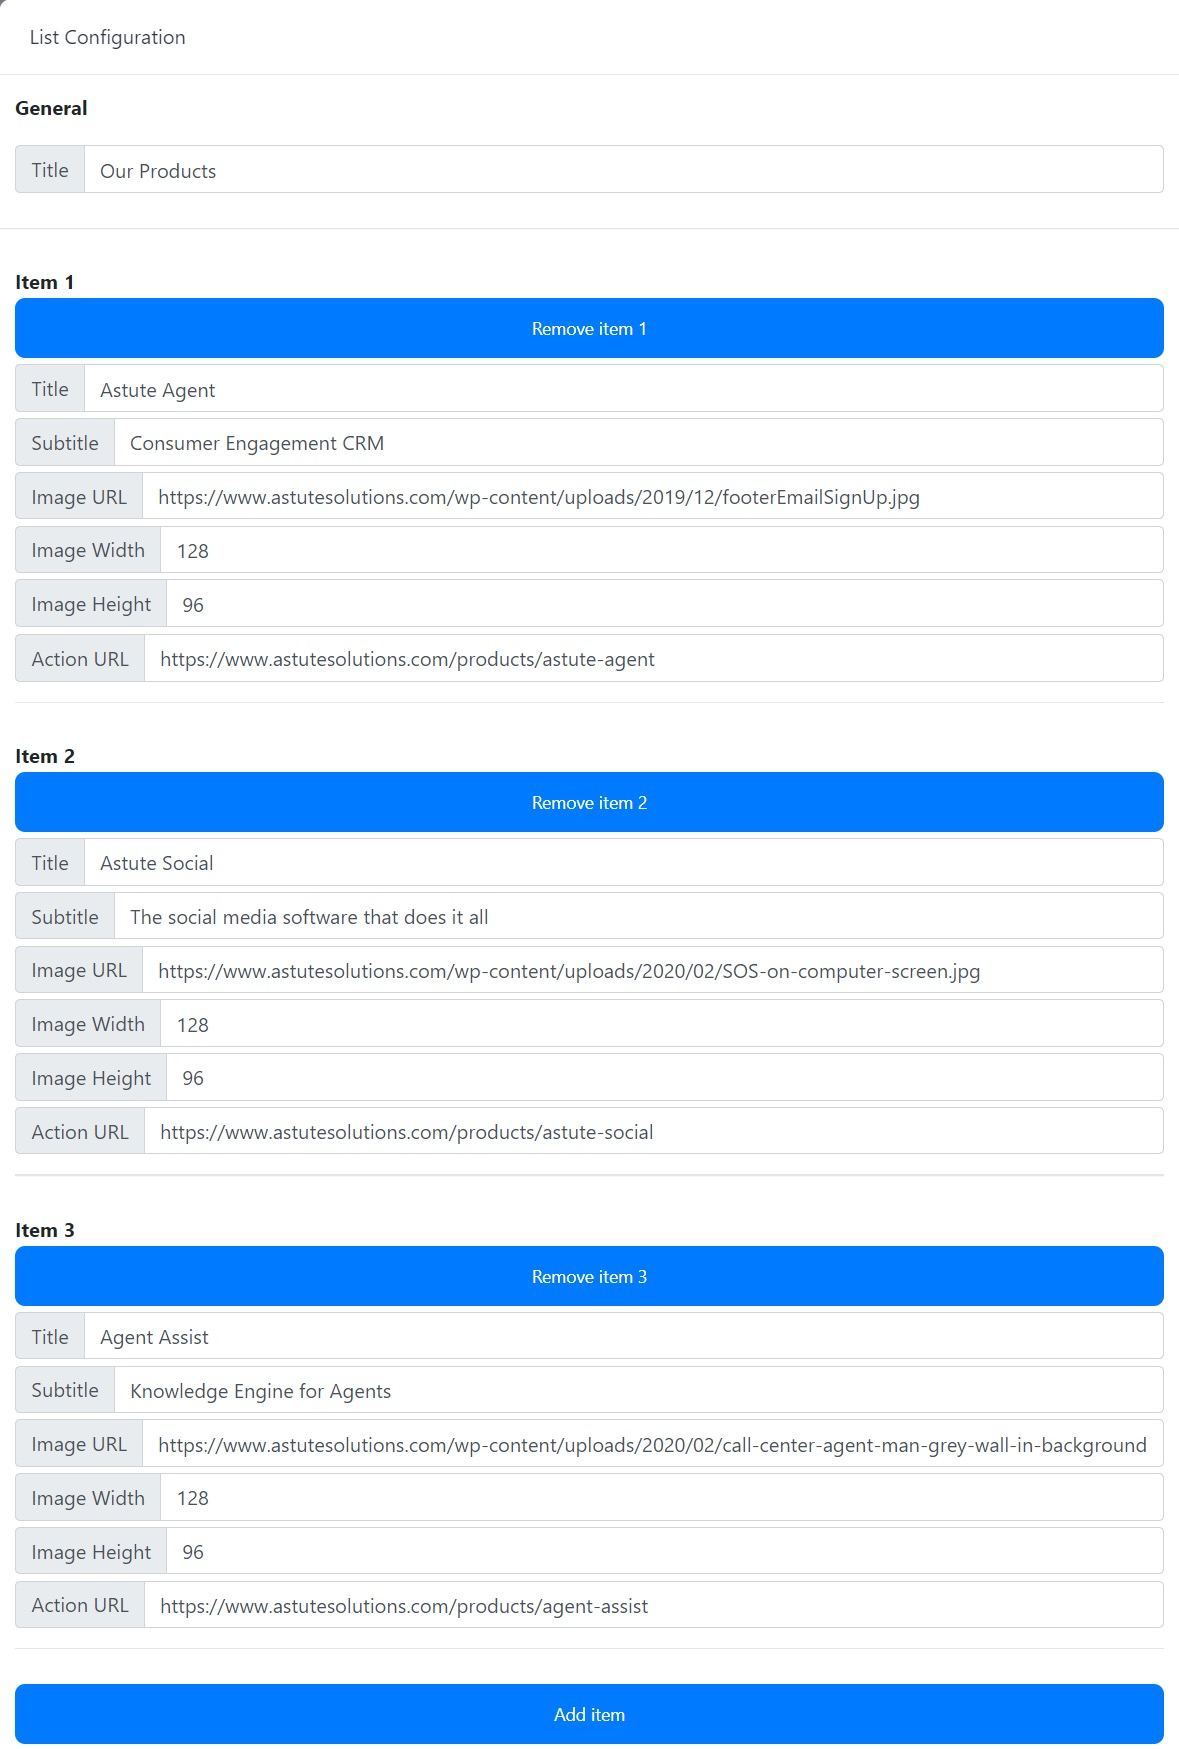
General
-
Title: Enter a title to display above the list.
Item
-
Title: Enter a title for the item.
-
Subtitle: Enter a subtitle to display beneath the item's title.
-
Image URL: Enter the URL address where the image you would like to display on the item is hosted.
-
Image Width: Enter the desired width of the image (in pixels).
-
Image Height: Enter the desired height of the image (in pixels).
-
Action URL: Enter the URL address to which users are taken when they click the item.
When you are finished configuring the List app, click OK at the bottom of the window.
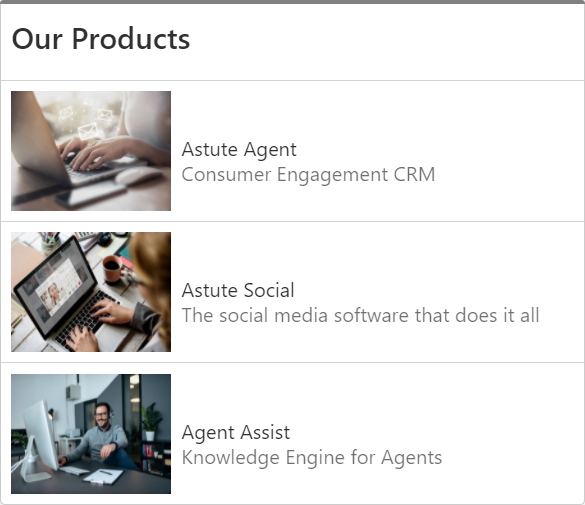
The image below demonstrates how a configured List app might appear to the end-user:
Video

The Video app allows you to display embedded YouTube videos within the messenger.
On the Video app, click the Configure App button to open the Video Configuration window.
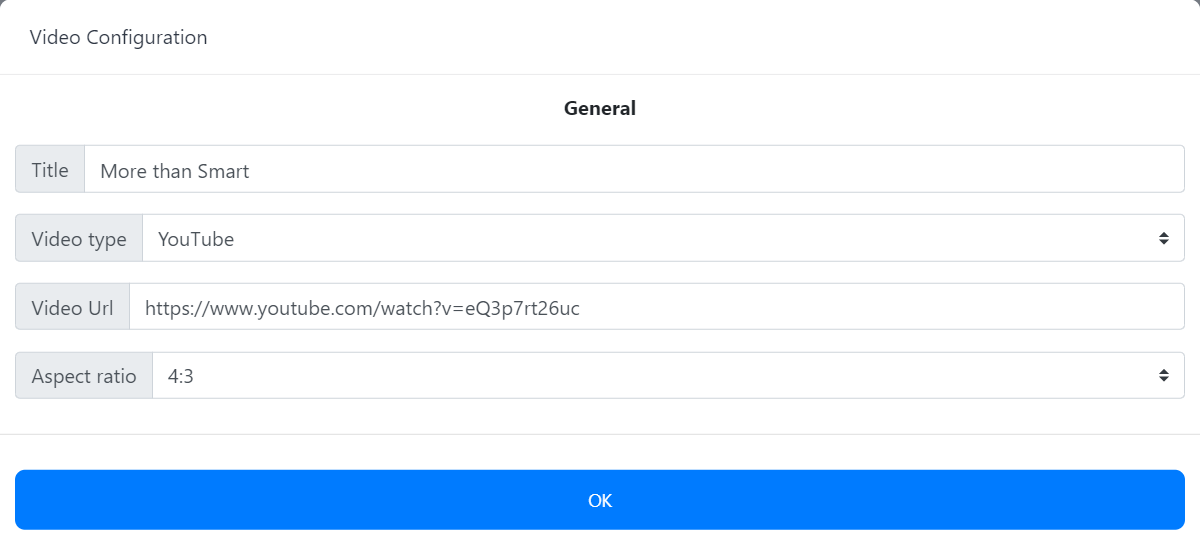
General
-
Title: Enter a title to appear above the embedded YouTube video.
-
Video Type: Use the drop-down menu to select the type of video you would like to embed.
-
-
-
Video URL: Enter the URL address of the YouTube video you would like to embed.
-
Aspect Ratio: Use the drop-down menu to select the aspect ratio in which the embedded video appears within the messenger. There are two options:
-
4:3
-
16:9
-
When you are finished configuring the Video app, click OK at the bottom of the window.
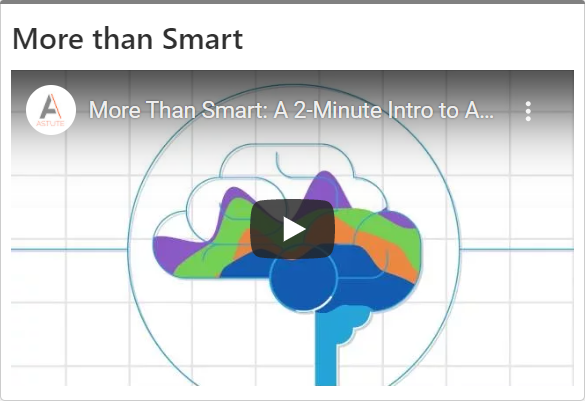
The image below illustrates how a configured Video app might appear to the end-user:
Versions

The Version tab shows you a history of previously published version of the messenger, alongside messages detailing the specific changes that were made to each version.
Buttons
Select a messenger version to display the Replace and Copy to New Messenger buttons.
-
Click the Replace button to replace the current version of the messenger with the version you have selected.
-
Click the Copy to New Messenger button to create a new, separate messenger from the version you have selected.