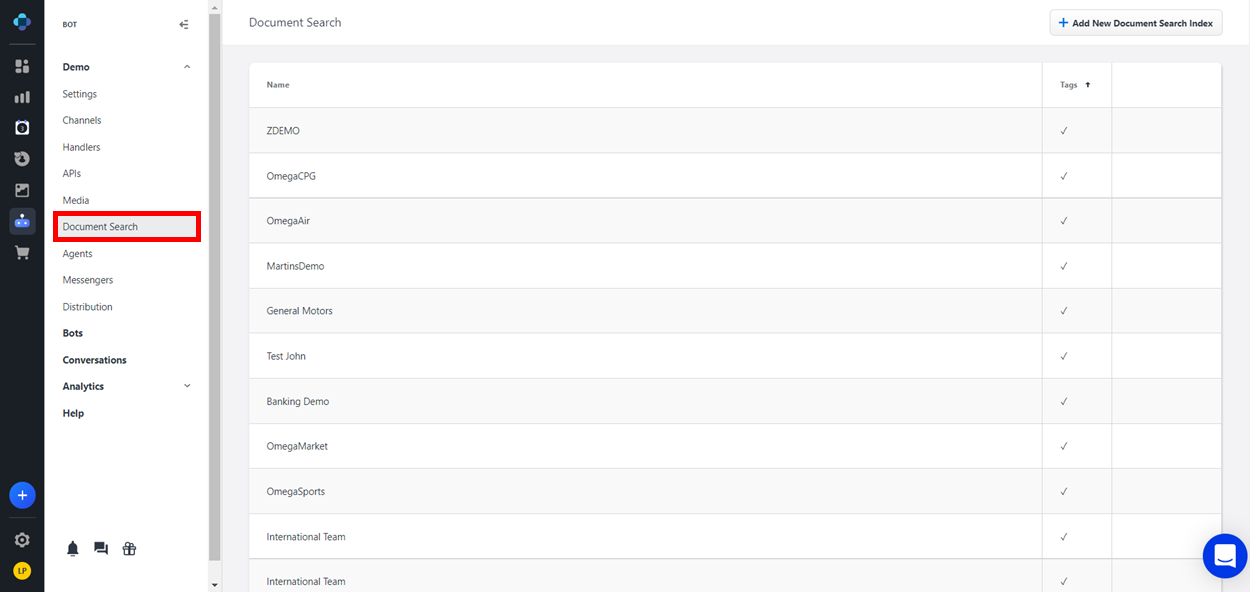
The Document Search page allows you to supply your bot with documents that it can then send to users as answers to their questions. Because your organization likely has a great deal of useful information already contained in existing documents, this feature enables the efficient sharing of that information without the need to spend time and effort re-writing it into your bot.
To use the Document Search feature in your bot, you must also set up a Document Results handler. For more information, see Handlers.
This page is unavailable on the Social Chatbot interface.
Accessing the Document Search page
-
From the Application Bar, click Your Company Name.
-
Click Document Search.
Setting up a search index
A search index is a custom repository of documents that are stored on the Emplifi platform or at specific URLs. To set up a search index, follow these steps:
-
At the top of the Document Search page, click the + Add New Document Search Index button. A new search index appears in the list below.
-
On the new search index, click the Edit button. The Search Index Settings page displays.
-
To add documents to the search index, click + Add from URL, + Add from Page, or + Add from Upload, depending on where the documents are stored.
-
To add a single document/webpage from a URL link, click + Add from URL and paste the appropriate URL in the text field that appears.
-
To add multiple documents that are all linked from the same webpage, click + Add from Page and paste the URL of the appropriate webpage in the text field that appears.
-
To add a document that is stored on your computer, click + Add from Upload, select the appropriate document from your computer's storage system, then click Save.
-
-
After adding a document, it appears in the Index Documents section. Hover your cursor over the document to display the following buttons.
-
Document Link: Click here to open the link to the webpage where the document is stored.
-
Reindex: If you have added a new version of the document, click here to update the document text that is stored within the search index. The icon to the left of the document name turns yellow during reindexing, then returns to green when reindexing is complete.
-
Edit: Click here to open the Document Settings window, where you can add tags and make other changes to the document. For more information, see the "Document Settings Window Layout" section below.
-
Delete: Click here to delete the document from the search index.
-
Adding language tags
You can also create tags and add them to documents in order to better organize your search index. The most common type of tag is a language tag, which designates the language in which a document is written so that users speaking to the bot in a certain language can receive documents in their language, if they exist. To create a language tag, follow these steps:
-
On the Search Index Settings page, add a new tag to the search index by clicking + Add Tag Configuration. The new tag appears in the Tag Configuration list.
-
On the new tag, click the Name text field and enter the name "Language". To save the name, click Enter on your keyboard.
-
Click the Value text field and enter either the two-digit language code or five-digit locale code for your document's language. To save the value, click Enter on your keyboard.
-
Example: Enter the value "en-us" to create a tag for documents written in English (US), or "es" for documents written in Spanish and valid for multiple countries.
-
To add a new value to the tag, click the Add button.
-
To delete a value from the tag, click the Delete button (x).
-
To delete a tag, click the Delete button (trash can).
-
Tags can also be used to label documents with terms not explicitly included in the document text but which users may nevertheless use when asking their questions. In this case, the tag allows the bot to locate the document and send it to the user as an answer.
Additional search index buttons
|
Icon |
Name |
Description |
|---|---|---|
|
|
Edit |
Click here to change the name of the search index. When you are finished, click Enter on your keyboard. |
|
|
Options |
Click here to open the Options dialog window. If custom request headers are required to allow the search indexer to access restricted documents, enter them here. |
|
|
Test |
Click here to open the Test dialog window, where you can run a test search of the index. |
|
|
Save |
Click here to save the changes you've made to the search index. |
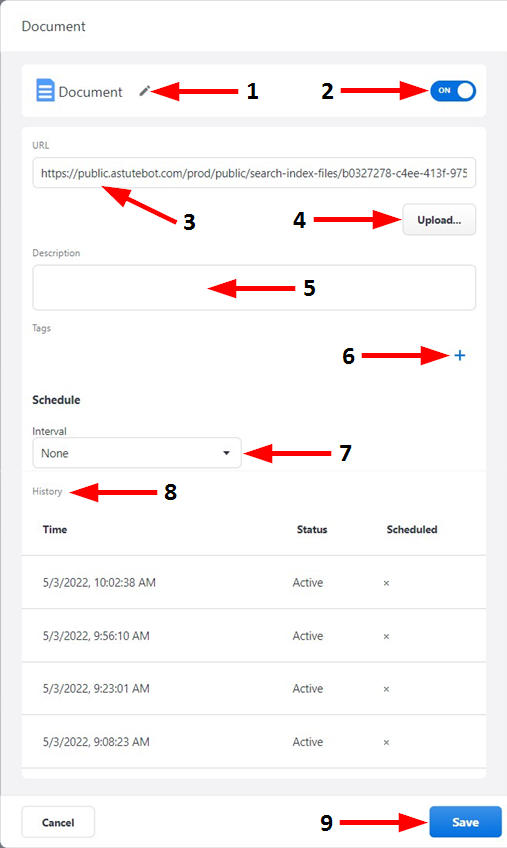
Document Settings window layout
|
Number |
Name |
Description |
|---|---|---|
|
1 |
Edit Document Name |
Click here to change the name of the document. When you are finished, click Enter on your keyboard. |
|
2 |
ON/OFF Toggle |
Click here to activate or deactivate the document from the search index. When the toggle is ON, the document is active and will appear in document searches. When the toggle is OFF, the document is inactive and will not appear in document searches. |
|
3 |
URL |
Click here to copy or change the URL where the document is stored. |
|
4 |
Upload |
Click here to upload a document from your computer's storage system. |
|
5 |
Description |
Click here to add a description or other notes to the document. |
|
6 |
Add Tag |
Click here to add one of the search index's tags to the document. |
|
7 |
Schedule |
Click here to configure the frequency of the document's automatic reindexing. There are four options available:
|
|
8 |
History |
This section displays the history of changes that have been made to the document. |
|
9 |
Save |
Click here to save any changes that you have made to the document. |