On the Distribution page, you can configure outgoing SMS or email "blasts" to a predefined group of users. These blasts can be used to prompt the recipients to interact with the bot on a regular basis, or just for announcements.
This page is unavailable on the Social Chatbot interface.
Accessing the Distribution page
-
From the Application Bar, click Your Company Name.
-
Click Distribution.
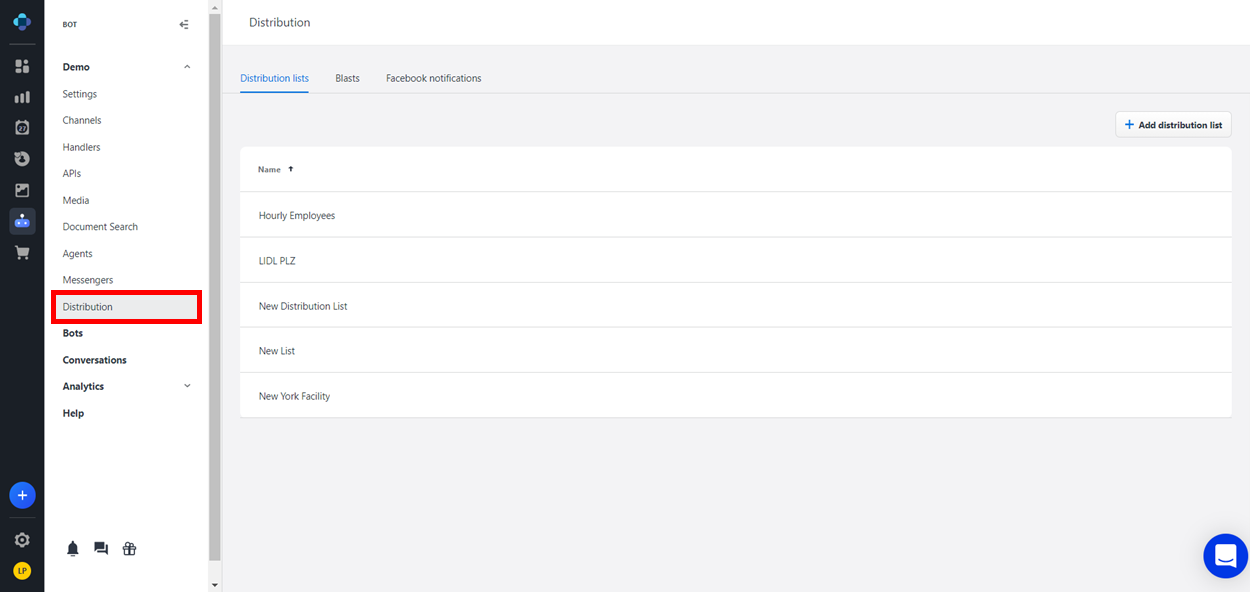
Distribution page layout
Distribution Lists tab
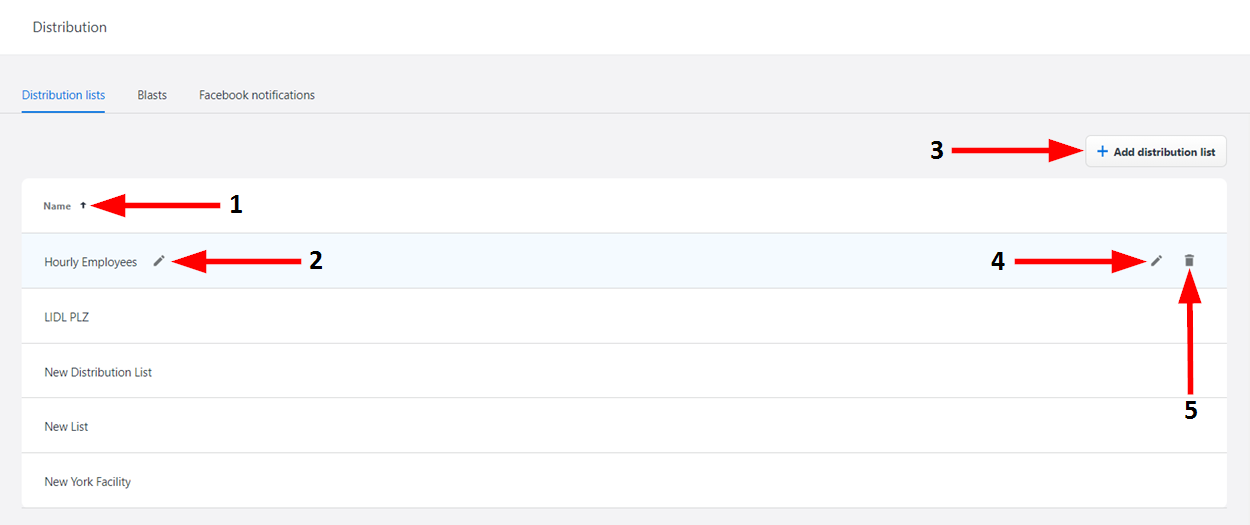
The Distribution List tab is where you can add the list of users to whom your outgoing SMS or email blasts are sent.
Buttons
|
Number |
Name |
Description |
|---|---|---|
|
1 |
Sort By |
Click here sort the list of distribution lists in alphabetical or reverse-alphabetical order. |
|
2 |
Rename |
Click here to enter a new name for the distribution list. When you are finished typing, click Enter to save the name. |
|
3 |
Add Distribution List |
Click here to create a new distribution list. |
|
4 |
Edit Distribution List |
Click here to open the Distribution List Settings window. For more information, see the "Configuring Distribution Lists" section below. |
|
5 |
Delete Distribution List |
Click here to delete the distribution list. A dialog window will display to verify that you want to delete the distribution list. |
Blasts tab
Buttons
|
Number |
Name |
Description |
|---|---|---|
|
1 |
Sort By |
Click here sort the list of blasts in alphabetical or reverse-alphabetical order. |
|
2 |
Rename |
Click here to enter a new name for the blast. When you are finished typing, click Enter to save the name. |
|
3 |
Enabled Toggle |
Click the ON/OFF toggle to enable or disable the blast. |
|
4 |
Add Blast |
Click here to create a new blast. |
|
5 |
Edit Blast |
Click here to open the Blast Settings window. For more information, see the "Configuring Blasts" section below. |
|
6 |
Run Blast |
Click here to send your message to the recipients designated in the Blast Settings. |
|
7 |
View Blast History |
Click here to view a log of the blasts that have been previously sent. The log contains each blast's start time, end time, and state. |
|
8 |
Delete Blast |
Click here to delete the blast. A dialog window will display to verify that you want to delete the blast. |
Configuring Distribution lists
To configure your distribution lists, first go to the Distribution Lists tab. Find the distribution list that you would like to configure, or create a new one, then click its Edit button. The Distribution List Settings window opens.
Distribution List settings window layout
The Distribution List Settings window contains two tabs: Info and Schedule.
Info tab buttons

|
Number |
Name |
Description |
|---|---|---|
|
1 |
Schedule Tab |
Click here to open the Schedule tab. For more information, see the "Schedule Tab Buttons" section below. |
|
2 |
Import CSV |
Click here to import contact information in the form of a comma-separated values (CSV) file. For more information, see the "Importing a CSV File" section below. |
|
3 |
Add Person |
Click here to add a new person to the distribution list. You will be prompted to enter their first name, last name, phone number, and email address. When you have entered all this information, click Add to save it. |
|
4 |
Edit Person |
After selecting a person from the list, click here to edit the information associated with them (first name, last name, phone number, email address, etc.). |
|
5 |
Remove Person |
After selecting a person from the list, click here to remove them. |
|
6 |
Close |
Click here to exit the Distribution List Settings window. |
Schedule tab buttons

|
Number |
Name |
Description |
|---|---|---|
|
1 |
Info Tab |
Click here to open the Info tab. For more information, see the "Info Tab Buttons" section above. |
|
2 |
Select All |
Click here to select every person on the list. |
|
3 |
Select None |
After selecting any number of people from the list, click here to de-select all of them. |
|
4 |
Edit Person |
After selecting a person from the list, click here to edit their schedule information and time zone. |
|
5 |
Edit People |
After selecting multiple people from the list, click here to edit their schedule information and time zone. |
|
6 |
Close |
Click here to exit the Distribution List Settings window. |
Blast settings window layout
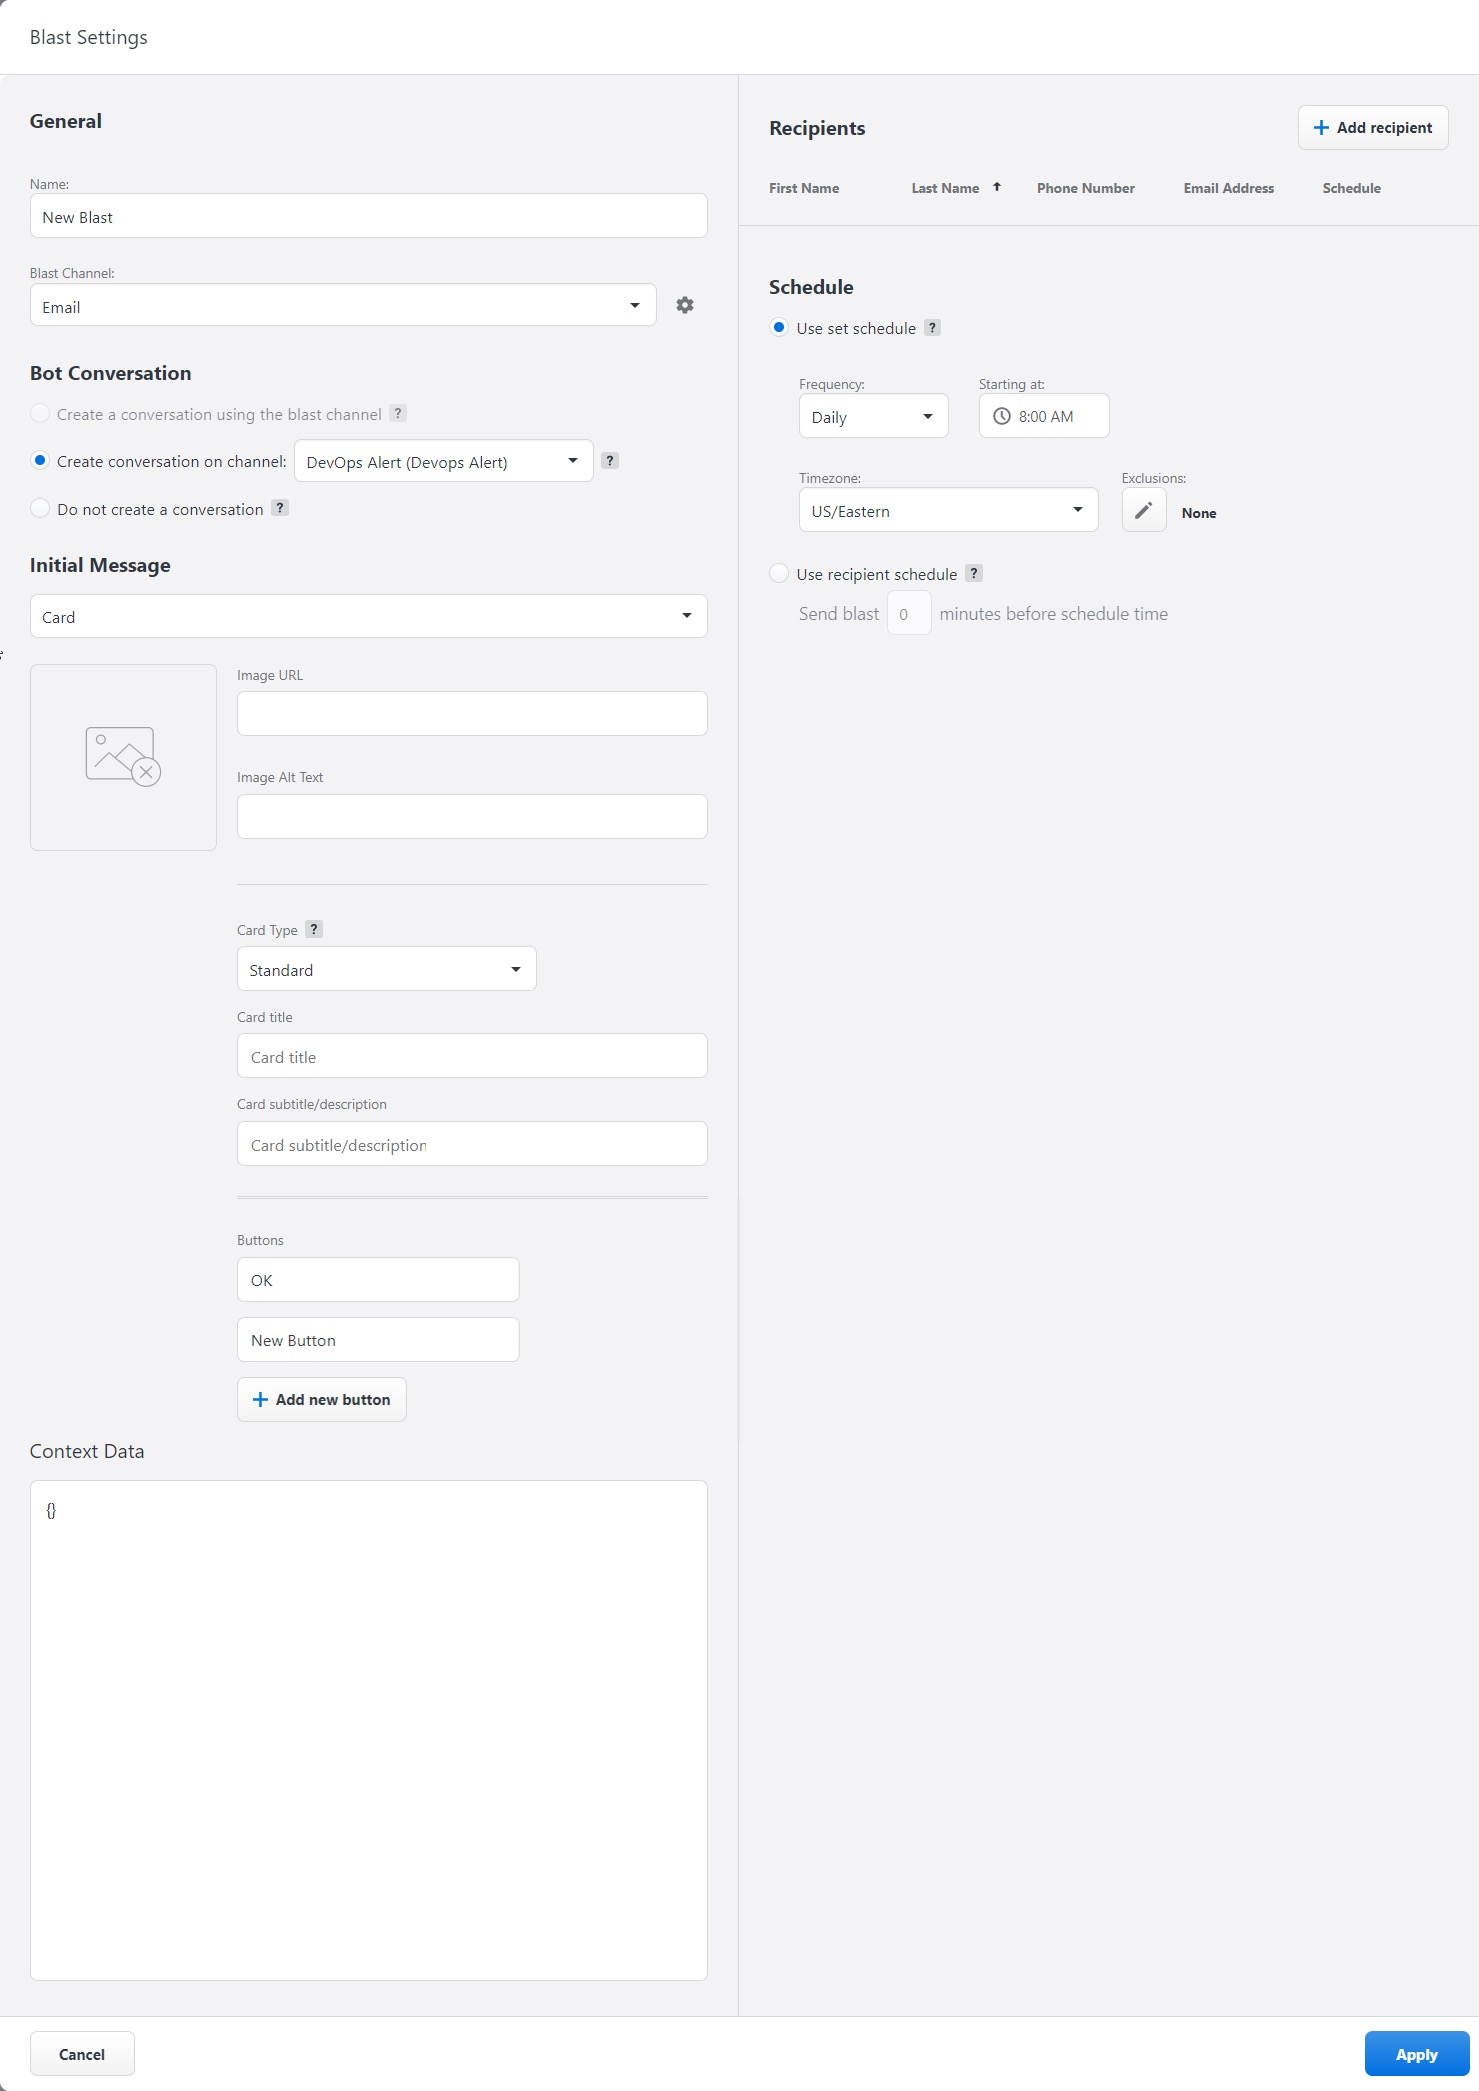
The Blast Settings window contains four main sections: General, Bot Conversation, Recipients, and Schedule. For more information about Blasts, see the "Blasts" section above.
General
-
Name: Enter a name for the blast. This name is only used within Emplifi Bot.
-
Blast Channel: Use the drop-down menu to select the bot channel through which the blast is sent to recipients. For more information, see Channels.
When you select the channel type “Email”, the adjacent Settings button darkens, allowing you to click it and configure additional elements of the blast, such as its subject line and message body.
Bot Conversation
-
Create a Conversation Using the Blast Channel: Select this option to create a bot conversation for each recipient on the channel that the blast is sent through.
-
Create Conversation on Channel: Select this option to create a bot conversation for each recipient on a different channel from that through which the blast is sent. Use the drop-down menu to select the different channel. Recipients will receive a link to communicate with the bot on the selected web channel.
-
Do Not Create a Conversation: Select this option to send a blast that does not initiate a conversation with the recipients. This type of blast functions as an announcement, with no expectation of a response from any recipients. When this option is selected, the "Initial Message" and "Context Data" subsections become faded and cannot be configured.
-
Initial Message: Configure and enter the initial message of the bot conversation created by the blast. There are several types of messages available. You can choose from:
-
Text: A body of text capable of containing letters, numbers, and special characters.
-
To enter the text, click the text field. To save the text, click outside the text field.
-
-
Card: A card containing an image, a title, a subtitle/description, and a configurable amount of custom buttons.
-
To add an image, paste the URL at which the image is hosted into the text field labeled "Image URL". In the text field labeled "Image Alt Text", enter the text that appears when the user hovers over the image.
-
To change the card type, use the Card Type drop-down menu.
-
To configure a custom button's type, text, and payload, click the adjacent Edit button.
-
To remove a button, click the adjacent Delete button.
-
To create a new button, click the + Add New Button button.
-
-
Quick Replies: A short body of text accompanied by a configurable amount of custom buttons.
-
To enter the text, click the text field. To save the text, click outside the text field.
-
To configure a custom button's label and payload, click the adjacent Edit button.
-
To remove a button, click the adjacent Delete button.
-
To create a new button, click the + Add New Button button.
-
-
Multi Replies: A short body of text accompanied by a configurable amount of custom buttons. Unlike Quick Replies, users can select multiple button options at once.
-
To enter the title introducing the available replies, click the text field. To save the title, click outside the text field.
-
To configure a custom button's label and payload, click the adjacent Edit button.
-
To move the button up or down in the sequence, click the adjacent Arrow buttons .
-
To remove a button, click the adjacent Delete button.
-
To create a new button, click the + Add New Button button.
-
-
Image: An image hosted at a specific URL.
-
To add an image, paste the URL at which the image is hosted into the text field labeled "Image URL". In the text field labeled "Image Alt Text", enter the text that appears when the user hovers over the image.
-
-
Carousel: A carousel of multiple cards, each containing an image, a title, a subtitle/description, and a configurable amount of custom buttons.
-
To enter a title for the carousel, click the text field. To save the title, click outside the text field.
-
To add an image, paste the URL at which the image is hosted into the text box labeled "Image URL". In the text field labeled "Image Alt Text", enter the text that appears when the user hovers over the image.
-
To list the carousel cards dynamically, click the Context List button. In the text field that appears, enter the name of the bot object variable containing the data that will determine the order in which the cards are displayed.
-
To configure a custom button's type, text, and payload, click the adjacent Edit button.
-
To remove a button, click the adjacent Delete button.
-
To create a new button, click the + Add New Button button.
-
-
Custom Payload: A custom response written in the syntax of the interface on which the response is sent.
-
To select an interface, click on one of the several options displayed above the text field.
-
To configure a custom response, enter it in the text field using the syntax appropriate to the selected interface.
-
-
Event: A command to the bot's logic, triggering the performance of a certain action by the bot.
-
-
Context Data: Use this field to assign initial values to variables in the bot conversation created by the blast. For more information, see the "Configuring Data Context" section below.
Recipients
-
Add Recipient: Click here to configure who will receive the message blast. Click the + Add Recipient button to display a list of contacts from all of your distribution lists. From this list, you can select individual contacts to add, or you can add them all by clicking Select All, then Add.
Schedule
-
Use Set Schedule: Select this option to send the blast to all recipients at the same time. Use the following settings to configure when and how the blast is sent.
-
Frequency: Use the drop-down menu to select how often the blast is sent.
-
Daily: The blast is sent every day at a specific time.
-
Weekly: The blast is sent once a week on a specific day and at a specific time.
-
Monthly: The blast is sent once a month on a specific numeric day of the month and at a specific time.
-
-
Starting at: Use the drop-down menus and text box to select/enter the date and time at which the blast is sent.
-
Timezone: Use the drop-down menu to select the timezone in which you would like the blast's schedule to operate
-
Exclusions: Click the Edit button to open the Schedule Exclusions window, where you can select days on which the blast is not sent (like weekends, for example).
-
-
Use Recipient: Select this option to send the blast at a time determined by the recipients' schedules. In the text box, enter the number of minutes prior to the recipients' scheduled start time that the blast should be sent. For more information about start and end times, see the "Schedule Tab" section above.
When you are satisfied with your configurations, click Apply to save your changes and to close the Blast Settings window.
Additional configurations
Importing a CSV file
To import contact information to your distribution list in the form of a comma-separated values (CSV) file, follow the steps below.
-
Create a new document/workbook in your preferred spreadsheet program.
-
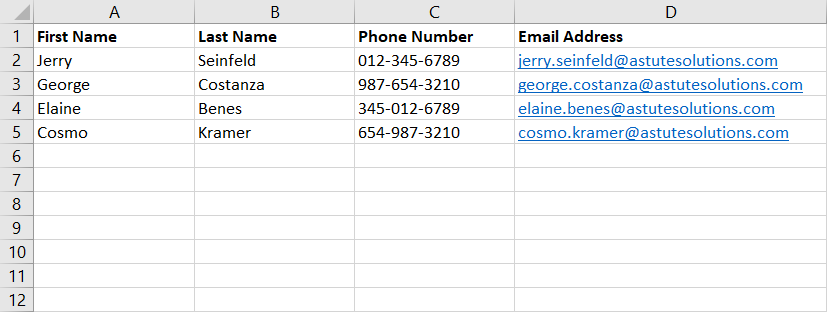
At the top of the first four columns, create four headers in the following order, from left to right: First Name, Last Name, Phone Number, and Email Address.
-
To create additional columns to store more details about your contacts, skip the first twelve columns of your document/workbook (as discussed above, the first four columns are automatically assigned to First Name, Last Name, Phone Number, and Email Address; the following eight columns are assigned to the contact's daily schedule and time zone). Starting with the thirteenth column, create headers for the type of contact information that you would like the columns to contain.
-
-
Enter the information for your contacts in the respective columns. Be sure to keep the information for each individual contact in a single row.
-
When you are finished, save your document/workbook as a .csv file.
-
Open Emplifi Bot and navigate to the Distribution page. Open the Distribution List Settings window for the distribution list that you would like to add contacts to.
-
On the Info tab, click the Import CSV... button. Your device's file directory window opens.
-
Locate and select the .csv file containing the contact information that you would like to import. Click Open. The information automatically appears in the Info tab of the Distribution List Settings window.
-
Verify that the details of the contact information are in the appropriate columns.
Configuring context data
The Context Data section of the Blast Settings Window allows you to assign initial values to variables in the bot conversation created by the blast, or to map data values from the distribution list into the bot's variables. Use the following types of syntax to do so:
-
Boolean variables: "variableName": true OR false
-
String variables:"variableName": "value"
-
Distribution list variables: "variableName": "{{person['variableName']}}"
-
In this case, the "variableName" must be that of a distribution list variable (i.e. a column heading on the Info Tab of the Distribution List Settings Window, such as "{{person['phone']}}" or "{{person['email']}}"). For more information about configuring distribution list variables, see the "Importing a CSV File" section above.
-
The image below illustrates a possible configuration of the Context Data section.
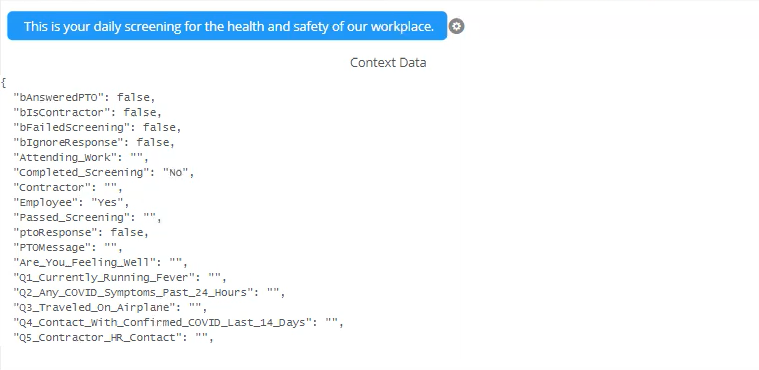
All variables must be entered between the two curly brackets ({ }) that appear by default in the Context Data section. In a list of variables like that in the image above, each variable must occupy its own line, which (with the exception of the final variable in the list) must end with a comma.
The Boolean and/or string variables that you enter and define in the Context Data section must already exist in the bot selected from the "Blast Channel" drop-down menu (i.e. the bot with which blast recipients have a conversation). For more information, see Variables.