Summary: This article explains how to use teams to configure your users' access to resources and data in the Emplifi account. Using teams allows you to grant the users access only to the Emplifi platform modules and account resources that they need for work and to restrict access to everything else.
How teams work
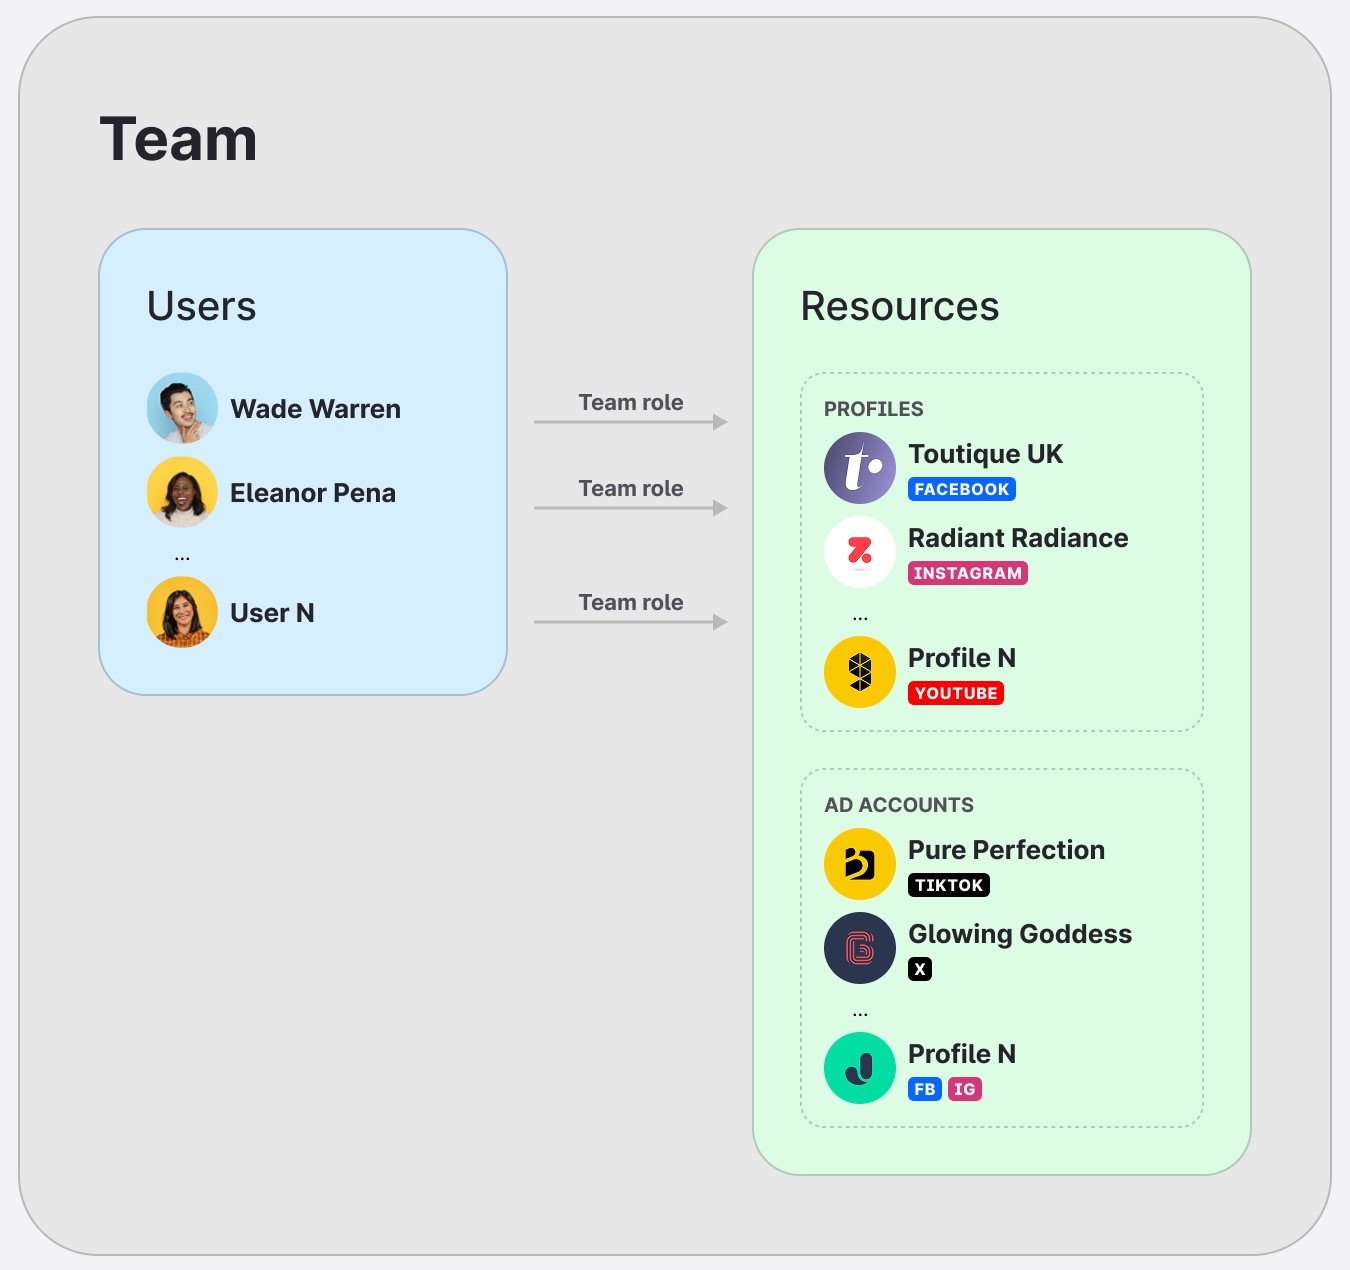
A team groups the resources (such as profiles and ad accounts) and the users. Once added to a team, a user is granted access to the resources in the team. At the same time, they cannot access any other resource in the Emplifi account if this resource is not in the team.
The team also specifies what products (that is, modules of the Emplifi platform such as Publisher, Unified Analytics, Community, and so on) the users can access. By combining the products, resources, and users under a team, you define in what modules the users can use the resources.
Finally, what the user is allowed to do with the resources and their data (view social media content, create and publish content on social media, post public replies, and so on) in the Emplifi platform modules is defined by the user’s team role.
Once you set up teams in your account, managing users' access to the resources becomes a matter of adding users to teams to grant them access to the team resources and removing users from the teams to restrict their access.
Example: Your social media department needs to be able to publish posts to your company’s Facebook and Instagram accounts via Publisher and track performance of the posts in Unified Analytics. The department should not be able to access the other modules of your Emplifi account (Community and Content). They also should not be able to interact with any Google Business profiles.
This is a high-level overview of how you do it:
-
Create a team named “Social media”.
-
In this team, allow access only to Publisher and Unified Analytics.
Access to additional modules should be disabled. -
Add your Facebook and Instagram profiles to the team.
Do not add any Google Business profiles to the team.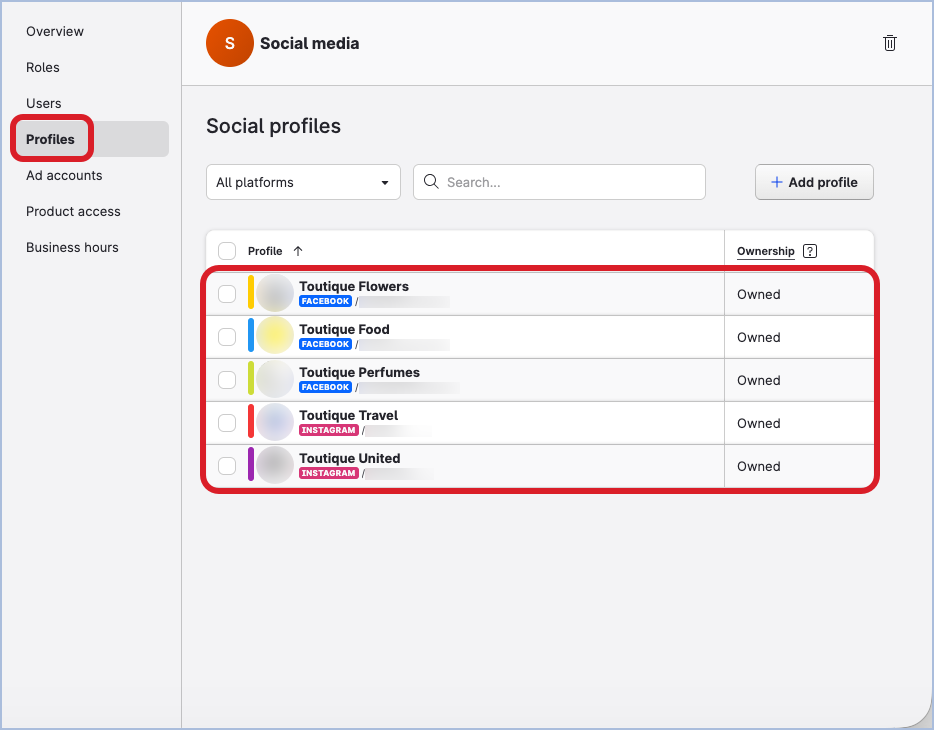
-
Create team roles that allow the users to manage the team itself, view insights in Unified Analytics, and manage posts in Publisher.
-
Add the users to the team with the respective team roles.
Where to find teams
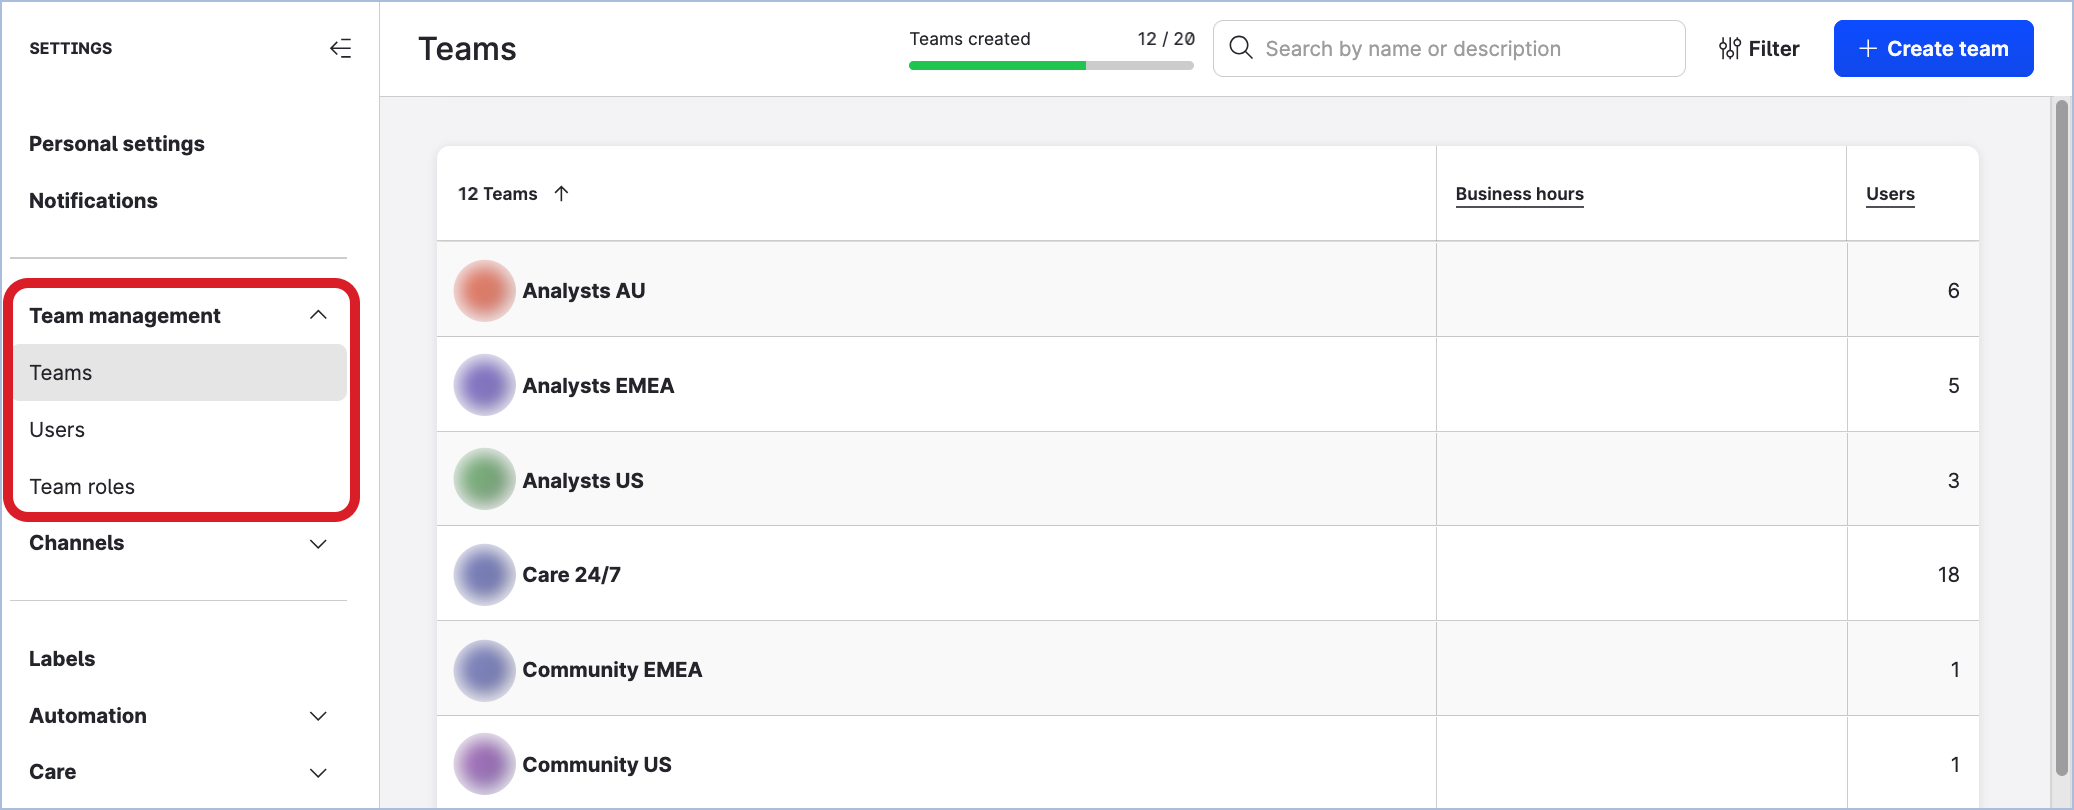
You can access the teams, the team roles, and the users in the Settings section of your Emplifi account, under Team management.
Team roles
To have access to the resources and resource data in the Emplifi account, a user must be a member of a team that has these resources added, and have a team role assigned.
A team role is a set of permissions that defines what a user with this role is allowed to do with the team resources and their data (view social media content, create and publish content on social media, post public replies, and so on).
One team per team role
A team role is always tied to a specific team and can be used in this one team only. Within the team, a team role can be assigned to multiple users.
If you need to use the same team role in multiple teams, create a custom role template and then reuse it in as many teams as you need (see Update and Maintain Teams).
Default team role
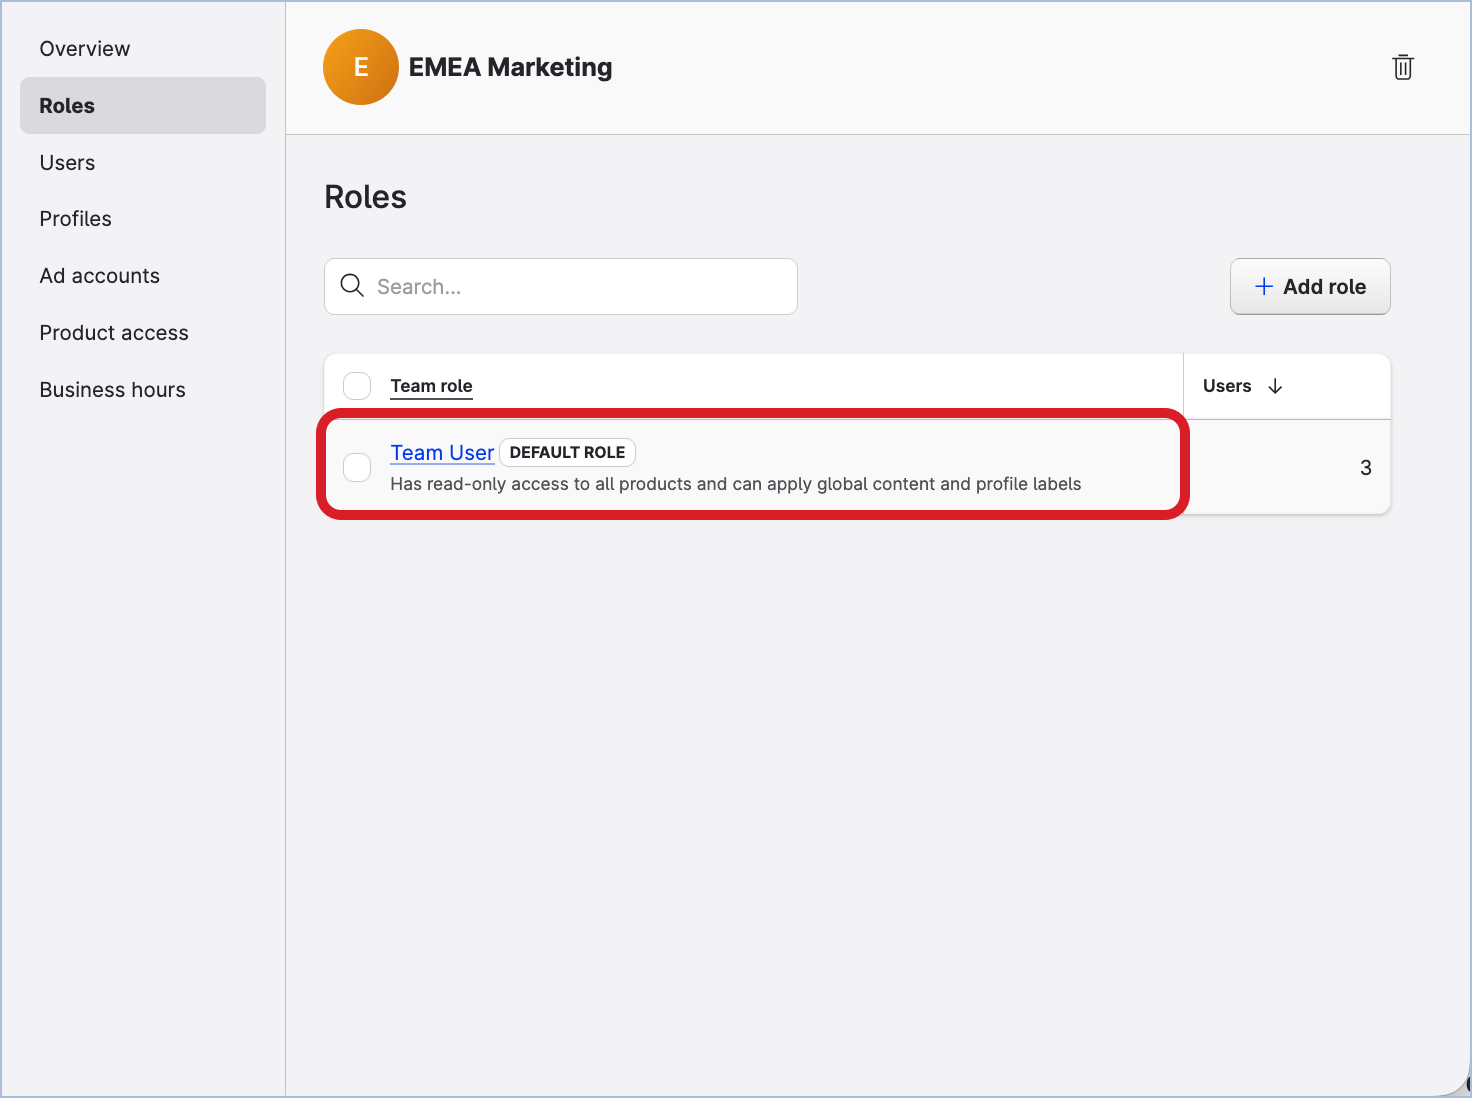
Each team has a default profile role - “Team User” - that is created automatically when the team is being created. The default team role is pre-selected for new users when they are being added to the team. You can use the default profile role when the team has no other team roles added.
The default profile role cannot be removed from the team.
Team admin
A team admin is a user who manages the team itself: they can create and delete team roles for the team, make sure that the users and the resources in the team are the correct ones and add/remove them as needed.
We recommend that you have at least one team admin in each team to transfer the daily work from platform admins and to enable regional teams, brands, and departments to work autonomously.
You can have multiple team admins in a team, if needed, as a backup or to divide the responsibilities among several users.
However, you can choose to not have a team admin in a team. In this case, platform admins manage the team.
The Emplifi platform offers a “Team Admin” template (see further in this article) that you can use to create a team admin role for your teams. Alternatively, you can create a team admin role from scratch and customize it according to your business needs and requirements.
Team role templates
The Emplifi platform provides a set of predefined role templates — Team Admin, Team User, Care Agent, Community Specialist (without approval), Content Creator (without approval), and Social Media Analyst. These templates are editable: you can modify their permissions and, when you save changes, choose to propagate them to any child roles connected to the template.
-
Team admin
Team admins manage the teams where they are team admins: create and delete team roles for the teams, add users/resources/team roles to the teams, remove users/resources/team roles from the teams, edit the teams' names and descriptions.
Team admins have a full scope of available permissions for the resources added to their teams (view social media content, create and publish content on social media, post public replies, and so on). -
Team user
Team users have read-only access to all Emplifi platform modules enabled in their team and can apply global content and profile labels to the team resources. -
Care agent
Care agents can create and post replies and manage cases in Care on behalf of the profiles added to their teams. Care agents cannot configure Care settings. -
Community specialist (without approval)
Community specialists (without approval) can create replies and manage messages in Community on behalf of the profiles added to their teams. They cannot approve replies or configure Community settings. -
Content creator (without approval)
Content creators (without approval) can create and manage content in Publisher on behalf of the profiles added to their teams. They cannot approve content or configure approval flows. -
Social media analyst
Social media analysts can analyze and generate reports on the performance of social profiles and ad accounts in Unified Analytics, Content, and Dashboard. They can also manage permissions for labeling and sentiments.
You can also create your own custom role templates based on your specific business needs (see Update and Maintain Teams).
The team role templates cannot be added to teams directly. They are used only as blueprints to create team roles based on.
Default team
Any user and any resource in the Emplifi account must belong to at least one team. When inviting a user or adding a resource to the Emplifi account, you have to specify what team to add them to.
Even when you have not yet created any team of your own, there is always a default team in your Emplifi account. It is created automatically, with access to all modules of the Emplifi platform enabled and the default “Team User” team role added to it. You can use the default team as a starting point while there are no other teams in your account. For example, when inviting other platform admins to the account, add them to the default team.
You can later remove a user or a resource from all the teams that they belong to. This is what happens when you do that:
-
For a user, it depends on their platform access (see Access to the Emplifi Platform).
-
Platform admins will be still able to access any module of the Emplifi platform and see all the teams, team roles, resources, and the other users under Settings → Team management. However, they will not be able to access and interact with the resource data in the Emplifi modules.
-
Platform users will not be able to access any module of the Emplifi platform, see any resource, team, team role, or user in the Emplifi account. They will be able to access only their personal settings.
-
-
A resource that is not added to any team is not accessible in any module of the Emplifi platform (for example, cannot be selected in Publisher for publishing content, cannot be used to reply in Community, and so on).
You can create more teams based on your business needs.
The maximum number of teams that you can create depends on your plan. If you need more teams than your plan allows, contact your Customer Success Manager or Emplifi Support at support@emplifi.io.
Team users
A user can be added to multiple teams and have a different team role in each team to reflect the level of access they should have to each team’s resources.
If multiple teams hold the same resource and the same user, the user’s access to this resource within the Emplifi account is determined by all permissions from all this user’s team roles combined.
Visibility of teams, users, and resources
Whether a user can see teams, resources, and other users in the Emplifi account depends on their platform access (see Access to the Emplifi Platform) and what team the user is added to.
-
Platform admins can always see all the teams, team roles, resources, and the other users regardless of whether they are assigned to the respective teams.
-
Platform users are limited by the teams they are members of.
-
When browsing the teams under Settings → Team management → Teams, the user can see only the teams that they are added to.
The user cannot see any team they are not a member of. -
When browsing the team roles under Settings → Team management → Team roles, the user can see only the role templates (both system and custom) and the team roles added to the teams that the user is added to.
The user cannot see any team role from the teams they are not a member of. -
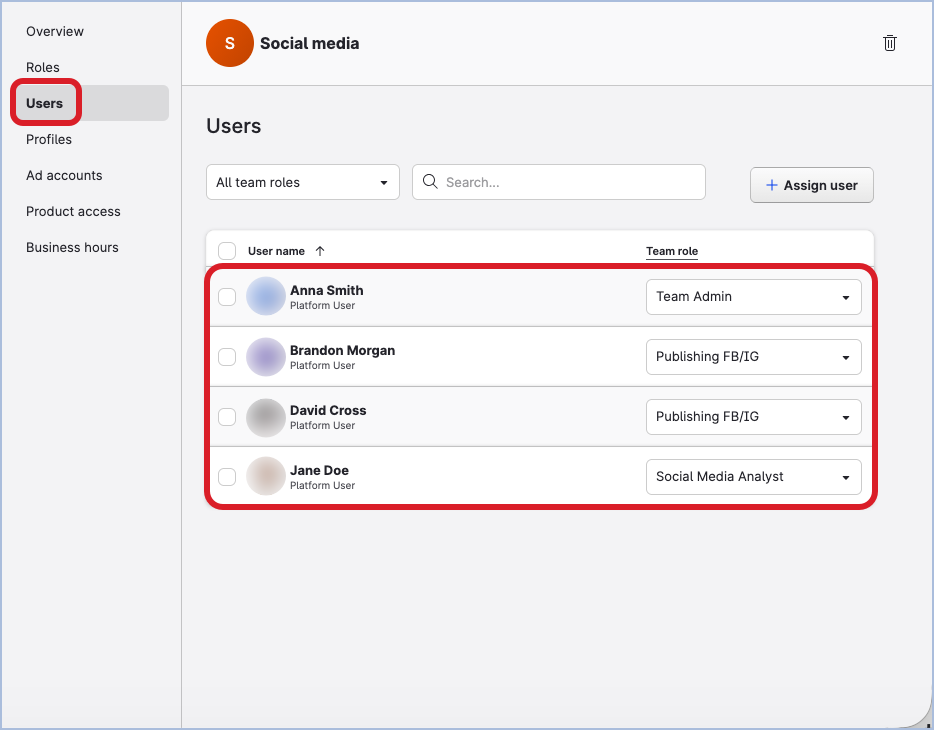
When browsing the users under Settings → Team management → Users, the user can see only the users that are added to the teams the user themselves is added to.
The user cannot see any user from the teams they are not a member of. -
When browsing the social profiles, Google Business profiles, or ad accounts under Settings → Channels, the user can see only the social profiles, Google Business profiles, and ad accounts that are added to the teams the user is added to.
The user cannot see any social profile, Google Business profile, or ad account from the teams they are not a member of.
-
Collaborative and restrictive accounts
Access to products and resources is defined by team membership and the roles assigned within each team. In addition to this structure, accounts can operate in either a Collaborative or Restrictive mode, which controls how users interact with people outside their own teams.
In a Collaborative account, users can see and interact with members of other teams in shared contexts - such as assigning work, mentioning users, or sharing content - while still only accessing the resources explicitly assigned to their own teams. This mode is ideal for organizations that require cross-team visibility and coordination without compromising resource-level permissions.
In a Restrictive account, users can only see and interact with members of their own team in collaborative workflows. This provides a more isolated environment, reinforcing stricter boundaries between teams.
Regardless of the selected mode, access to resources (such as profiles or configurations) is always controlled by team assignment, ensuring that visibility of people does not imply access to their resources.
In restrictive accounts, Platform Admins can also control collaboration at the team level: you can explicitly enable or disable collaboration between individual teams, rather than applying a single account-wide setting. When collaboration is enabled between two teams, the relationship is bidirectional. See Update and Maintain Teams | Manage collaboration between teamsfor details.
To request the Restrictive mode, please contact your Customer Success Manager or Emplifi Support at support@emplifi.io.
Set up teams in your Emplifi account
To set up teams in your Emplifi account, complete the following steps:
-
Decide what teams you need.
-
Invite platform admins.
-
Create teams.
-
Create team role for team admins.
-
Add team admins to the teams.
-
Create other team roles.
-
Add users to the teams.
-
Add resources to the teams.
-
(Optional) Assign business hours to the teams.
Decide what teams you need
Analyze your business requirements and decide what your teams should look like.
How you organize teams in your Emplifi account depends on your business needs and practices. You may want to create teams for different regions where your company is active (EMEA, APAC, LATAM, and so on), or for different departments of your company (Marketing, PR, Finances, Support, and so on), or for external agencies you may be working with, or all above.
The following questions may help you make this decision:
-
How many teams you need?
The maximum number of teams that you can create depends on your plan. If you need more teams than your plan allows, contact your Customer Success Manager or Emplifi Support at support@emplifi.io.
-
For each team:
-
Access to what modules within the Emplifi account should this team allow?
What modules of the Emplifi platform (for example, Publisher, Community, Unified Analytics, and so on) should the users of this team be able to access and use to work with the team resources and the resource data? -
What resources should be added to the team?
What profiles and ad accounts should the users in the team be able to access and work with? -
What users should be added to the team?
Who should have access and work with the team resources and the resource data? -
What team role should each user have?
What can and cannot each user in the team do to the team resources and the resource data (view social media content, create and publish content on social media, post public replies, and so on)? -
Does this team need business hours assigned?
If the team groups users and profiles for work in Community and Care, do you want to assign them the business hours when the Community or Care users are expected to interact with the customers?
-
Invite platform admins
Choose the users who should be platform admins, and invite them to the Emplifi account.
Platform admins can access all the modules of the Emplifi platform enabled in the account and manage all the settings in Emplifi account including the teams. Having one to three platform admins per account is sufficient. For more information about platform admins and what they can do, see Access to the Emplifi Platform.
Steps:
-
Go to Settings → Team management → Users.
-
Click Add users on the top right.
The dialog for specifying the user details opens. -
In the Team dropdown, select the default team (for more information, see “Default team” earlier in this article).
This is the team that the users will be added to. Because you have not created any team yet, the default team is the only team available to you. -
In the Team Role dropdown, select the “Team User” team role.
This is the default team role and the only available team role in the default team that you selected in the previous step. It will be assigned to the users when they are added to the default team. -
In the Users field, enter the emails of the users.
-
Select the checkbox Make invited users Platform Admins.
At this point, the dialog should look similar to the following: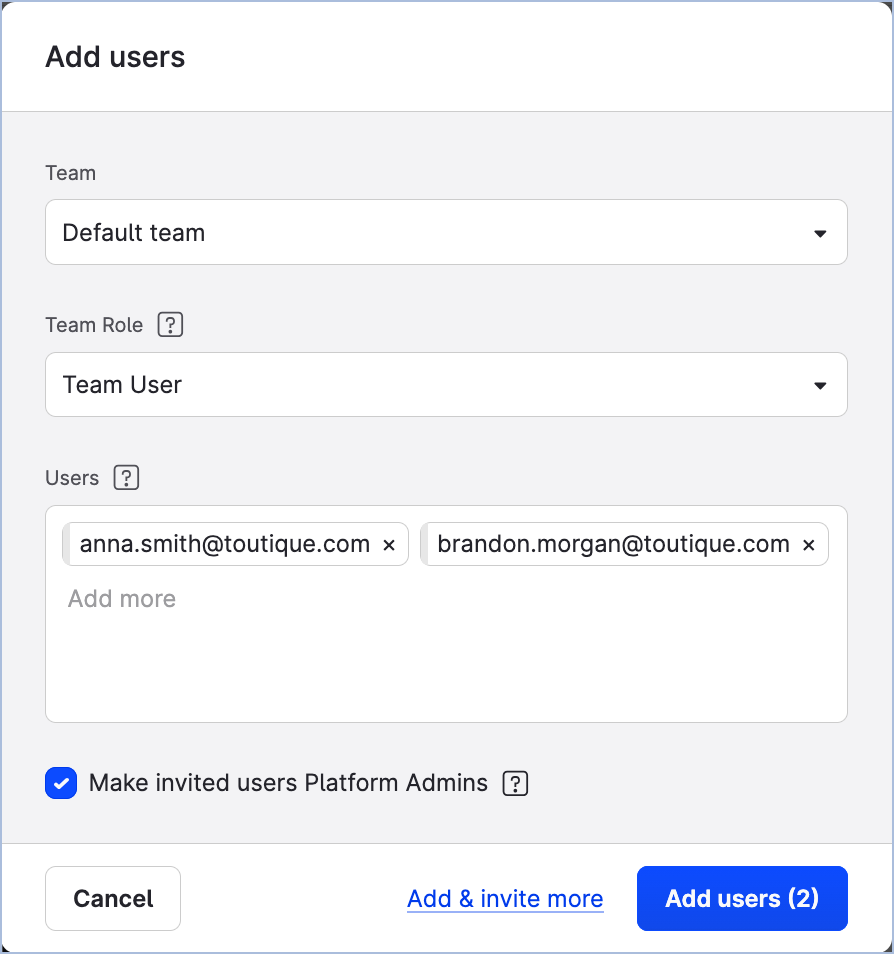
-
Click Add users.
Invitations to the Emplifi account are sent to the email addresses that you specified.
The users are added to the account with the status ofPendingand at the same time are added to the default team.
Once the users accept the invitation and log in, the status ofPendingwill be cleared.
Create teams
Create the teams that you decided on previously.
You can do it yourself, or you can delegate it to any other platform admin whom you invited previously.
The maximum number of teams that you can create depends on your plan. If you need more teams than your plan allows, contact your Customer Success Manager or Emplifi Support at support@emplifi.io.
If your plan allows only one team, you are going to work with the default team that already exists in your Emplifi account and has the “Team user” team role added (for more information, see “Default team” earlier in this article).
You are not going to create any new team. Instead, proceed to the section “Create team roles for team admins” further in this article.
Steps:
-
Go to Settings → Team management → Teams.
-
Click +Create team.
The dialog for specifying team details opens. -
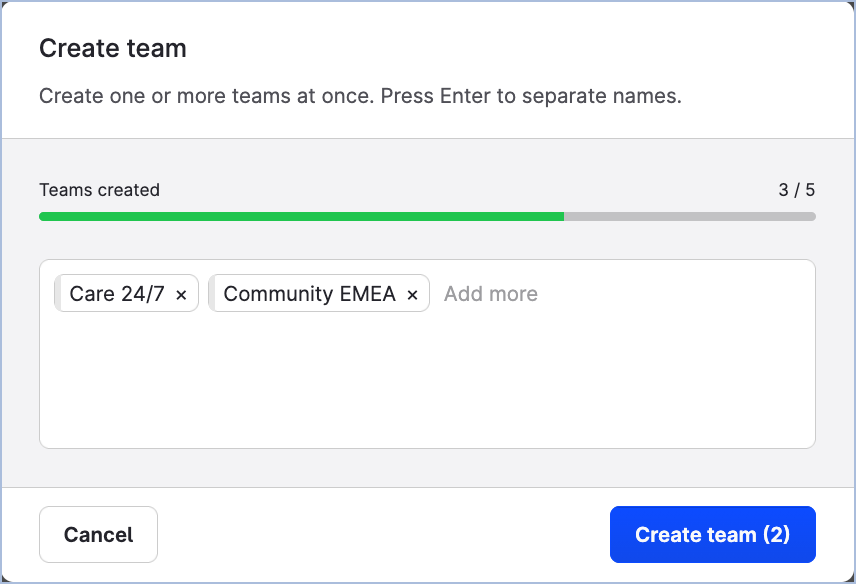
Enter the names of the teams: enter the name of the first team to add, press Enter, enter the name of the second team, press Enter, and so on. You can also copy the team names from an external source (a CSV file where the team names are separated by commas, an Excel file, or a Google Sheets file) and paste them into the field.
-
Click Create team.
The teams are created and are automatically listed in the alphabetical order. Each team is created together with a default “Team user” team role already added to it. You can later review these default team roles under Settings → Team management → Team roles.
You are now going to set up product access in the teams. -
Click one of the newly created teams.
The team panel slides out. -
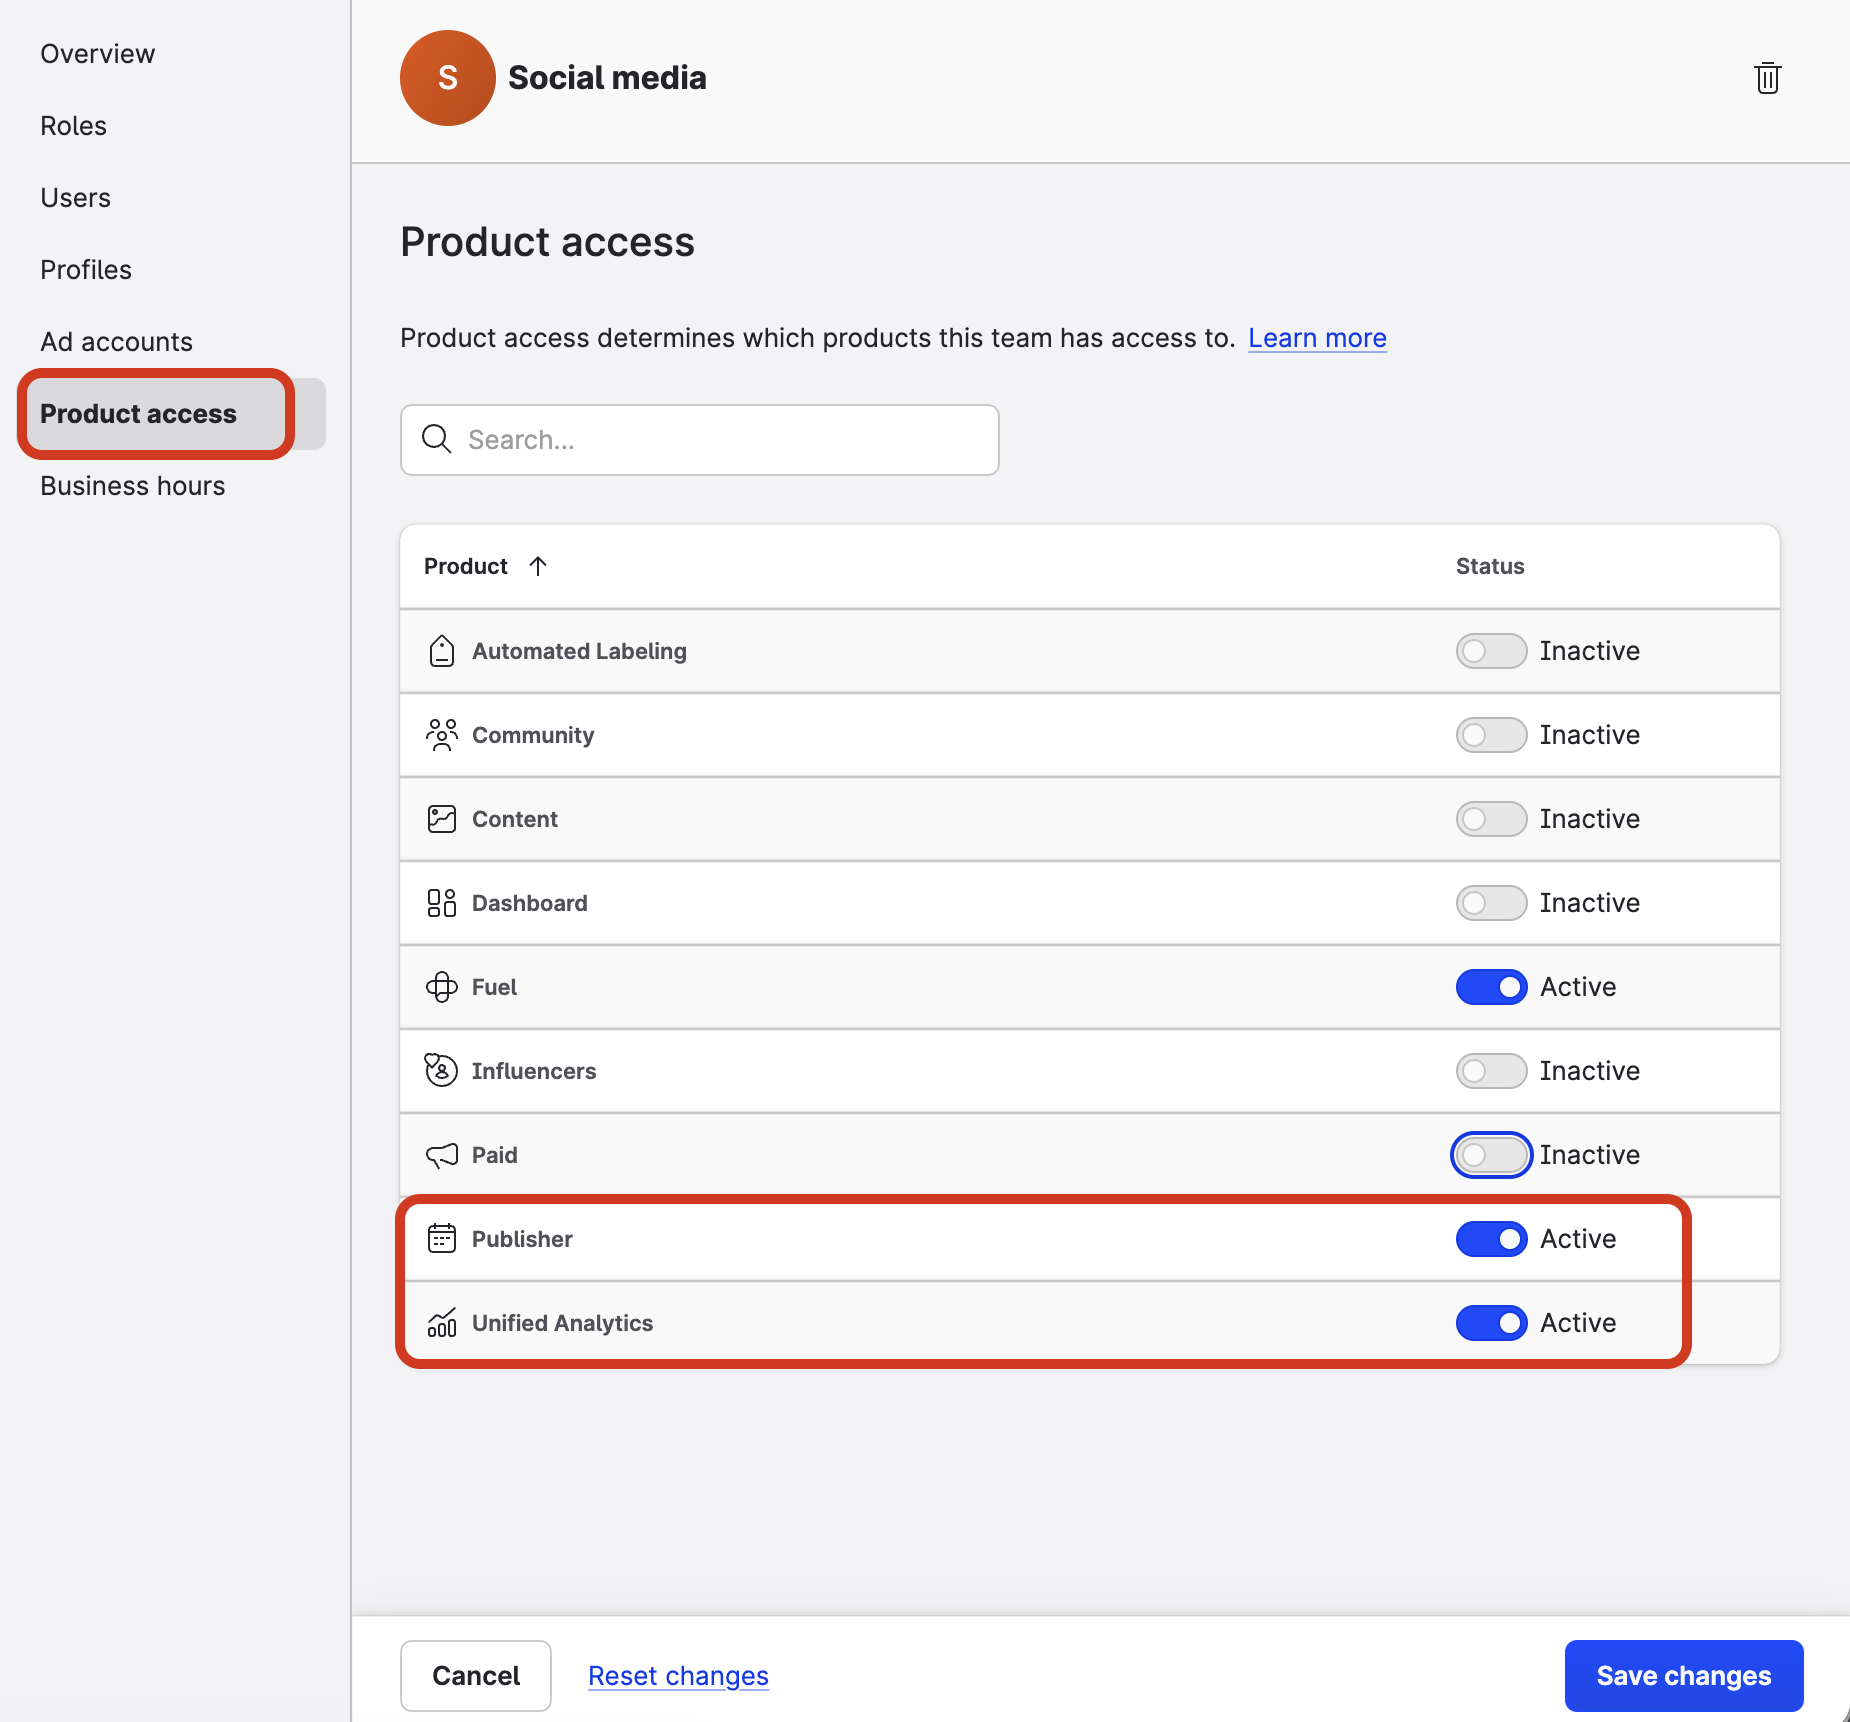
Click Product access.
You can see all the modules of the Emplifi platform listed.
By default, all of them are enabled. This means that the users of the team, once added, will be able to access all the modules. -
Disable the modules that you do not want the users to access.
For example, if you want the members of this team to have access to only Publisher and Unified Analytics, leave only these two modules enabled and disable all the other modules.
-
Once done, click Save changes.
The panel closes. -
Repeat Steps 5-8 for each team that you created.
You now have teams where access to the modules of the Emplifi platform is set up. The teams do not have any users and resources added yet.
Create team roles for team admins
Although a team is created together with a default “Team user” team role already added to it and you can start adding users to the team and assign them this team role, you would typically want at least one user in the team to have a “Team admin” role.
A team admin manages the team where they are a team admin. At the same time, the team admin has a full scope of available permissions for the resources added to their teams (view social media content, create and publish content on social media, post public replies, and so on). For more information about team admins, see “Team roles” earlier in this article.
Because team roles are team-specific and are tied to their respective team, you are going to create an individual “Team admin” team role for each of your teams.
Steps:
-
Go to Settings → Team management → Team roles.
The system templates and the existing team roles (those are the default team roles that were created together with your teams) are listed.
Notice how the existing team roles have the same name - “Team user”, but each of them belongs to its respective team.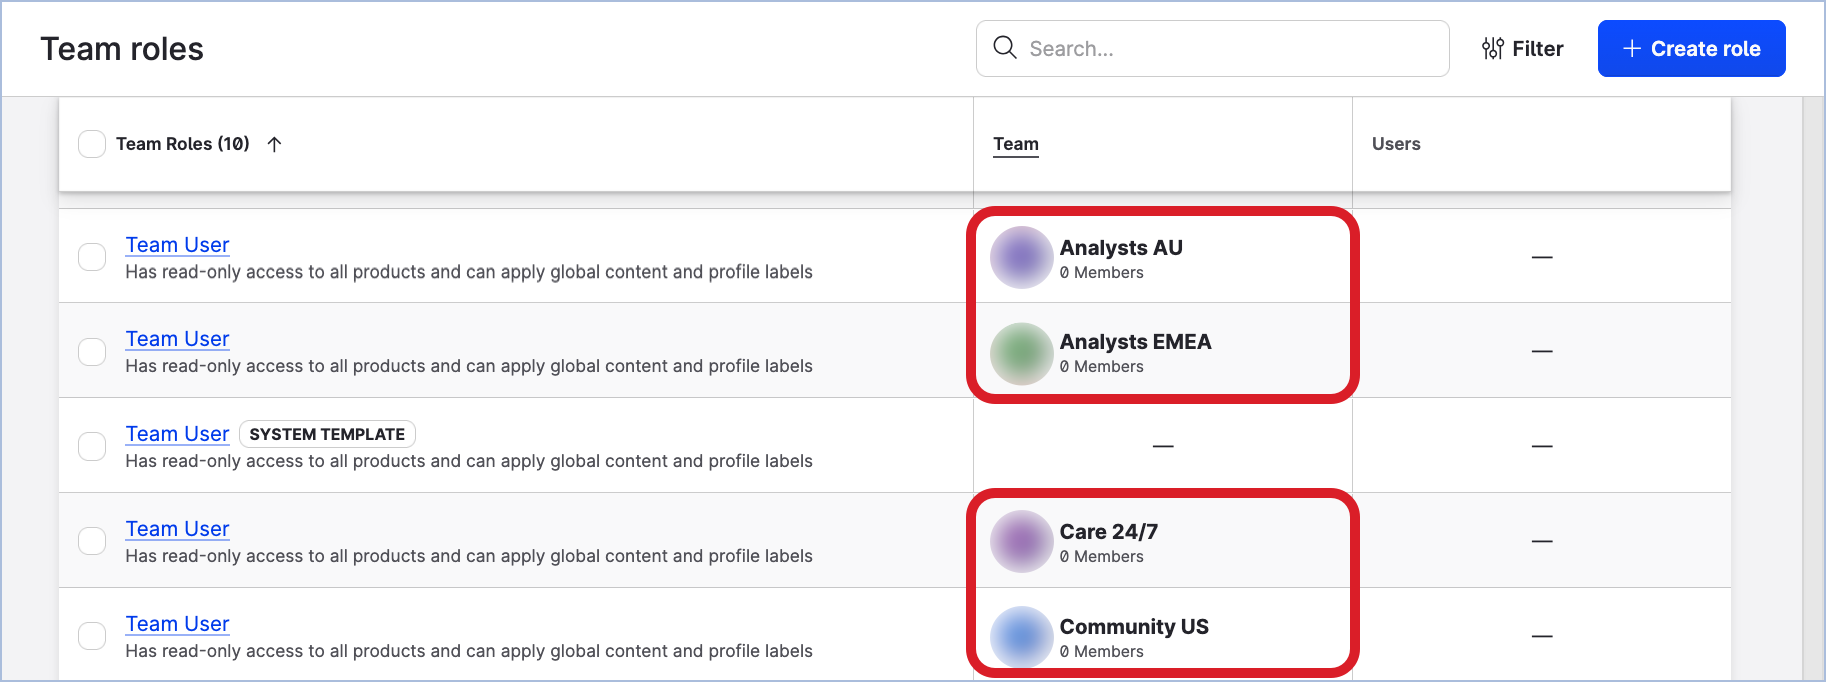
-
Click Create role.
The team role panel slides out.
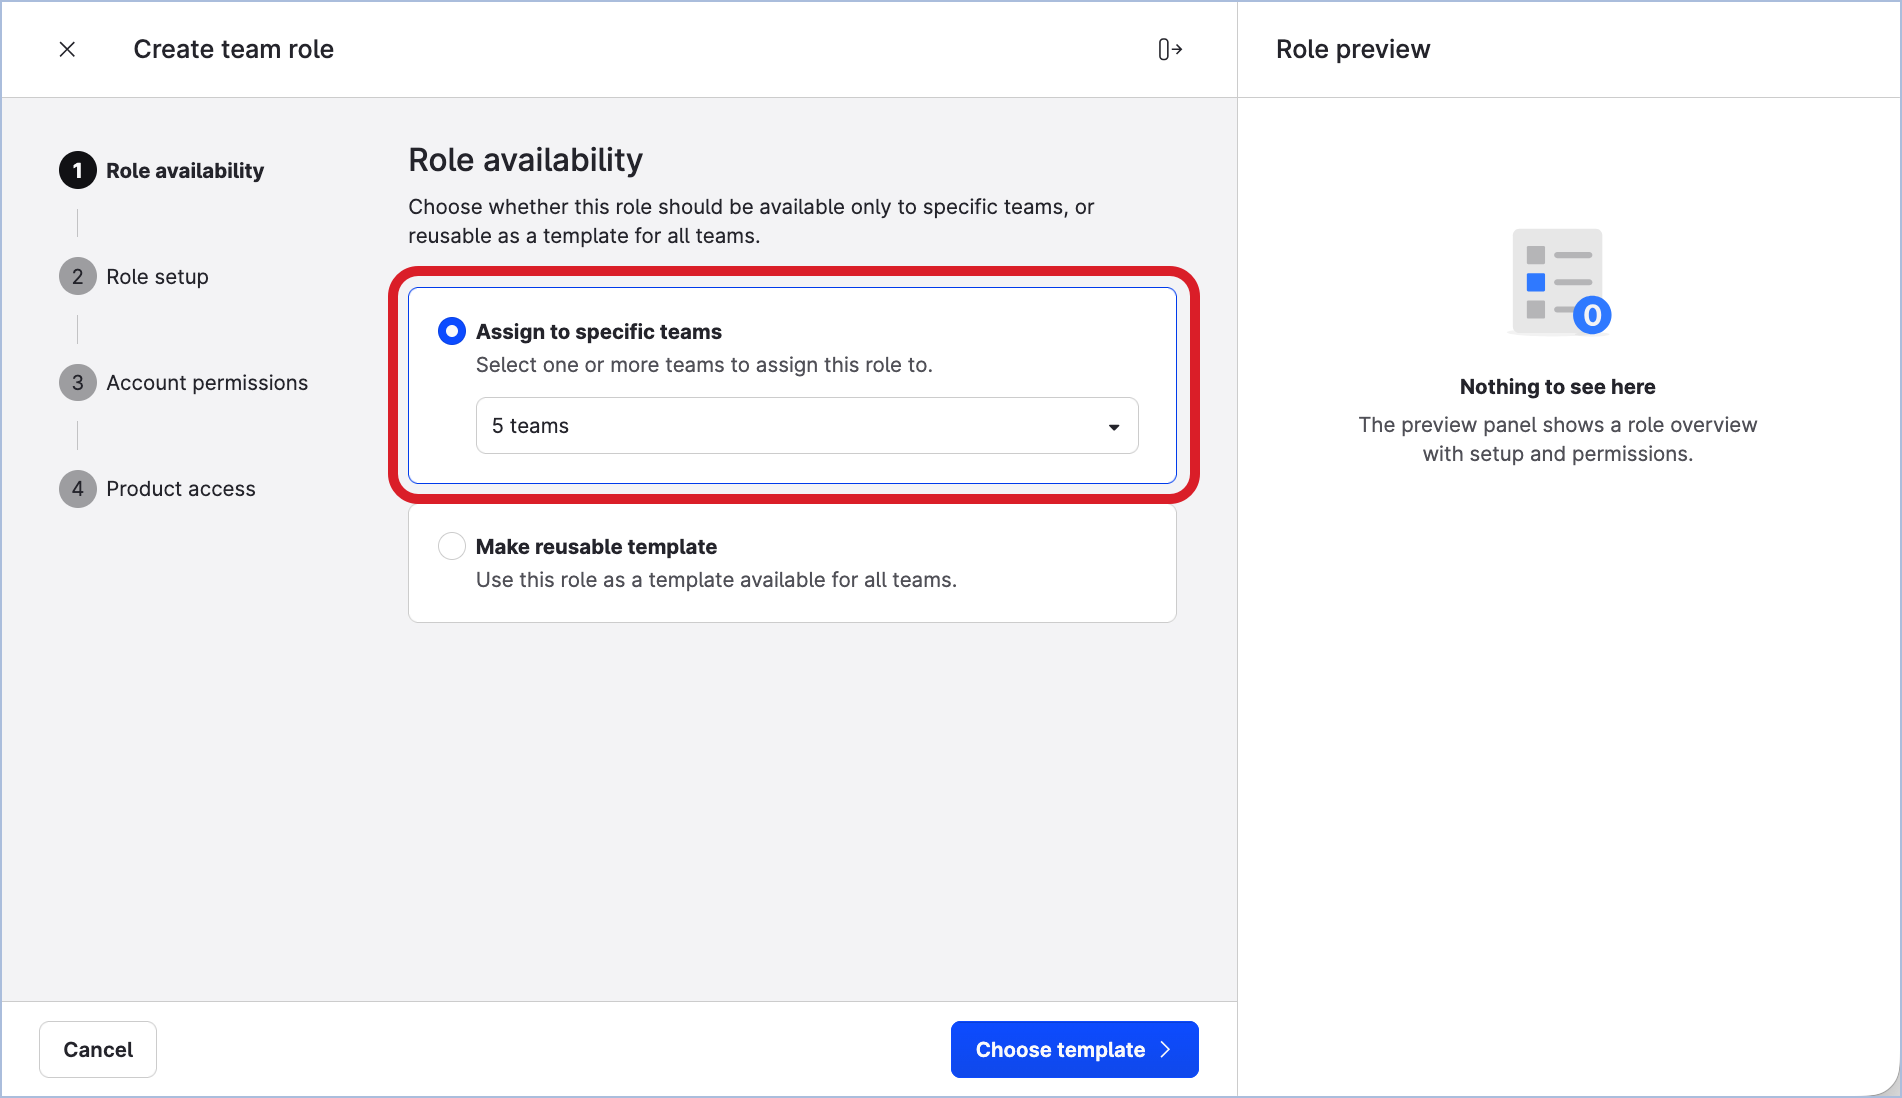
You are prompted to choose whether to create a team-specific role or a team role template. -
Leave the Assign to specific teams option selected. Then, click the dropdown and select all of the teams that you created.
By doing this, you are going to create separate “Team admin” team roles for each of your teams in one go.
If you have the default team only, select it in the dropdown.
If you want to use this team role in the teams that you may create in the future, consider creating a custom role template which you will be able to reuse later in as many teams as you need (see Update and Maintain Teams).
-
Click Choose template.
You are prompted to choose whether to define role permissions manually from scratch or to use one of the system templates. -
Select Team Admin.
This is a system template that you are going to create the team roles based on.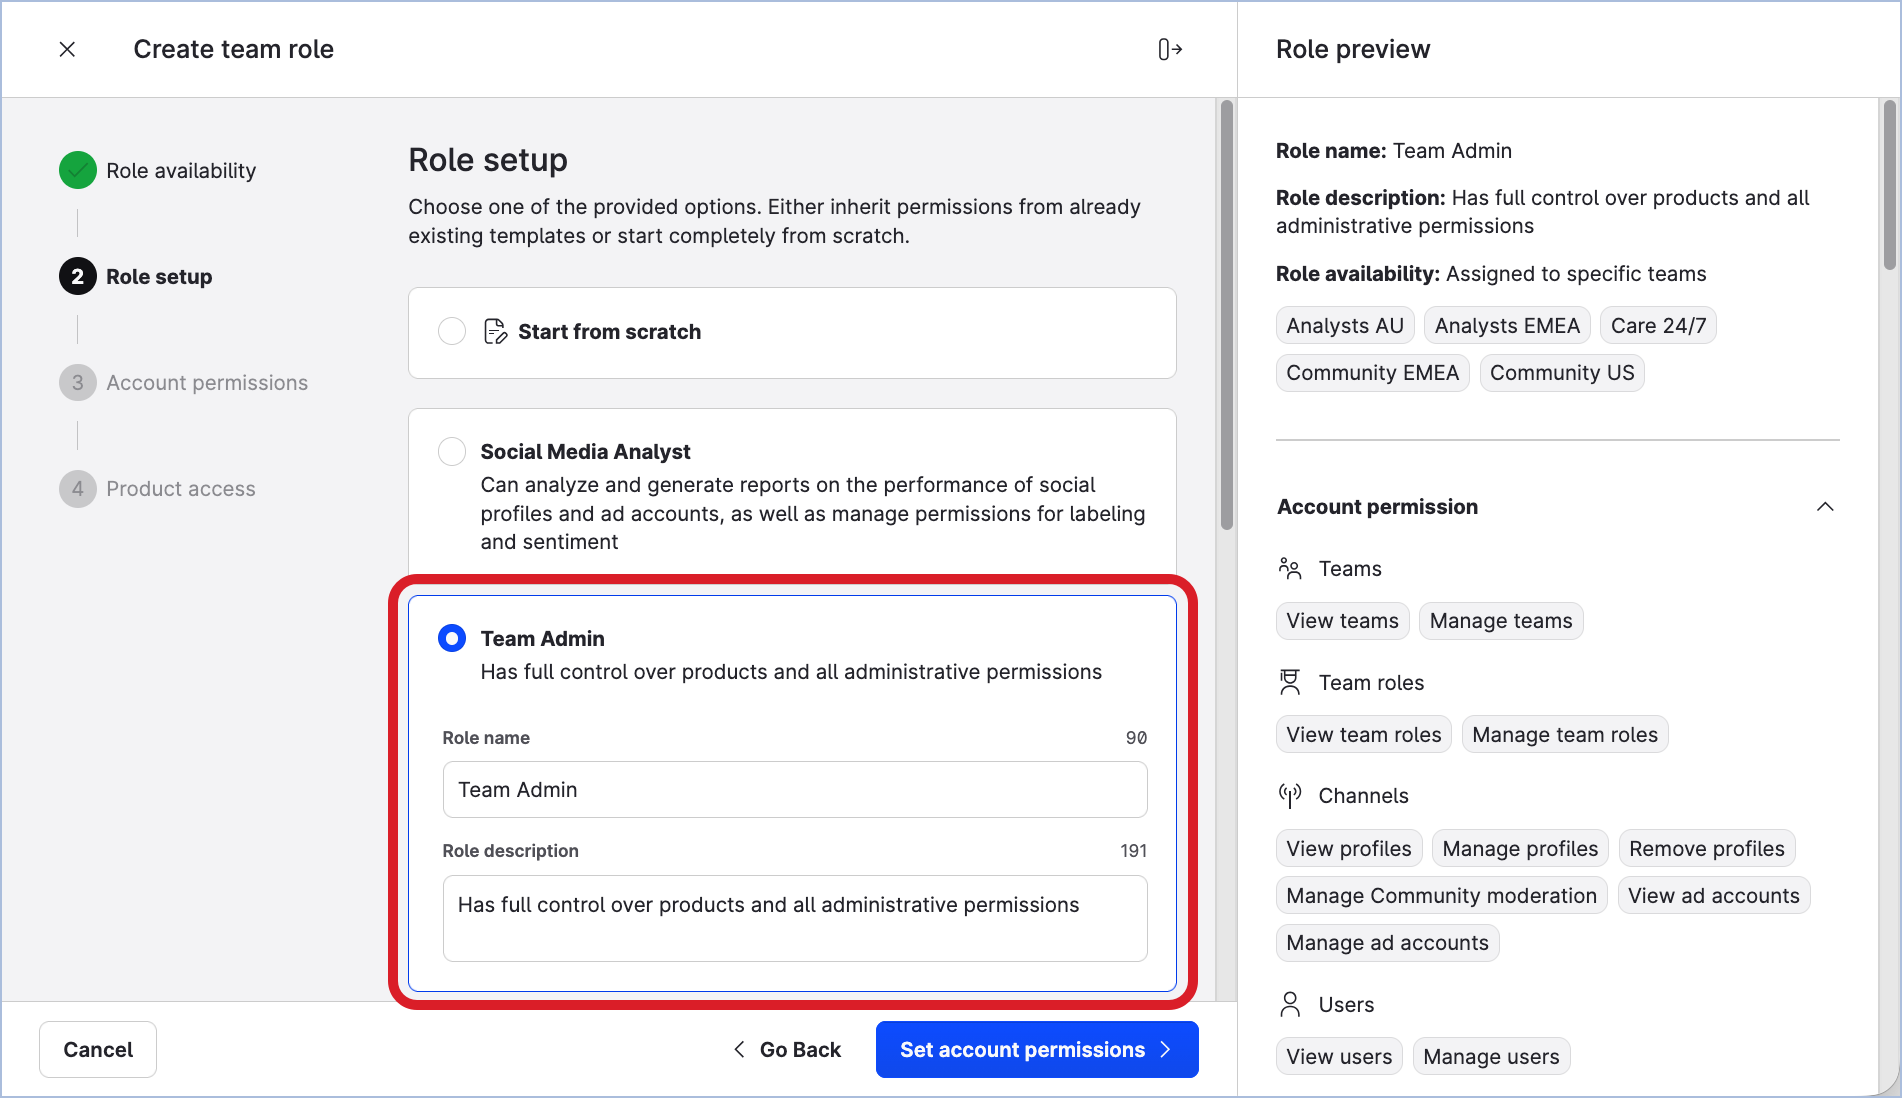
Notice the panel on the right: it is a preview of all the permissions that the team roles are going to have.
-
Click Set account permissions.
You are prompted to review the permissions. A “Team admin” team role has all the permissions granted by default.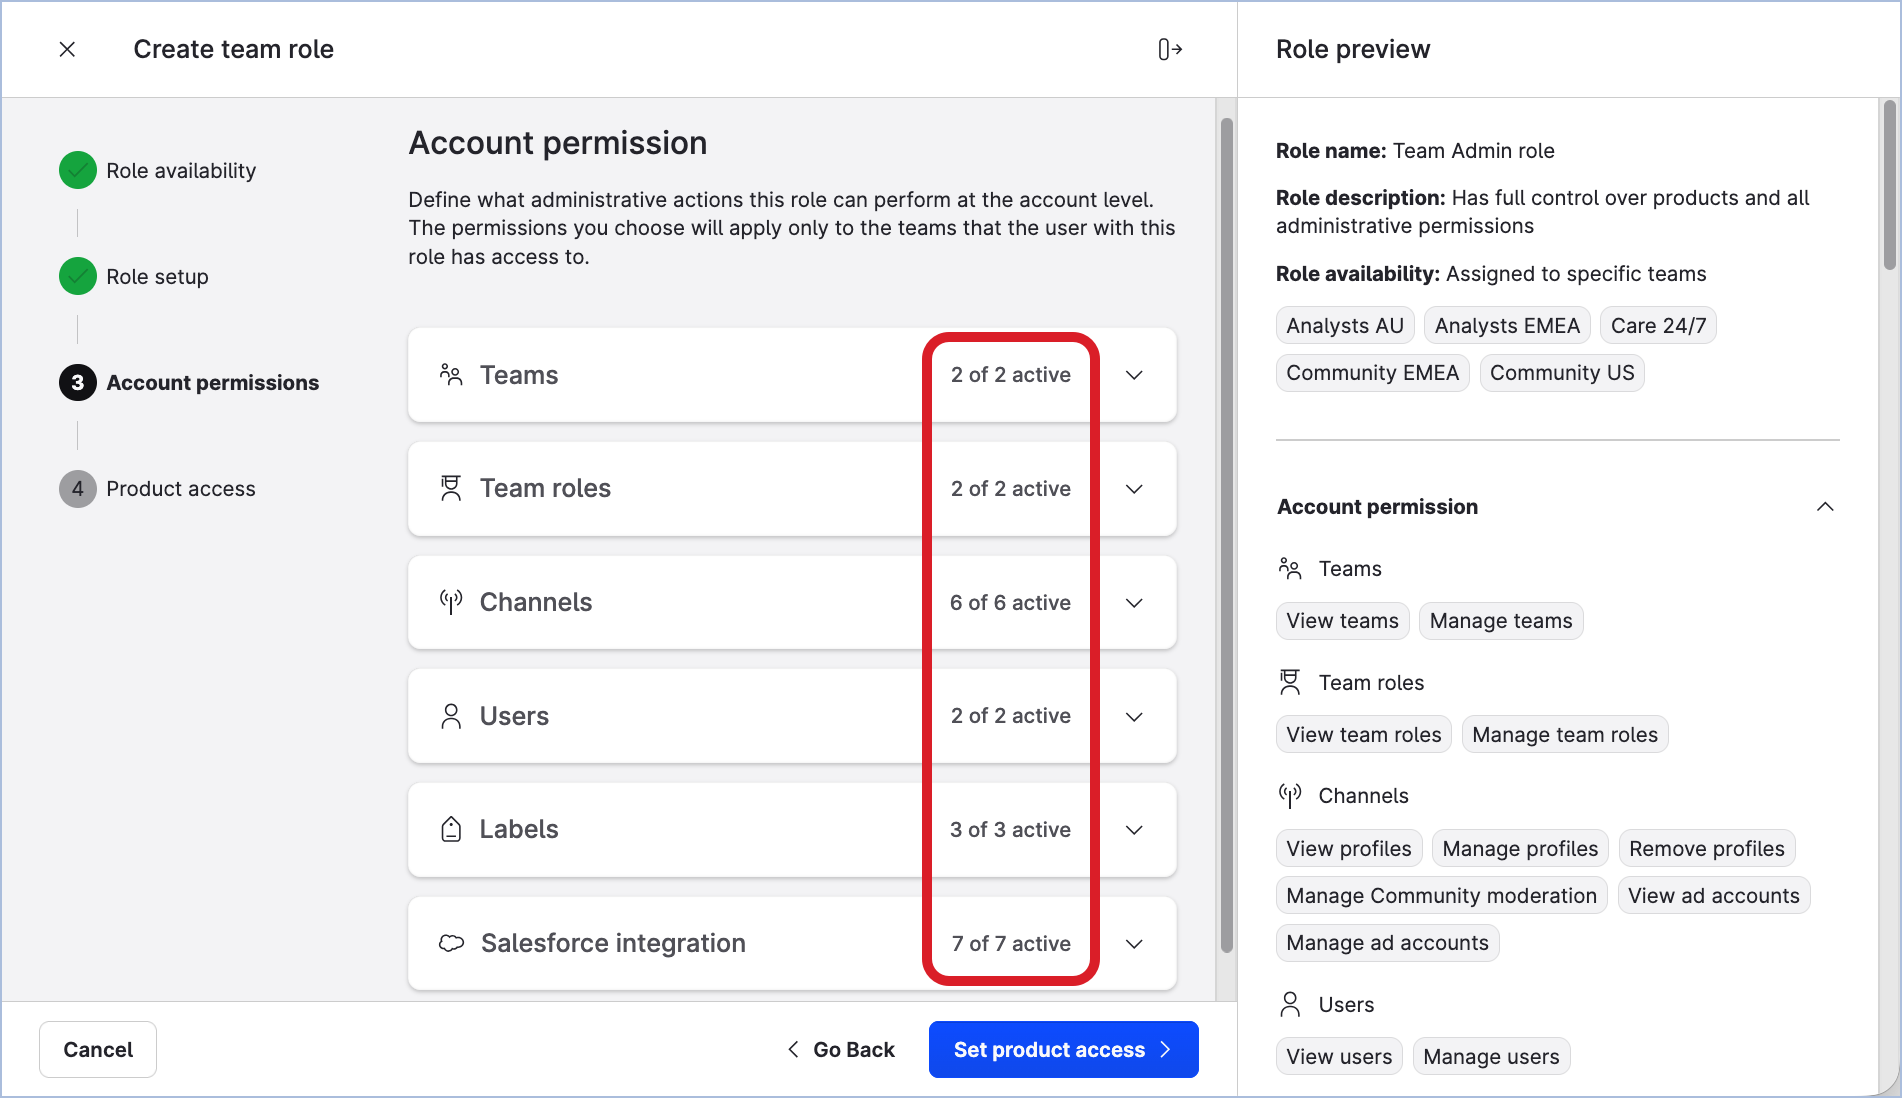
-
Expand each section and familiarize yourself with the individual permissions of the team role.
-
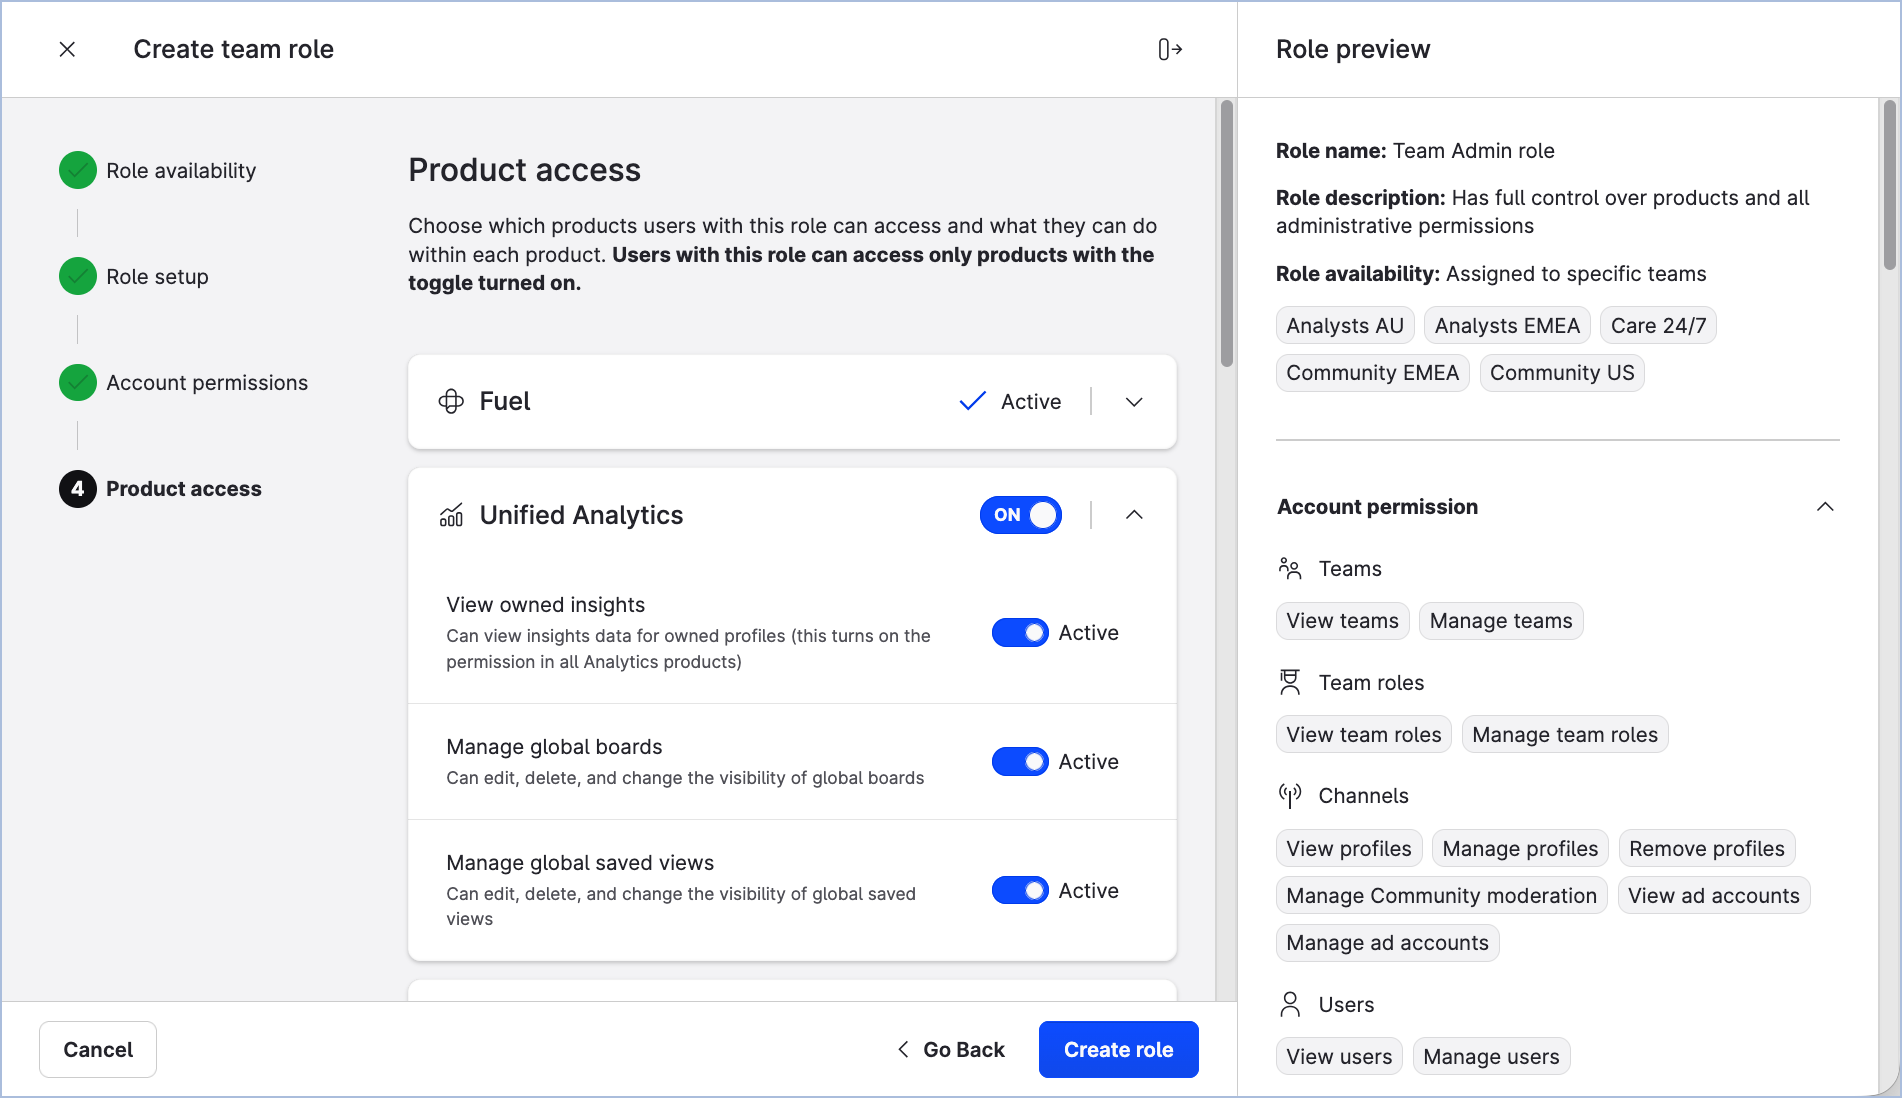
Once done, click Set product access.
You are prompted to review the modules of the Emplifi platform the team role allows access to and actions available in the modules. A “Team admin” team role has all the modules and actions enabled by default. -
Expand each section and familiarize yourself with the individual actions. Disable certain actions if needed.
-
Once done, click Create role.
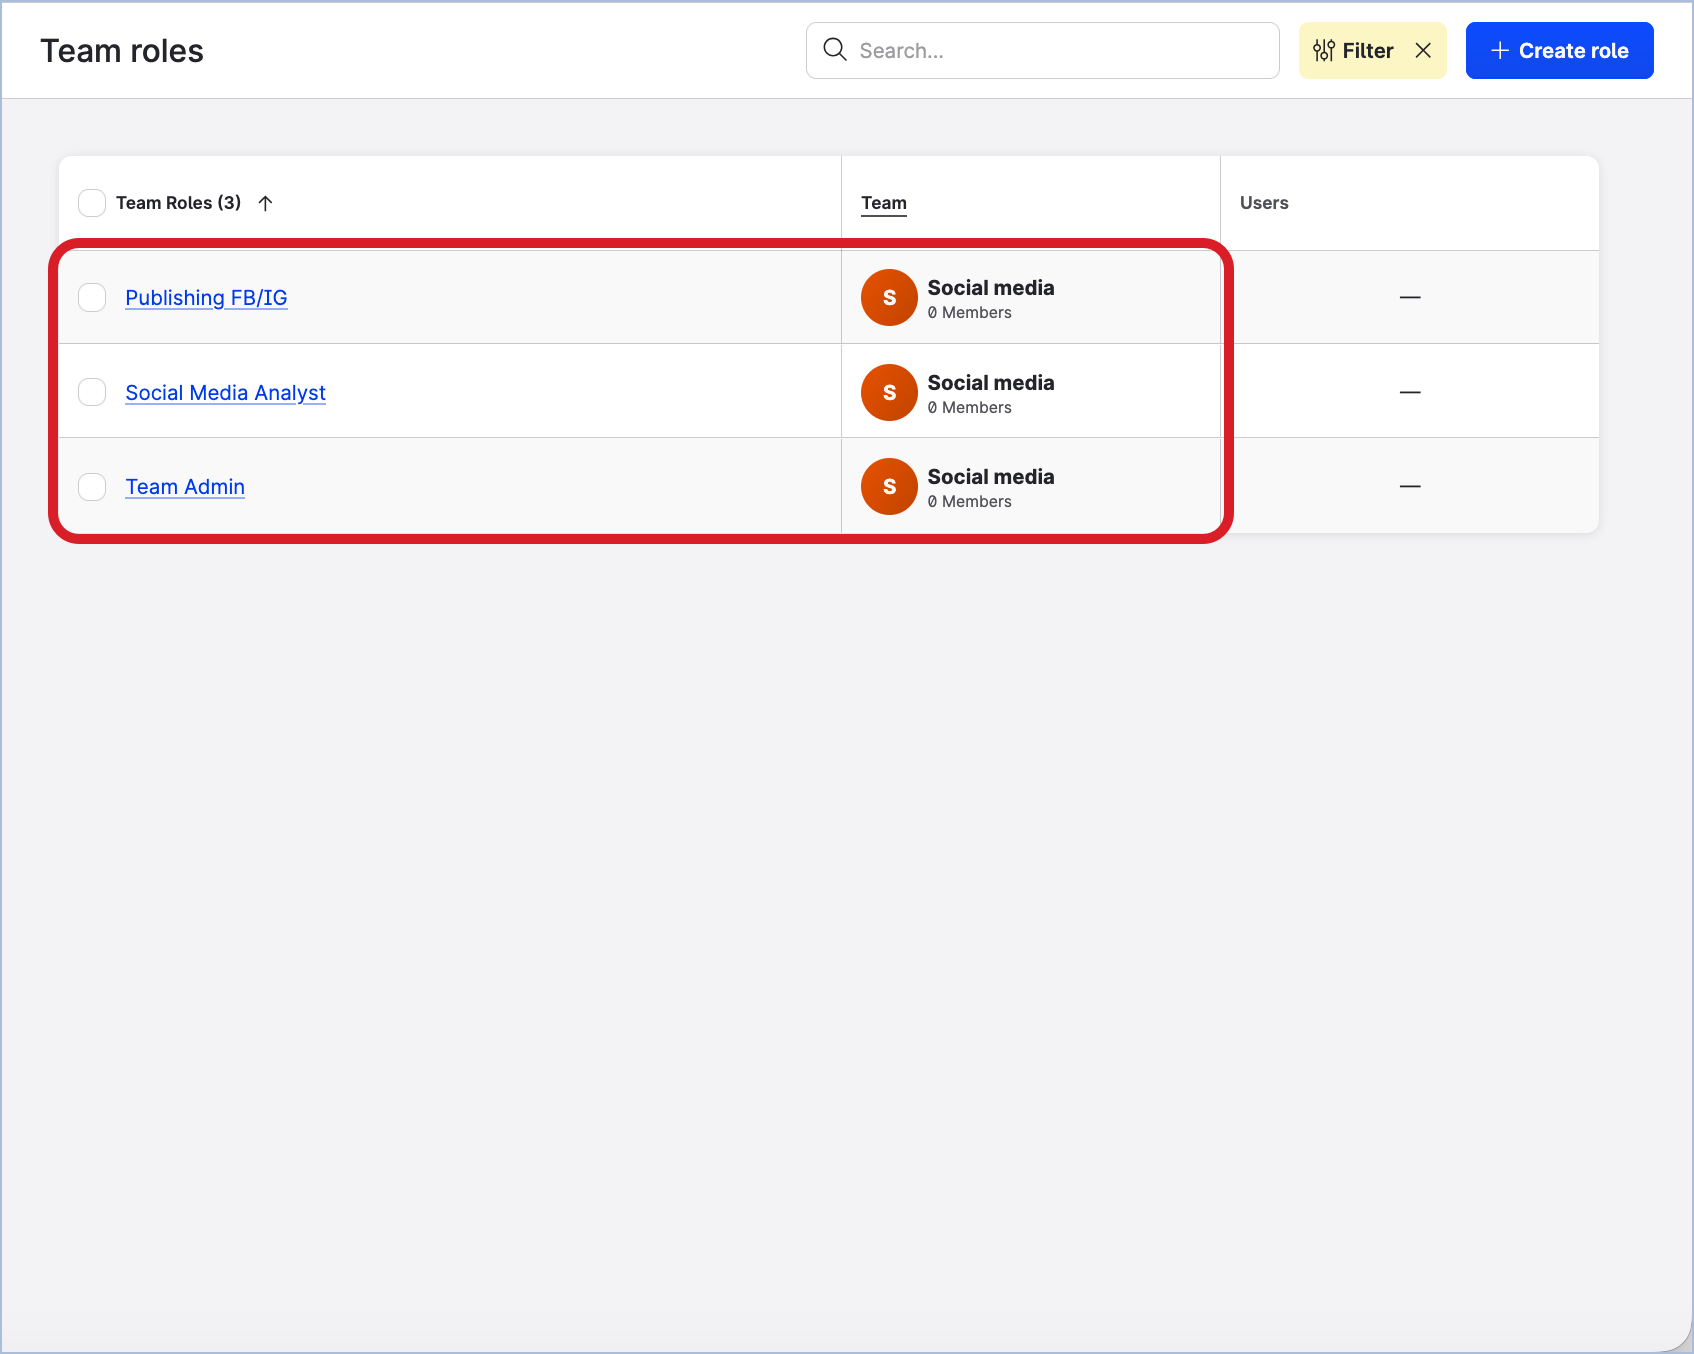
The team role panel closes. The “Team admin” team roles are created, one for each team that you selected.
The newly created team roles have the same name - “Team Admin”, but each of them belongs to its respective team.
Now that you have a “Team admin” team role for each of your teams, you can add a user with this team role to each team.
Add team admins to the teams
Steps:
-
Go to Settings → Team management → Teams.
-
Click one of your teams.
The team panel slides out.
-
Click the Users tab.
-
Click Assign users.
The dialog for adding users to the team opens. -
In the Team role dropdown, select the “Team Admin” team role.
You may notice that the dropdown displays two team roles: “Team User” that was created automatically together with the team, and “Team Admin” that you created previously. No other team roles appears in the dropdown. This is because each team role is team-specific, and only these two team roles are tied to this team. -
In the Users field, enter the email of the user.
-
Keep the checkbox Make invited users Platform Admins un-selected. The team admins should be added as platform users, not platform admins (for more information about the level of platform access, see Access to the Emplifi Platform).
At this point, the dialog should look similar to the following: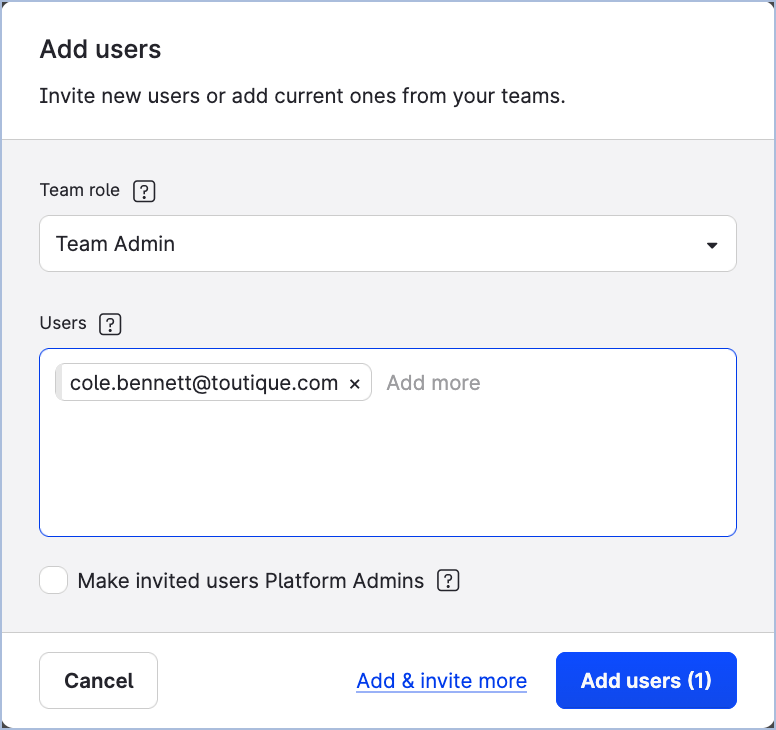
-
Click Add users.
-
The user is added to the team with the “Team Admin” team role assigned.
-
If a user with the specified email already exists in the Emplifi account, they are added to the team.
-
If a user with the specified email does not exist in the Emplifi account, an invitation to the Emplifi account is sent to the email address that you specified.
The user is added to the account with the status ofPendingand at the same time is added to the team.
Once the user accepts the invitation and logs in, the status ofPendingwill be cleared.
-
-
Close the team panel.
-
Repeat Steps 2-9 for each of your teams.
Each of your teams now has a dedicated team admin to whom you can delegate the team configuration and maintenance tasks.
Create other team roles
Now that each of your teams has a team admin, you can delegate the task of creating other team roles to the team admins. This is one of the permissions they can be granted and one of the responsibilities they can be given in the Emplifi account.
A team admin can create team role users only for the teams where they are team admins.
As a platform admin, you still can create other team roles yourself or ask the other platform admins to do so. Unlike team admins, platform admins can create team roles for any team in the Emplifi account.
How many other team roles you are going to create depends on how you decided to organize your teams (see “Decide what teams you need“ earlier in this article).
For one team, you may need to create only one team role. For the other team, you may need to create multiple team roles.
Steps:
-
Go to Settings → Team management → Team roles.
-
Click Create role.
The team role panel slides out.
You are prompted to choose whether to create a team-specific role or a team role template. -
Leave the Assign to specific teams option selected. Then, click the dropdown and select the team that you want to create the team role for.

-
Click Choose template.
You are prompted to choose whether to define role permissions manually from scratch or to use one of the system templates. -
Do one of the following:
-
If the team role that you want to create follows a common use case such as a Care agent or a social media analyst, select one the system role templates.
Notice the panel on the right: it is a preview of all the permissions that the team role is going to have based on what system role template you selected.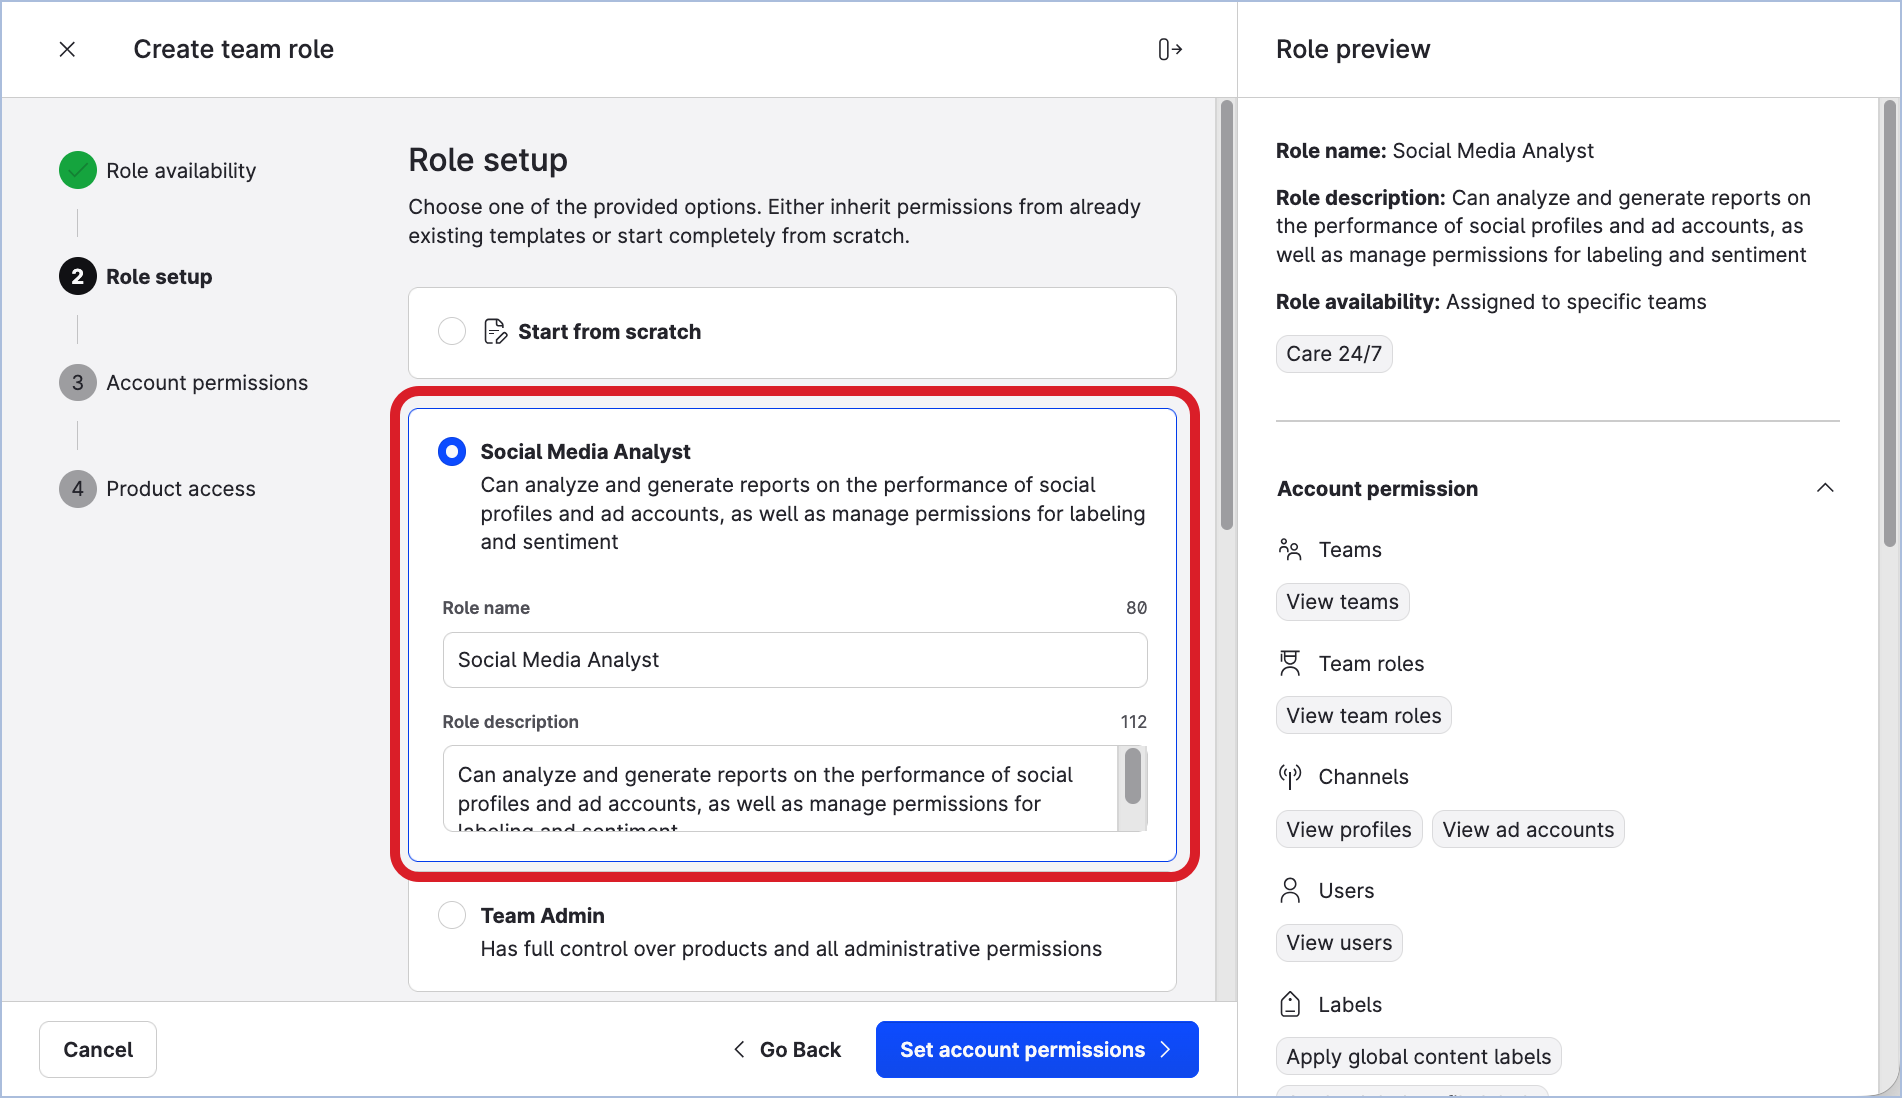
-
If none of the system templates fits the scope of the team role that you want to create, select Start from scratch and enter the name of the role.
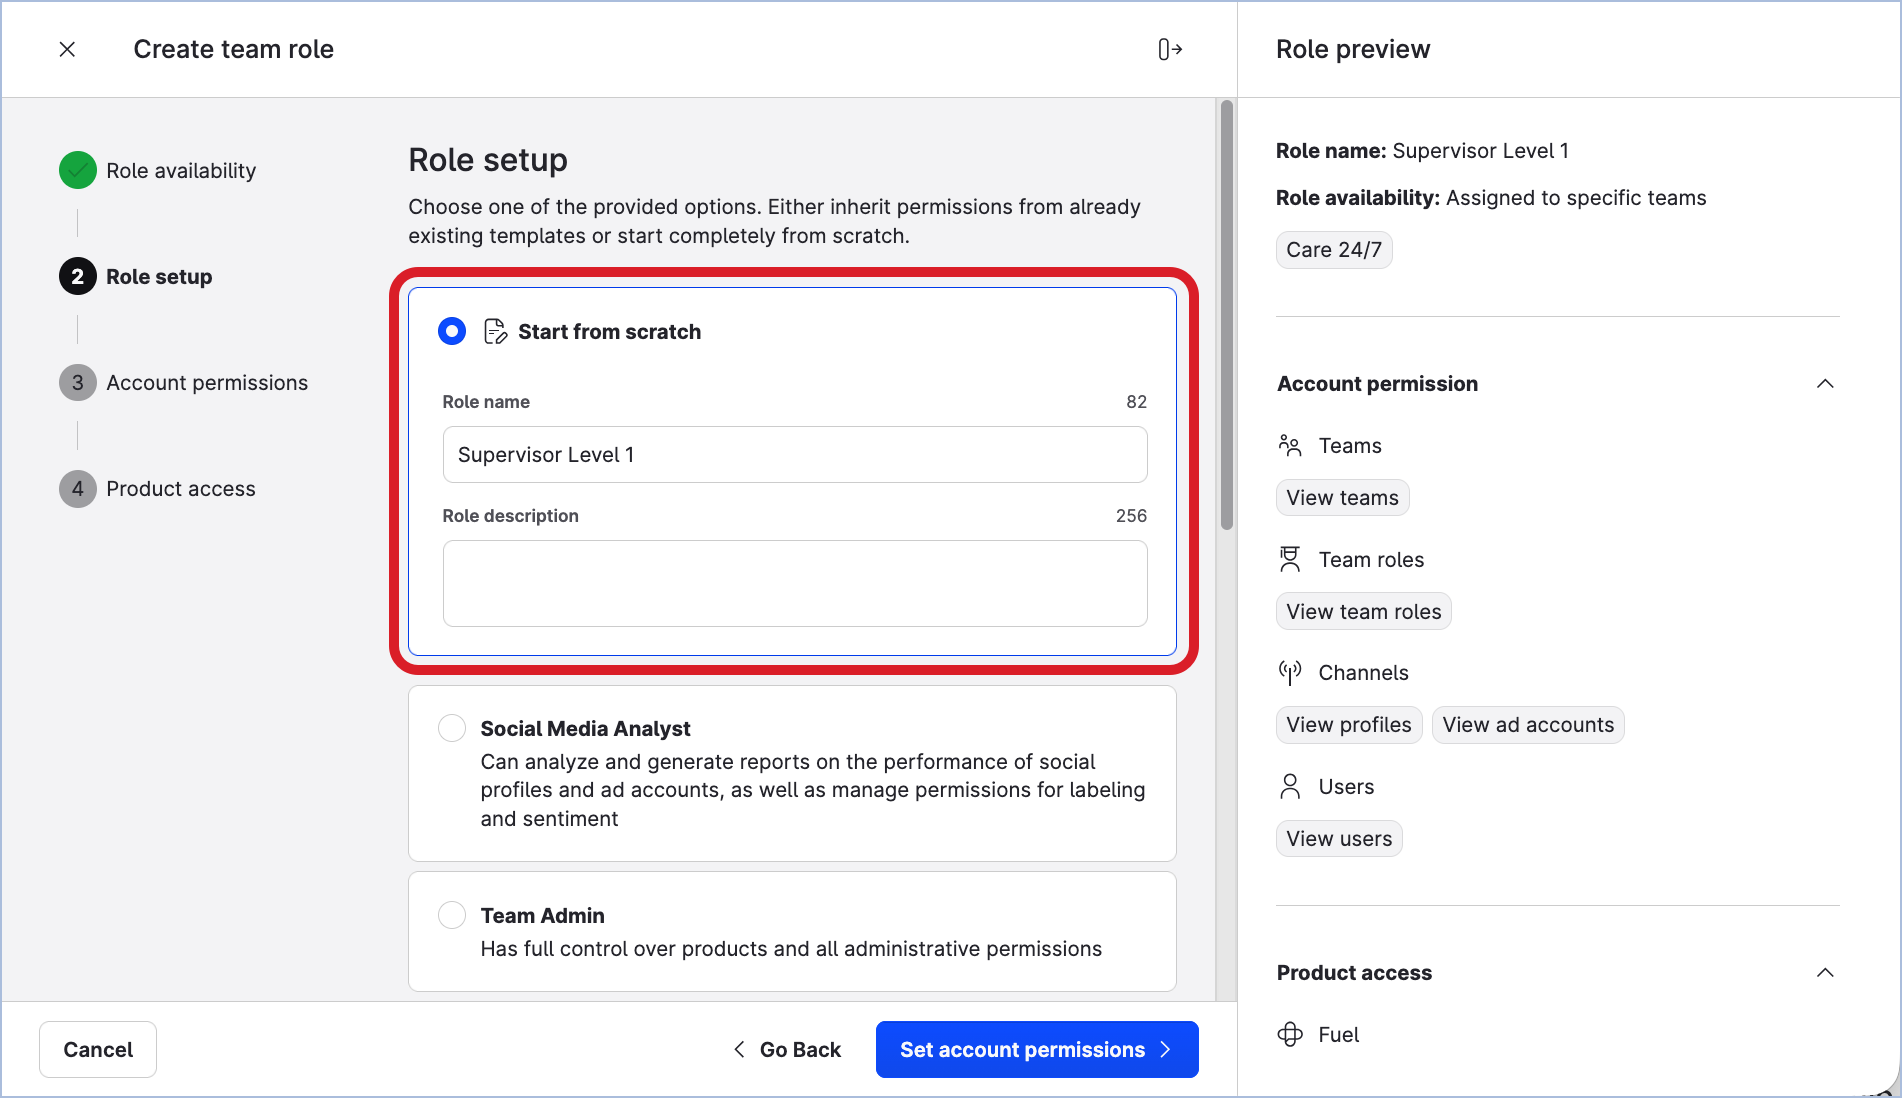
-
-
Click Set account permissions.
You are prompted to review the permissions. -
Expand each section and review the individual permissions of the team role. Enable and disable the permissions to customize the scope of the team role as needed.
Notice how the role preview panel on the right gets updated as you are changing the scope of the role. -
Once done, click Set product access.
You are prompted to review the modules of the Emplifi platform the team role allows access to and actions available in the modules. -
Expand each section and review the individual actions. Enable and disable the actions to customize the scope of the team role as needed.
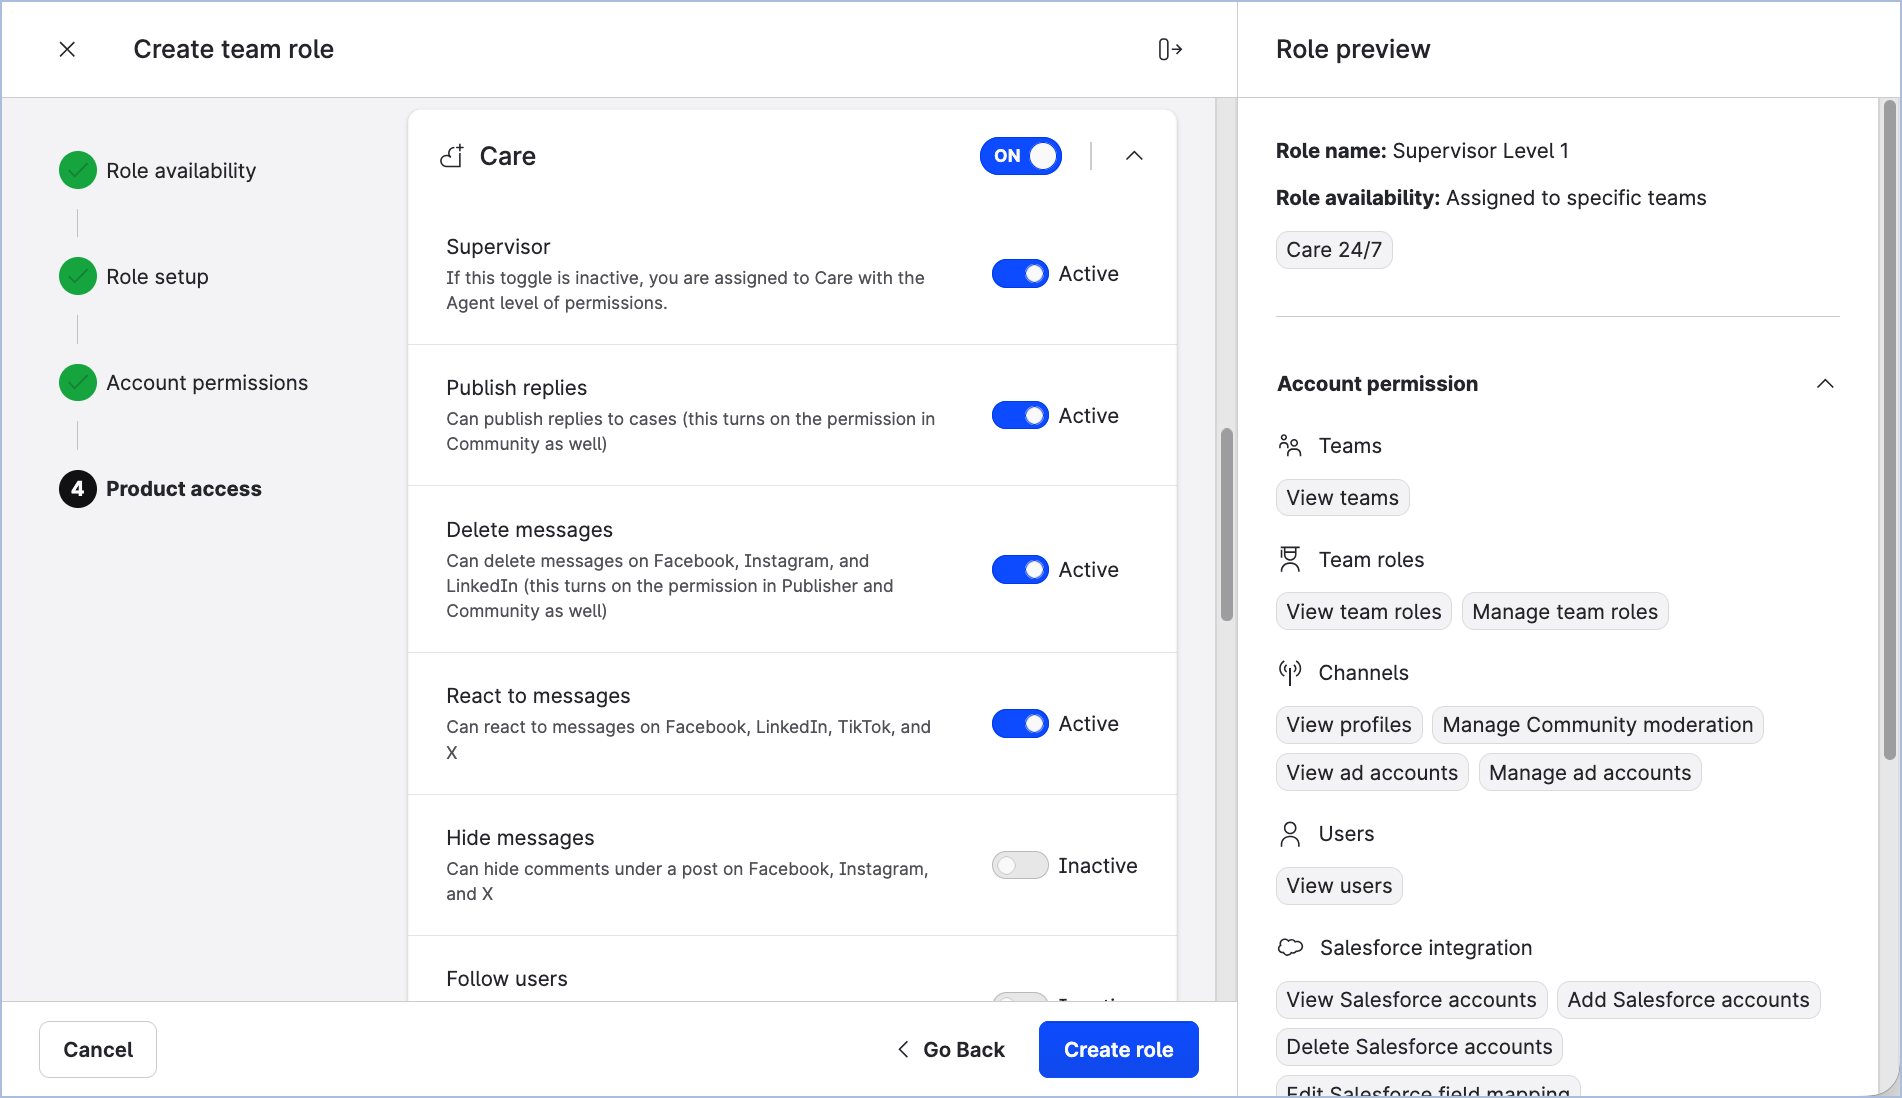
-
Once done, click Create role.
The team role panel closes. The team role is created and appears in the list of the team roles in the alphabetical order.
If you go to Settings → Team management → Teams and click the team that you created the team role for, you will see the team role listed on the Roles tab.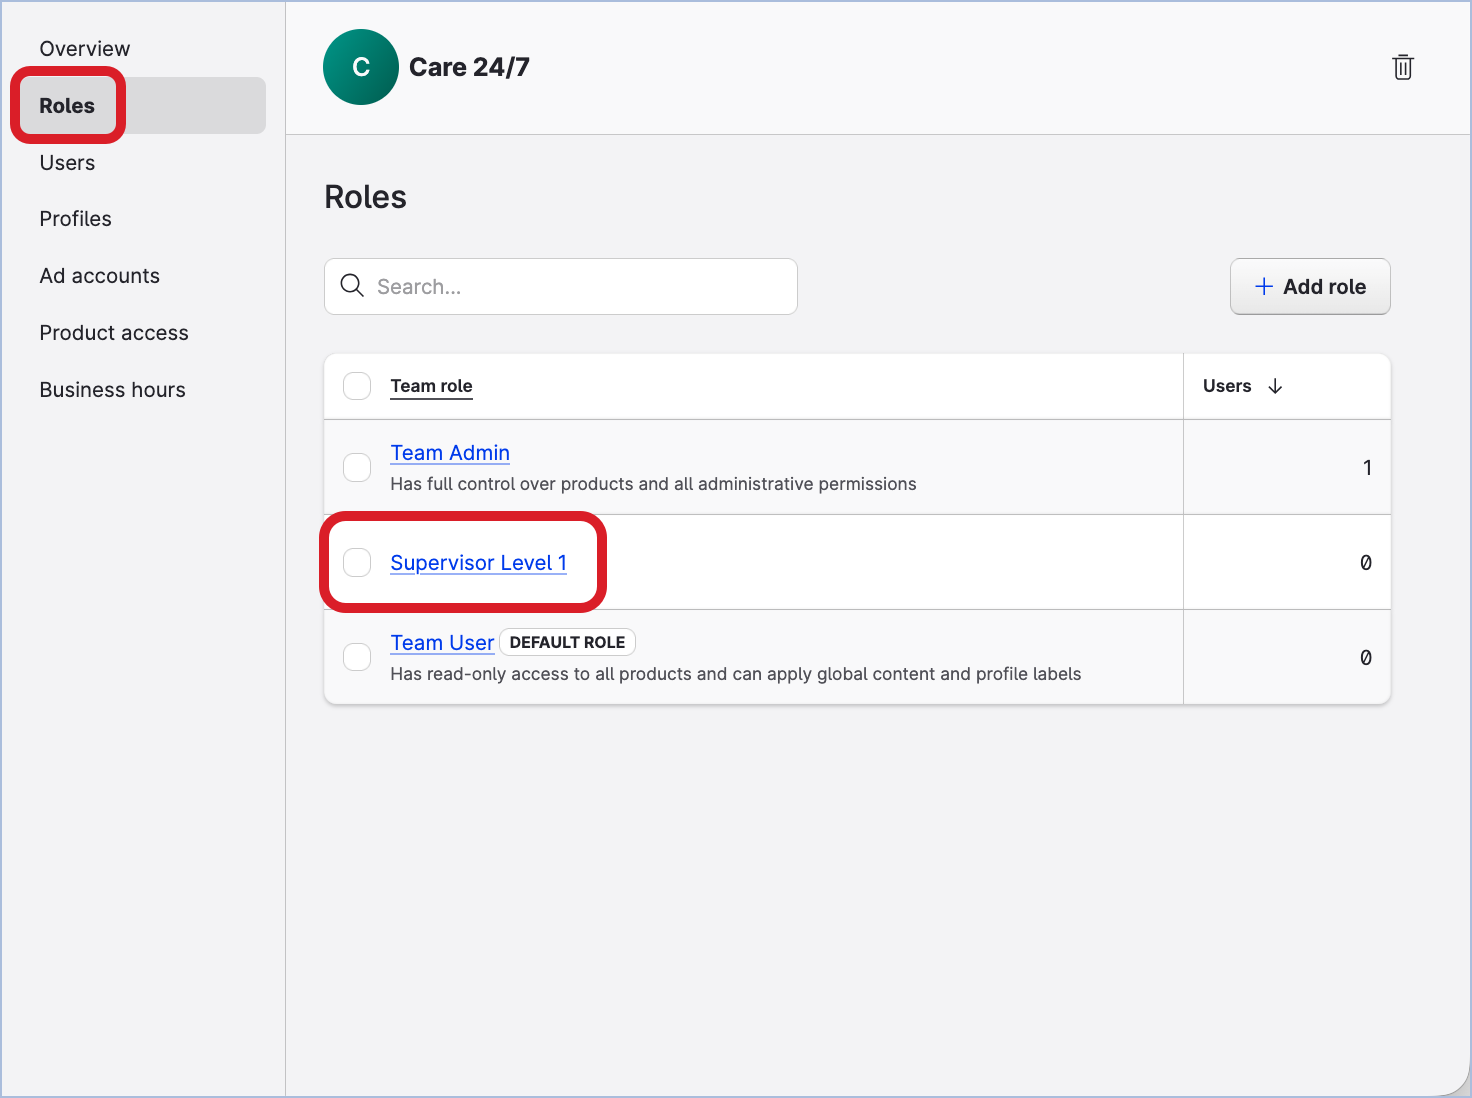
-
Repeat Steps 1-10 to create as many team roles as you need for your teams.
Now, you can add more users to your teams and assign them the team roles that you have just created.
Add users to the teams
Because all your teams have team admins, you can delegate the task of adding users to the teams to the team admins. This is one of the permissions they can be granted and one of the responsibilities they can be given in the Emplifi account.
A team admin can add users only to the teams where they are team admins.
As a platform admin, you still can add users to the teams yourself or ask the other platform admins to do so. Unlike team admins, platform admins can add users to any team in the Emplifi account.
Steps:
-
Go to Settings → Team management → Teams.
-
Click one of your teams.
The team panel slides out.
-
Click the Users tab.
-
Click Assign users.
The dialog for adding users to the team opens. -
In the Team role dropdown, select the team role that you want to assign to the users.
-
In the Users field, enter the emails of the users.
-
Keep the checkbox Make invited users Platform Admins un-selected. The users should be added as platform users, not platform admins (for more information about the level of platform access, see Access to the Emplifi Platform).
At this point, the dialog should look similar to the following: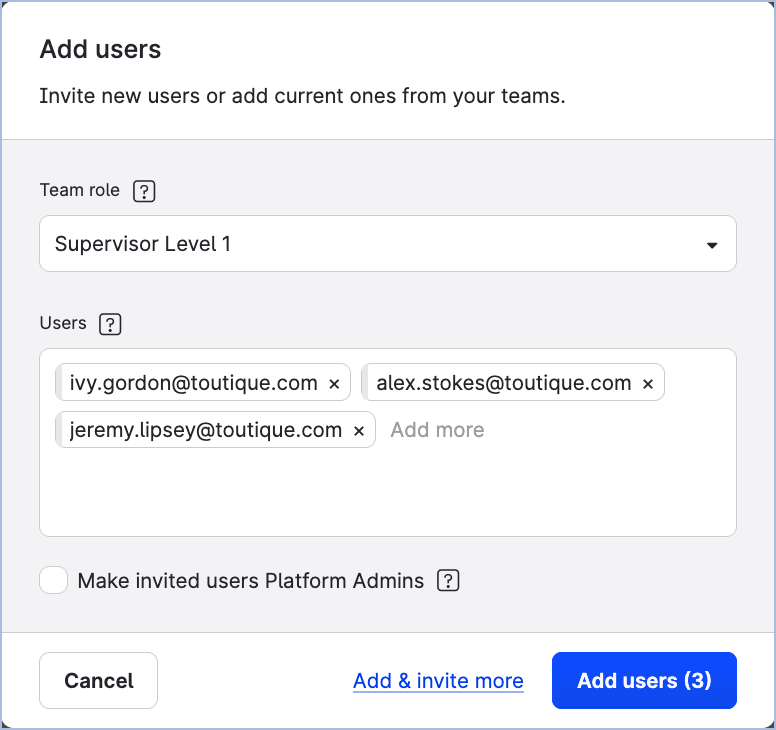
-
Click Add users.
Invitations to the Emplifi account are sent to the email addresses that you specified.
The users are added to the account with the status ofPendingand at the same time are added to the team.
Once the users accept the invitation and log in, the status ofPendingwill be cleared. -
Repeat Steps 1-8 for each of your teams.
You now have teams with the users added with their respective team roles. It is time to add resources to the teams.
Add resources to the teams
Once you add a resource (a profile or an ad account) to a team, the users in the team are immediately granted access to the resource. The level of access depends on the team role of each user.
Choose your way of adding resources to a team
There are two ways of adding a resource to a team:
-
Specifying the team when adding a resource to the Emplifi account
When adding a resource to the Emplifi account, you have to specify what team to add the resource to.
Even if you have not yet created any team of your own, there is always a default team in your Emplifi account, and you add the resource to it (for more information, see “Default team” earlier in this article).
-
For more information about adding profiles to the Emplifi account, see Connecting and Managing Profiles.
-
To add an owned profile, choose the platform (Facebook, Instagram, Google Business, and so on), and then review the article about adding a profile for this platform. For example, if you want to add an Instagram profile, see Add an Owned Profile for Your Instagram Account.
-
To add a public profile, see Add a Profile as Owned (Private) or Public.
-
-
For more information about adding ad accounts, see Connecting and Managing Ad Accounts.
Choose the platform (Facebook, Instagram, TikTok, and so on), and then review the article about adding an ad account for this platform. For example, if you want to add an TikTok ad account, see Add a TikTok Ad Account.
-
-
Adding a resource that already exists in the Emplifi account
If you already have resources in your Emplifi account (you or another platform admin have added them to the Emplifi account and specified a certain team to add them during the adding process), you can add these resources to the other teams.
Different profile connections in different teams
When adding an owned profile to a team, you can choose what profile connection you want to allow the users in the team to utilize. For more information about profile connections, see Check and Establish Connections of Owned Profiles.
For example, you can add a profile to one team and allow the team members to use its Publishing connection because they are going to be publishing content on social media. You can add the same profile to a different team and allow the Insights connection there because the team members will need to analyze and report on private insight data from this profile.
You even have the option to not allow any profile connection, and the team members will be working with this profile as if it was public.
Choose who will be adding resources to teams
You can delegate the task of adding resources to the team to the team admins. This is one of the permissions they can be granted and one of the responsibilities they can be given in the Emplifi account.
A team admin can add resources only to the teams where they are team admins.
As a platform admin, you still can add resources to the teams yourself or ask the other platform admins to do so. Unlike team admins, platform admins can add resources to any team in the Emplifi account.
To add a profile to a team, follow these steps:
-
Go to Settings → Team management → Teams.
-
Click one of your teams.
The team panel slides out.
-
Click the Profiles tab.
-
Click Add profile.
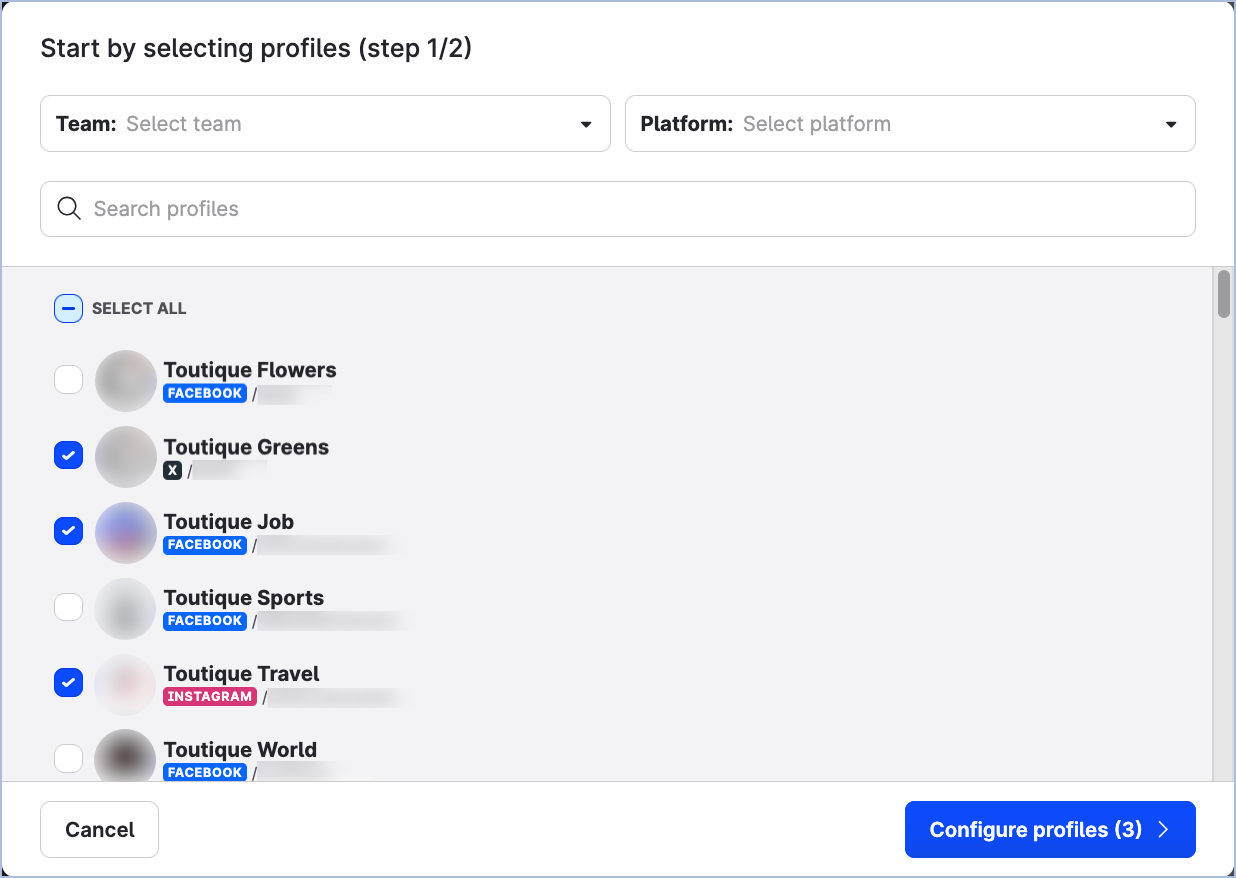
The dialog for adding profiles to the team opens. You can see all the profiles that exist in your Emplifi account. Both owned and public profiles are listed. -
Select the profiles that you want to add to the team, and click Configure profiles.
You are prompted to choose the profile connections you want to allow the users in the team to utilize.
-
For each profile, select the connections that the team members will be able to use.

-
To add an owned profile as public, do not select any connection for the profile.
-
You cannot select any connection for public profiles.
-
-
Click Complete configuration.
The profiles are added to the team.
The users in the team are granted access to the profiles according to their team roles.
To add an ad account to a team, follow these steps:
-
Go to Settings → Team management → Teams.
-
Click one of your teams.
The team panel slides out.
-
Click the Ad accounts tab.
-
Click Add account.
The dialog for adding ad accounts to the team opens. You can see all the ad accounts that exist in your Emplifi account. -
Select the ad accounts that you want to add to the team, and click Add accounts.
The ad accounts are added to the team.
The users in the team are granted access to the ad accounts according to their team roles.
(Optional) Assign business hours to the teams
If a team groups users and profiles for work in Community and Care and you want to consider business hours in calculating the response time, assign business hours to the team.
For more information about business hours and how to assign them to a team, see Set Up Business Hours for a Profile or a User.