Summary: This article explains what happens when your account is in the Teams migration preview state and what admins can configure before Teams becomes the active governance solution.
This article applies only to customers who are migrating to Teams.
If you have any questions, contact your Customer Success Manager or Emplifi Support at support@emplifi.io.
What does migration to Teams mean
Migrating to Teams means that your account will move from the legacy governance system to the Teams governance solution (see Govern Access to Account Resources Using Teams).
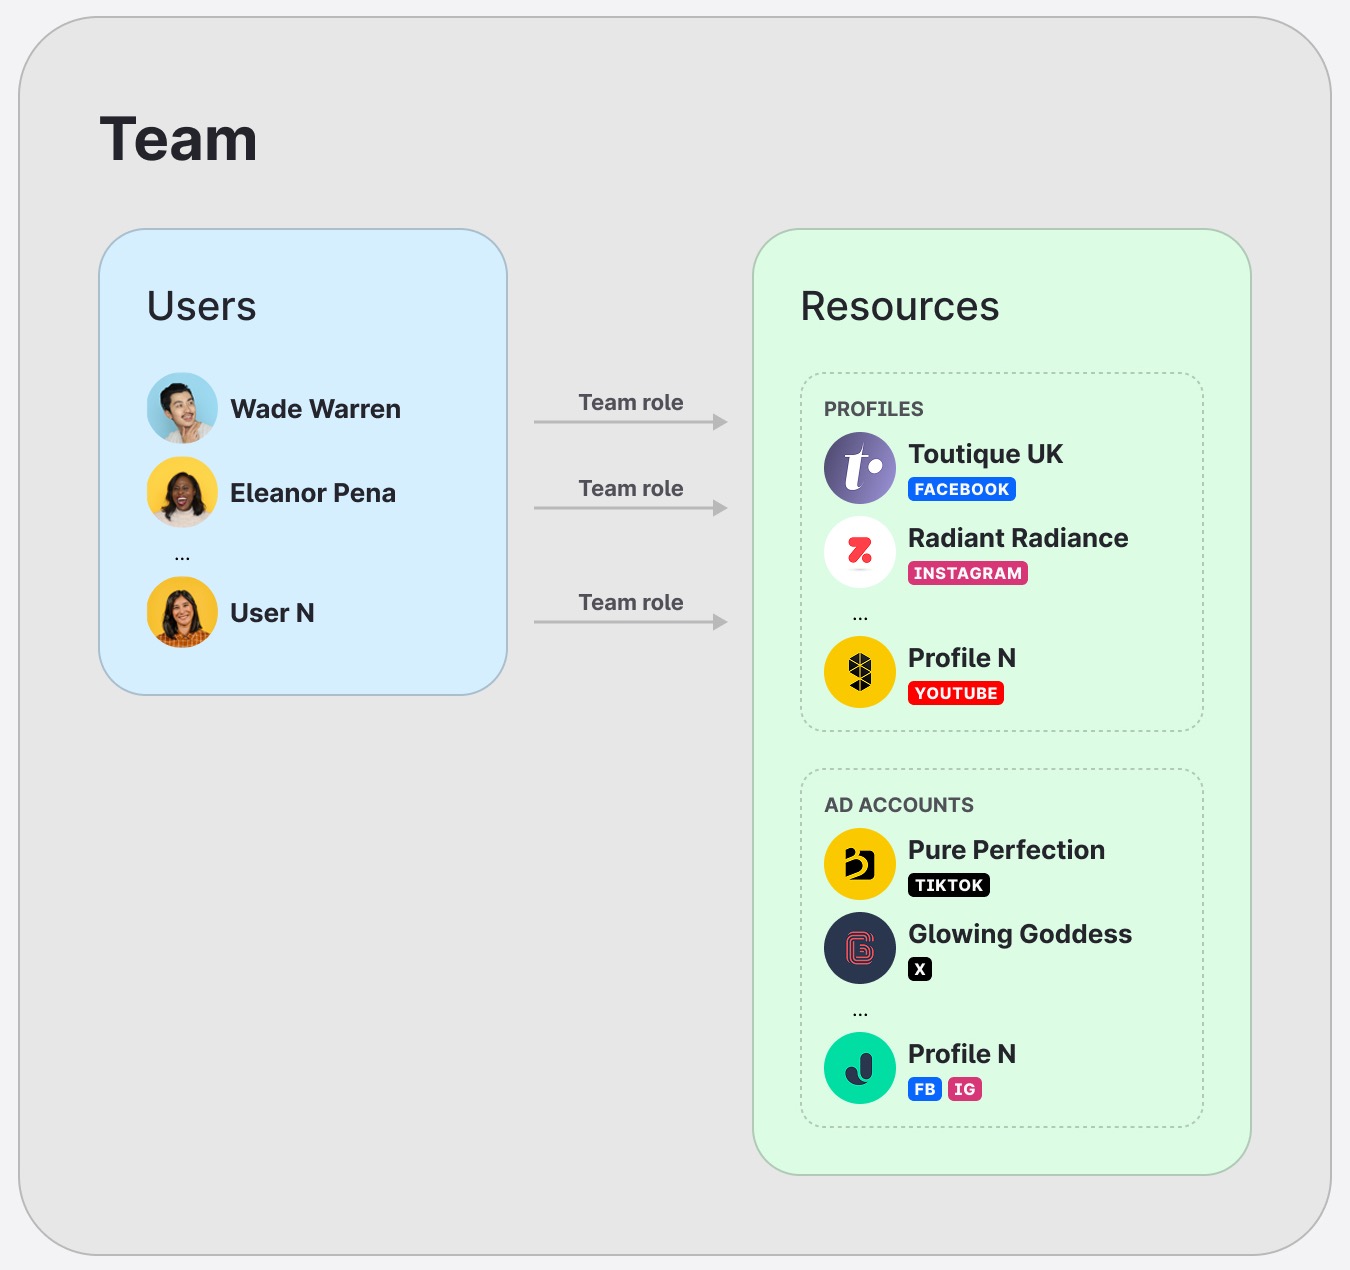
In the legacy system, access is managed through account roles, profile roles, and user groups. After migration, access is managed through teams, product access, team roles, users assigned to teams, and resources assigned to teams.
Teams becomes the main way to define who has access to what in your account. This makes it easier to manage access across users, teams, brands, regions, departments, or other parts of your organization.
The migration itself is handled by Emplifi. You do not need to start, run, or complete the migration manually in the platform.
Your responsibility during the preview state is to prepare and review your Teams configuration. When the configuration is ready, confirm with your Customer Success Manager that your account is ready to migrate. After your confirmation, Emplifi completes the migration on your behalf.
No disruption to your regular workflows is expected during the migration. The migration is completed by Emplifi, and no action is required from you to perform the migration itself.
What is the preview state
The preview state gives admins time to prepare their Teams configuration before Teams becomes active in the account.
During this period, admins can set up the future team-based governance structure without changing the existing account setup or interrupting regular workflows.
Changes made in Team management during the preview state do not affect current user access, permissions, visibility, or workflows until the account is migrated.
Until the migration is completed, the legacy governance system remains the active system for access and permissions (see User Roles and Permissions).
Governance systems available during the preview state
During the preview state, admins can see both governance systems:
|
Governance system |
Status during the preview state |
|
Legacy governance system |
Active. Account roles, profile roles, and user groups continue to control access in the account. |
|
Team management |
Available for preparation. Admins can configure the future Teams setup, but it does not affect the active account setup yet. |
What continues to work during the preview state
Until your account is migrated, the legacy governance system continues to work as before.
This means that admins can continue to view and manage the existing configuration, including:
-
account roles (see Account Roles)
-
profile roles (see Profile Roles)
-
user groups (see Organize Users into User Groups)
Regular workflows that depend on the existing governance setup continue to work as before until the migration is completed.
What admins can prepare in Team management
During the preview state, admins can use Team management to prepare the Teams configuration that should take effect after migration (see Update and Maintain Teams).
Admins can prepare the following:
-
create teams
-
define product access for teams
-
define collaboration between teams
-
create team roles
-
assign users to teams and team roles
-
assign profiles to teams and define profile access
The configuration created in Team management is saved as the future Teams setup. It does not affect the current account setup until the account is migrated.
What happens when the account is migrated
When the account is migrated, Teams becomes the active governance solution.
At that point, the Teams configuration prepared during the preview state takes effect. Access is then managed through teams, product access, team roles, users assigned to teams, and profiles assigned to teams.
Need help? If you have questions about your migration or need help preparing your Teams configuration, contact your Customer Success Manager or Emplifi Support at support@emplifi.io.
Prepare your Teams configuration during the preview state
To prepare your Teams configuration during the preview state, complete the following steps:
-
Decide what teams you need
-
Create teams
-
Create team roles for team admins
-
Add team admins to the teams
-
Create other team roles
-
Add users to the teams
-
Add resources to the teams
-
Update feature-specific configurations
-
Review your Teams configuration
-
Confirm readiness with your Customer Success Manager
Decide what teams you need
Analyze your business requirements and decide what your teams should look like. Your existing access structure — user groups, profile roles, and account roles — is a useful starting point for this decision.
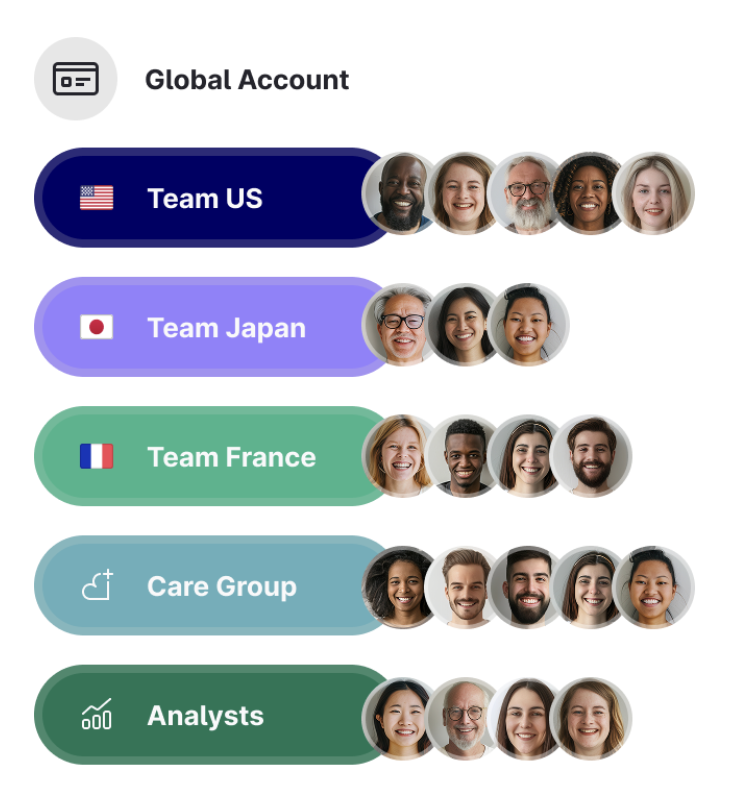
How you organize teams depends on your business needs and practices. You may want to create teams for different regions (EMEA, APAC, LATAM, and so on), different departments (Marketing, Care, Support, and so on), owned brands of your group, external agencies you may be working with, or a combination of all of the above — or any other team structure that fits your organization.
The following questions may help you make this decision:
-
How many teams do you need?
The maximum number of teams that you can create depends on your plan. If you need more teams than your plan allows, contact your Customer Success Manager or Emplifi Support at support@emplifi.io.
-
For each team:
-
Access to what modules within the Emplifi account should this team allow? What modules (for example, Publisher, Community, Unified Analytics, and so on) should the users of this team be able to access and use to work with the team resources?
-
What resources should be added to the team? What profiles and ad accounts should the users in the team be able to access and work with?
-
What users should be added to the team? Who should have access and work with the team resources and the resource data?
-
What team role should each user have? What can and cannot each user in the team do with the team resources and their data (view social media content, create and publish content on social media, post public replies, and so on)?
-
Does this team need business hours assigned? If the team groups users and profiles for work in Community and Care, do you want to assign business hours to define when users are expected to interact with customers?
Changes made in Team management during the preview state do not affect current user access, permissions, visibility, or workflows. You can iterate on the Teams configuration freely before the migration is completed.
Collaboration mode
As part of planning your teams, decide whether your account should operate in Collaborative or Restrictive mode. This setting controls how users interact with people outside their own team and affects all teams in the account.
Collaborative account — Users can see and interact with members of other teams in shared contexts, such as assigning work, mentioning users, or sharing content. They can do this while still only accessing the resources explicitly assigned to their own teams. This mode is ideal for organizations that require cross-team visibility and coordination.
Restrictive account — Users can only see and interact with members of their own team in collaborative workflows. This provides a more isolated environment and reinforces stricter boundaries between teams. This mode is suitable for organizations that require stronger separation between teams, such as those working with external agencies or managing multiple independent brands.
In restrictive accounts, Platform Admins can also manage collaboration at the team level — explicitly enabling it between selected teams after migration. See Update and Maintain Teams | Manage collaboration between teamsfor details.
Regardless of the selected mode, access to resources (such as profiles or configurations) is always controlled by team assignment. Visibility of people does not imply access to their resources.
Accounts operate in Collaborative mode by default. If you need Restrictive mode, make this decision before migration: Restrictive mode requires account configuration before migration and may also require additional feature-specific configuration updates (see In Restrictive accounts only).
To request Restrictive mode, contact your Customer Success Manager or Emplifi Support at support@emplifi.io.
Create teams
Create the teams you decided on previously. Each team defines a scope of access: which Emplifi modules its members can use, and which resources they can work with. As you create your teams, consider how your team structure maps to product access — teams with different workflows or responsibilities will likely need different combinations of modules enabled.
The maximum number of teams that you can create depends on your plan. If you need more teams than your plan allows, contact your Customer Success Manager or Emplifi Support at support@emplifi.io.
Steps:
-
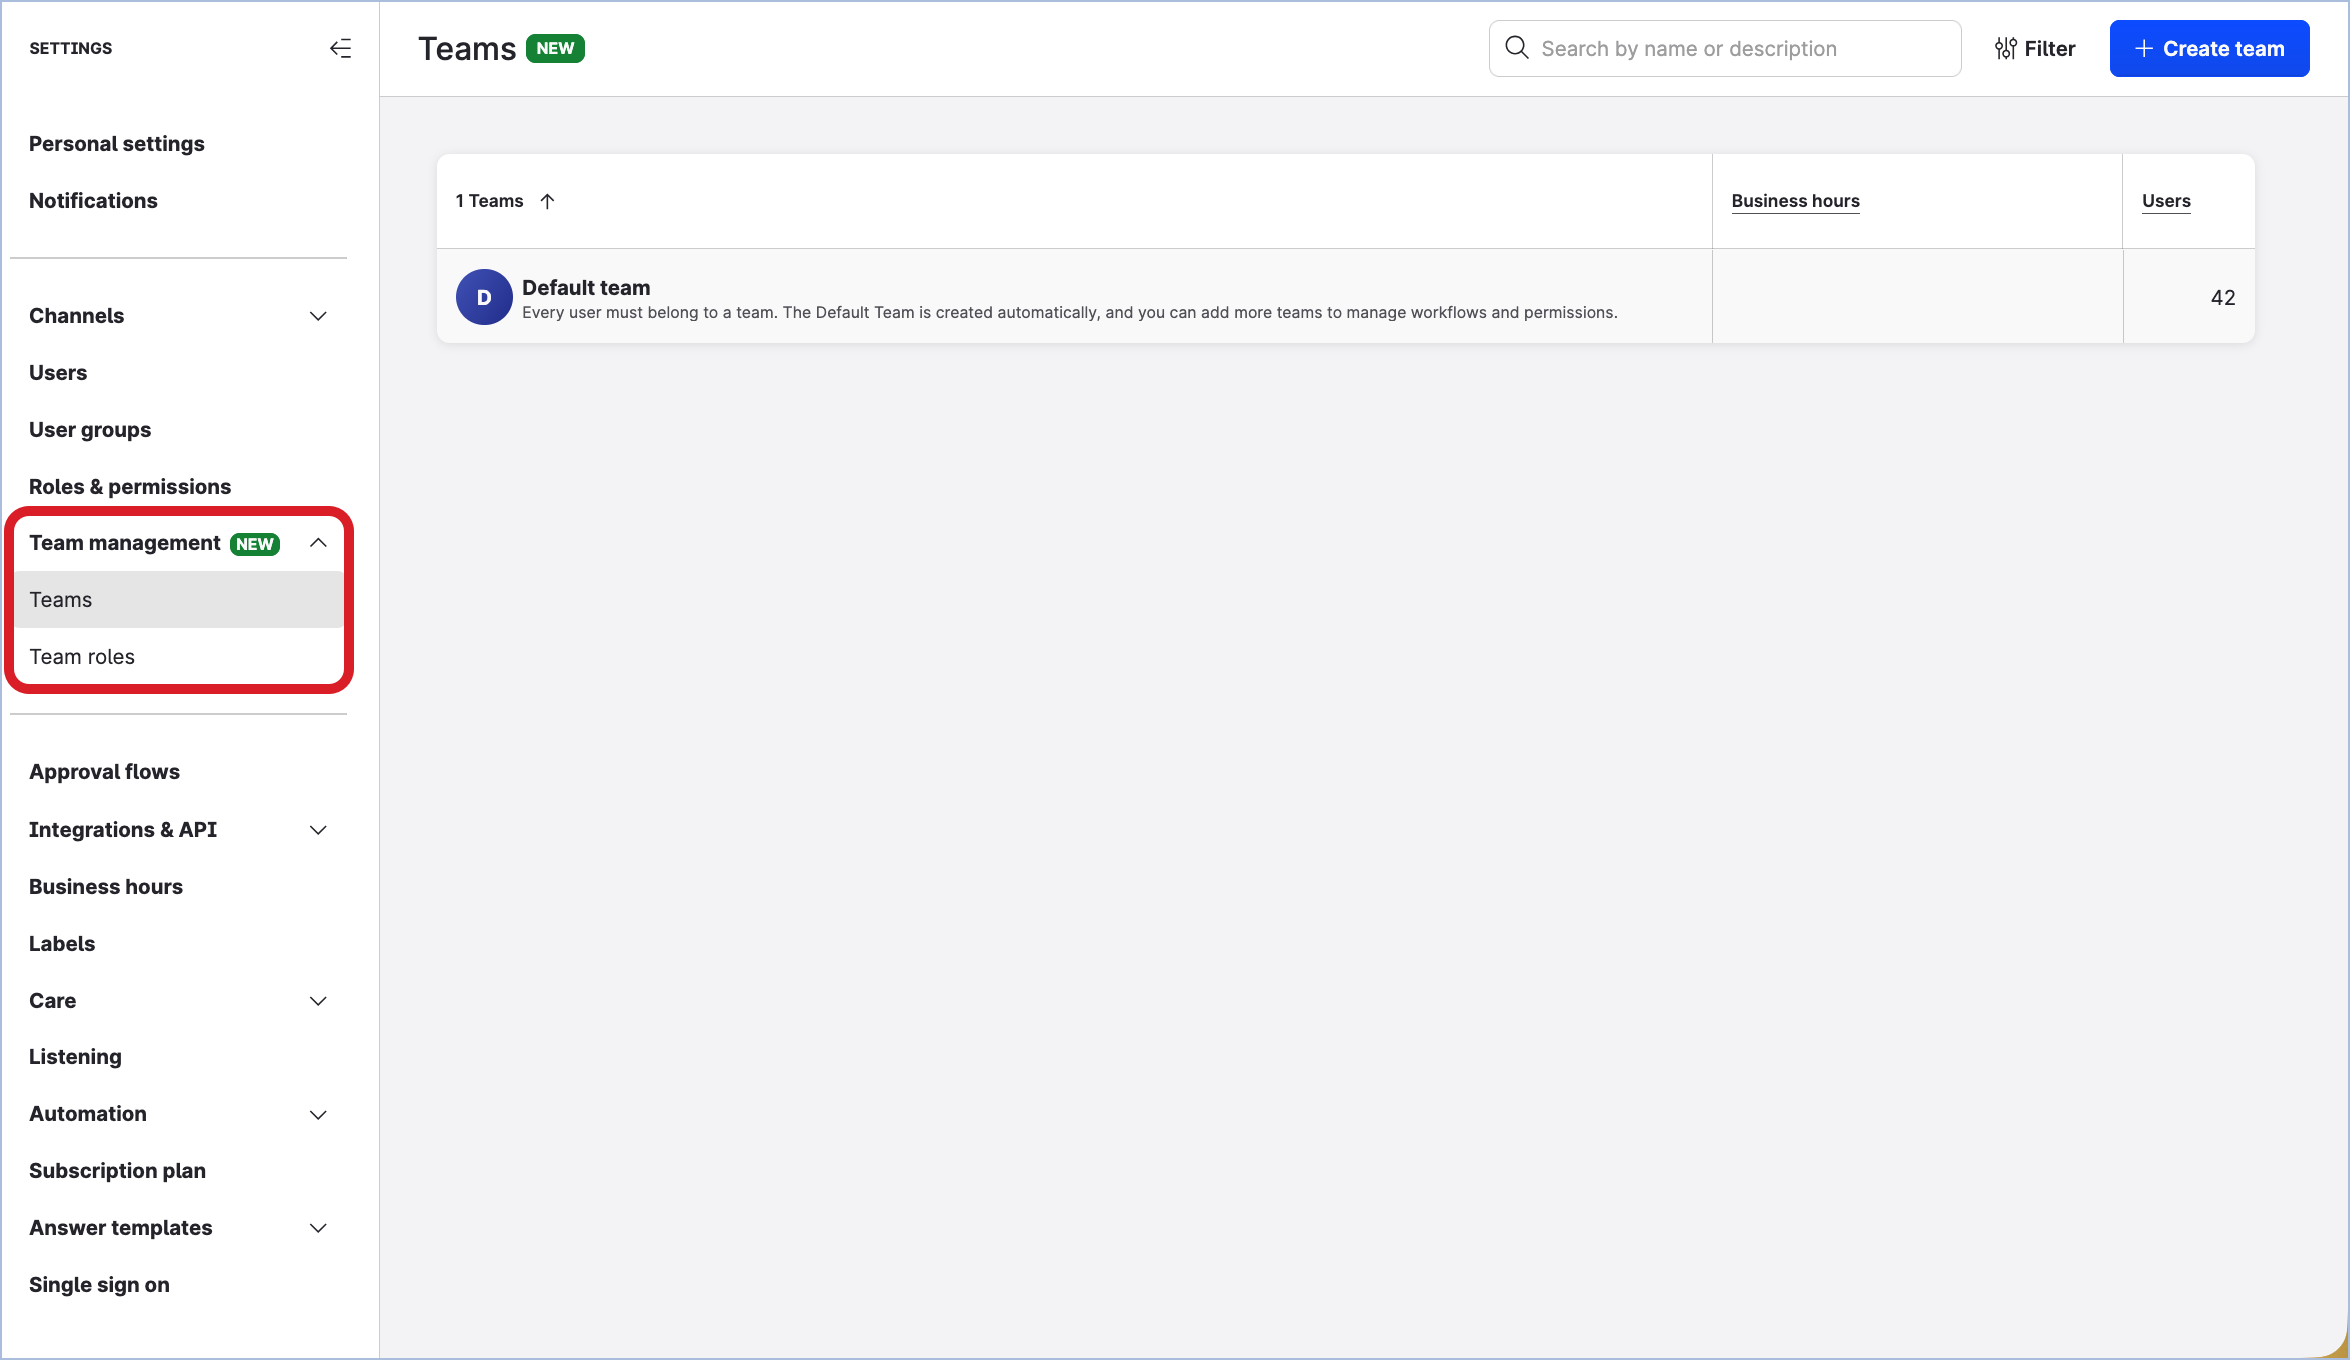
Go to Settings → Team management → Teams.
-
Click +Create team.
The dialog for specifying team details opens. -
Enter the names of the teams: enter the name of the first team, press Enter, enter the name of the second team, press Enter, and so on. You can also copy team names from a CSV file, an Excel file, or a Google Sheets file and paste them into the field.
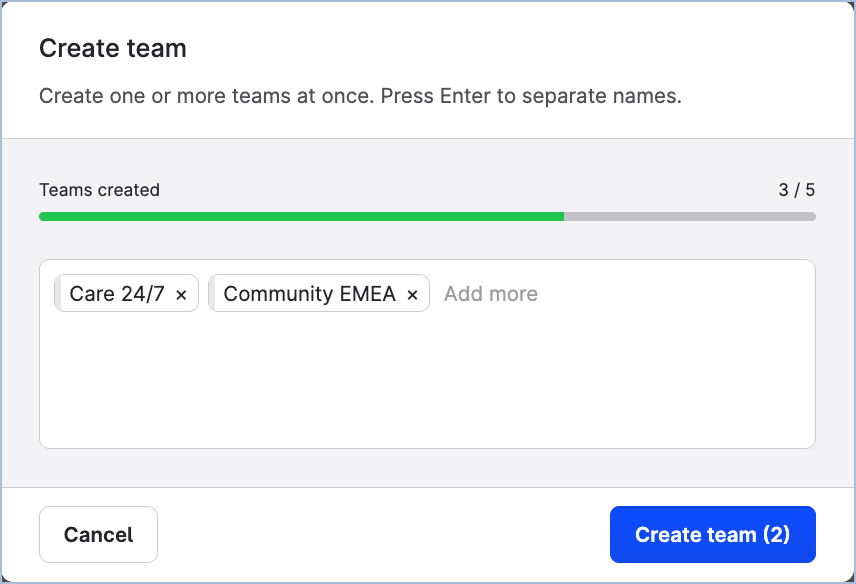
-
Click Create team.
The teams are created and listed in alphabetical order. Each team is created with a default “Team user” team role already added to it. -
Click one of the newly created teams.
The team panel slides out.
-
Click Product access.
You can see all the modules of the Emplifi platform listed. By default, all of them are enabled. -
Disable the modules that you do not want the users to access.
For example, if you want the members of this team to have access to only Publisher and Unified Analytics, leave only these two modules enabled and disable all the other modules.
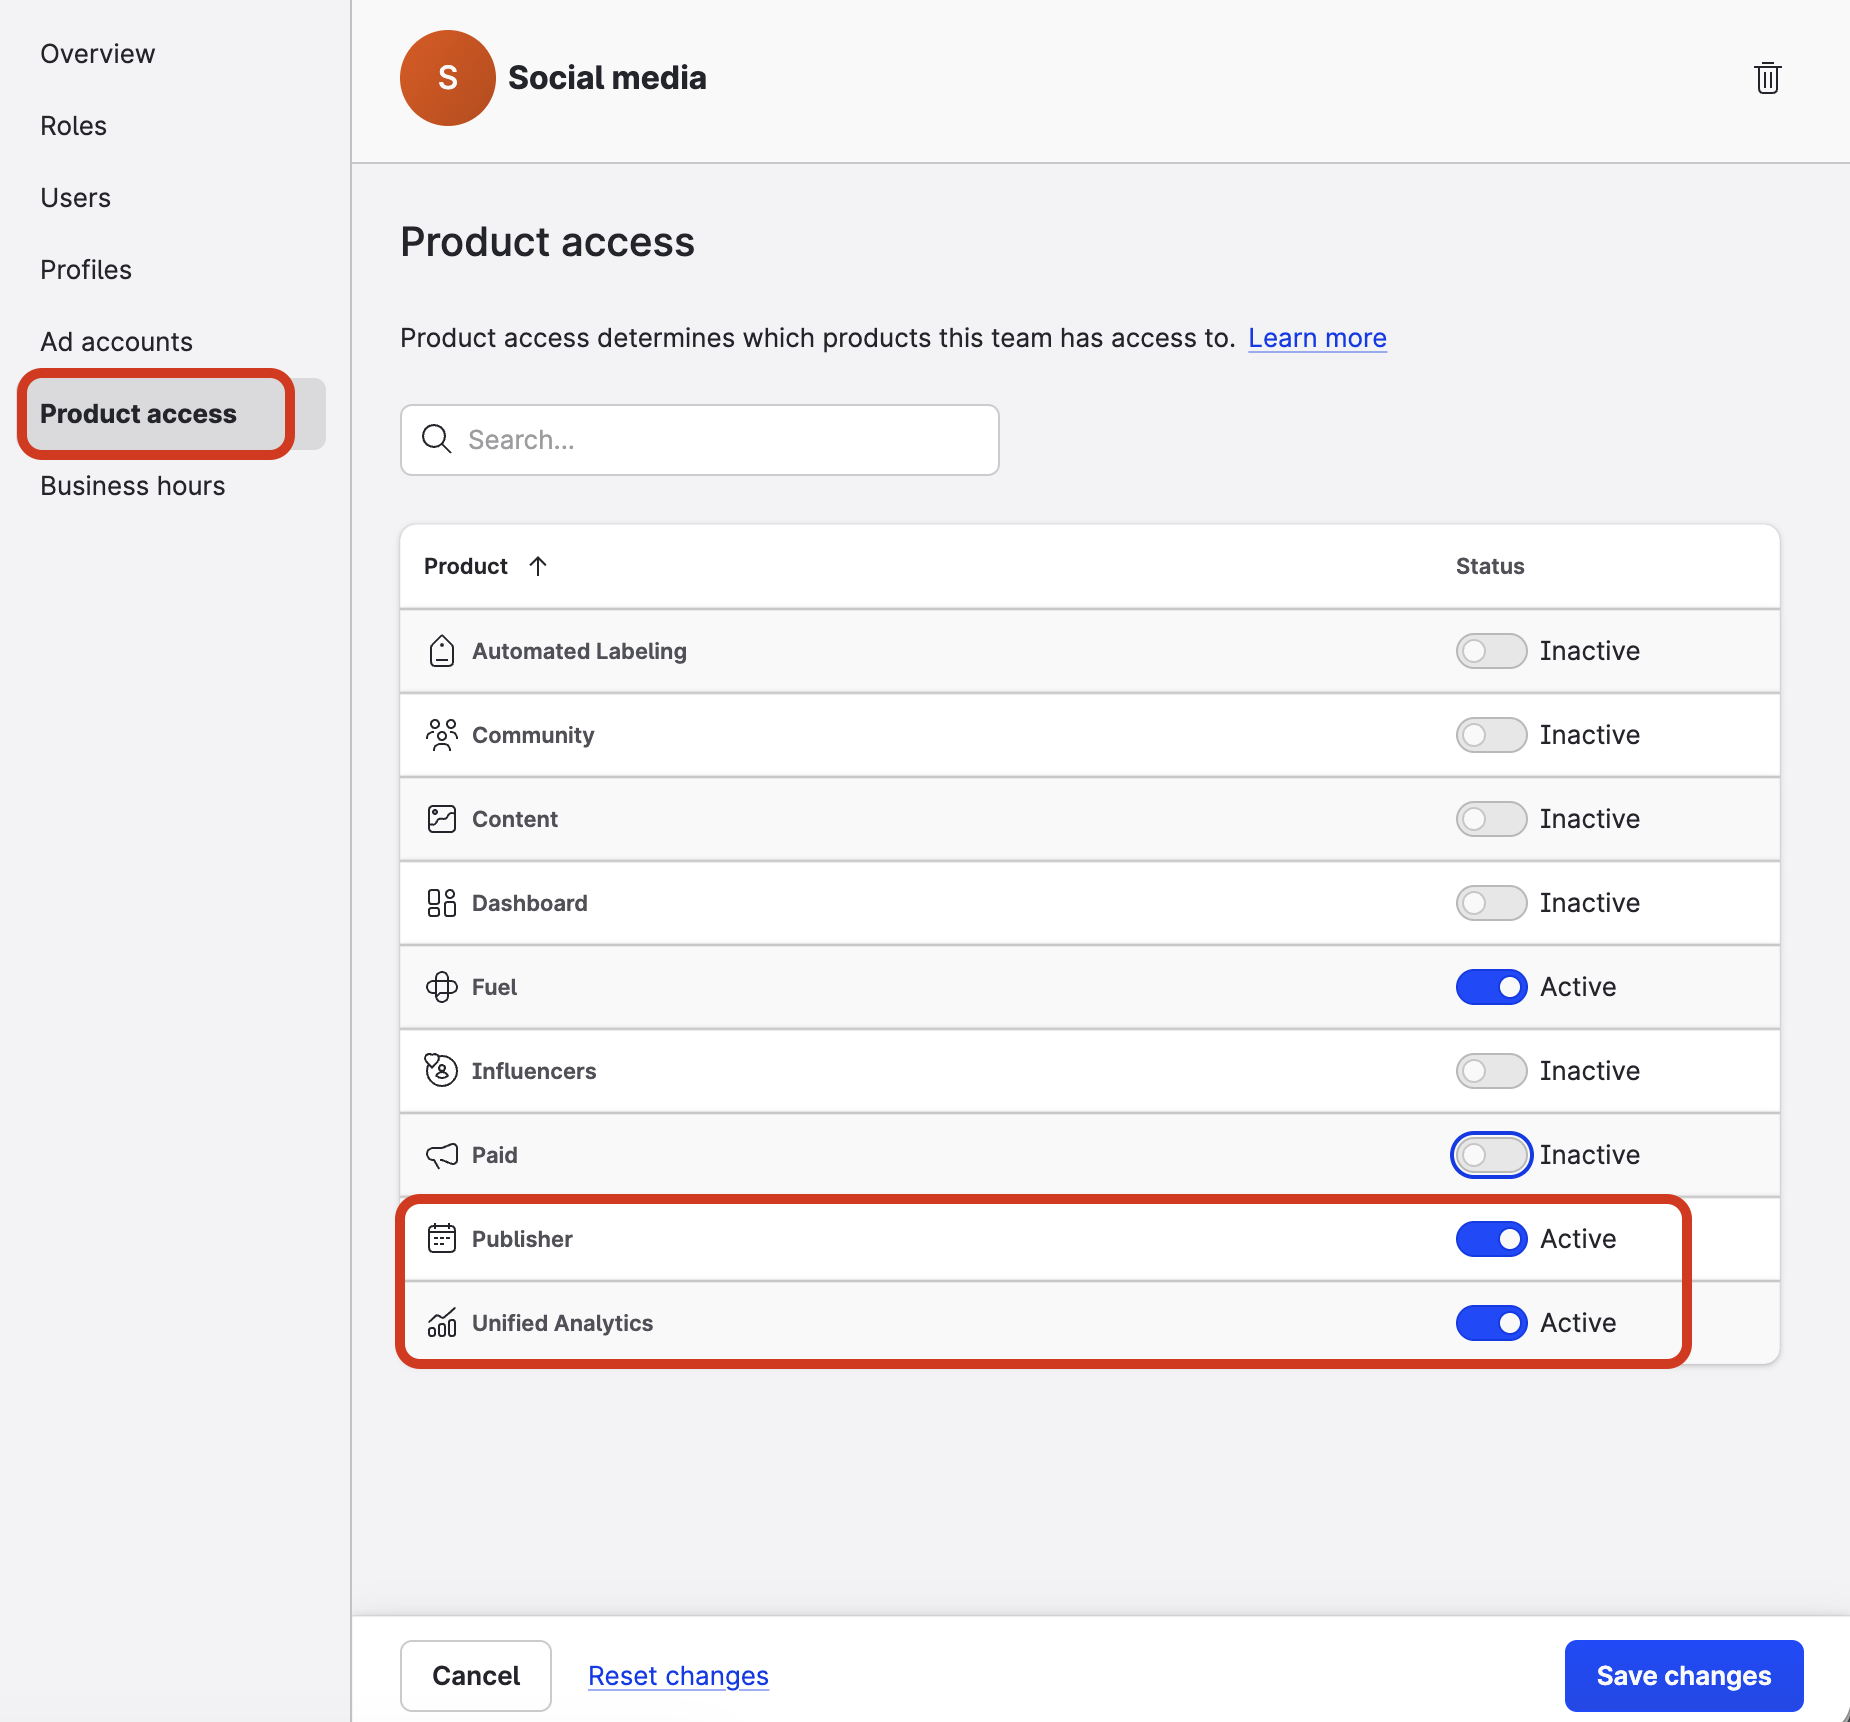
-
Once done, click Save changes.
The panel closes. -
Repeat Steps 5–8 for each team that you created.
If you want to apply the same product access settings to multiple teams at once, you can use the bulk action in the Teams list. Select the teams you want to update, then click Product access in the action bar that appears at the bottom of the page.
You now have teams where access to the modules of the Emplifi platform is set up. The teams do not have any users and resources added yet.
Create team roles for team admins
Although a team is created together with a default “Team user” team role, you would typically want at least one user in each team to have a “Team admin” role. A team admin manages the team itself and has a full scope of available permissions for the resources added to their team (see Team roles).
Because team roles are team-specific, you are going to create an individual “Team admin” team role for each of your teams. To do this efficiently, you will first create a custom template, then use it to generate one dedicated role per team. Using a custom template means that any permission changes you make to the template later can be propagated to all the child roles derived from it — when you update the template, you will be prompted to choose whether to sync the changes to the child roles.
Steps:
Phase 1: Create a custom “Team admin” template
-
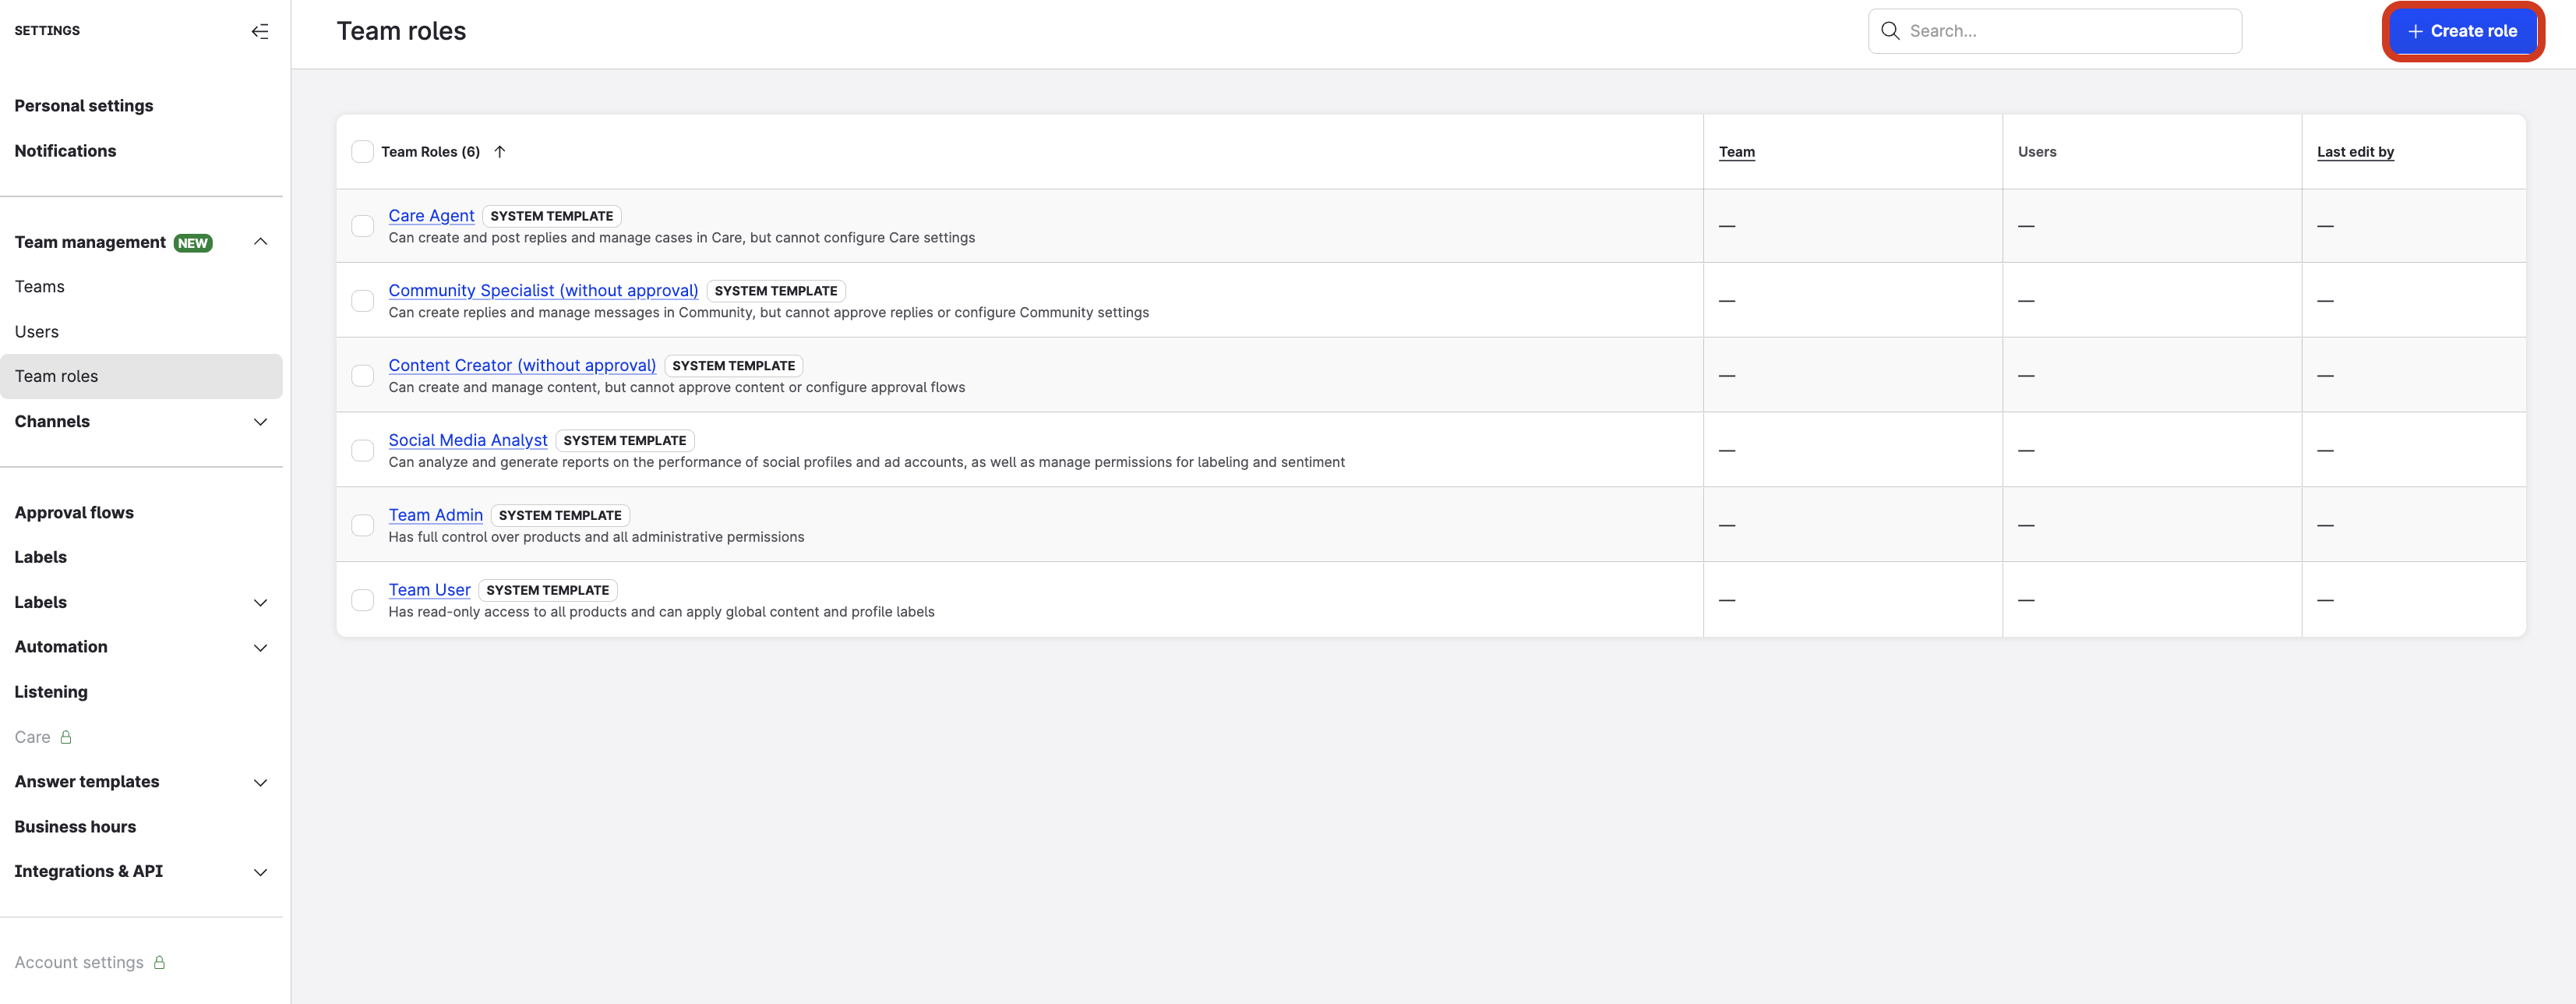
Go to Settings → Team management → Team roles.
The pre-defined templates and existing team roles are listed. -
Click + Create role.
The team role panel slides out.
You are prompted to choose whether to create a team-specific role or a team role template. -
Select Make reusable template.
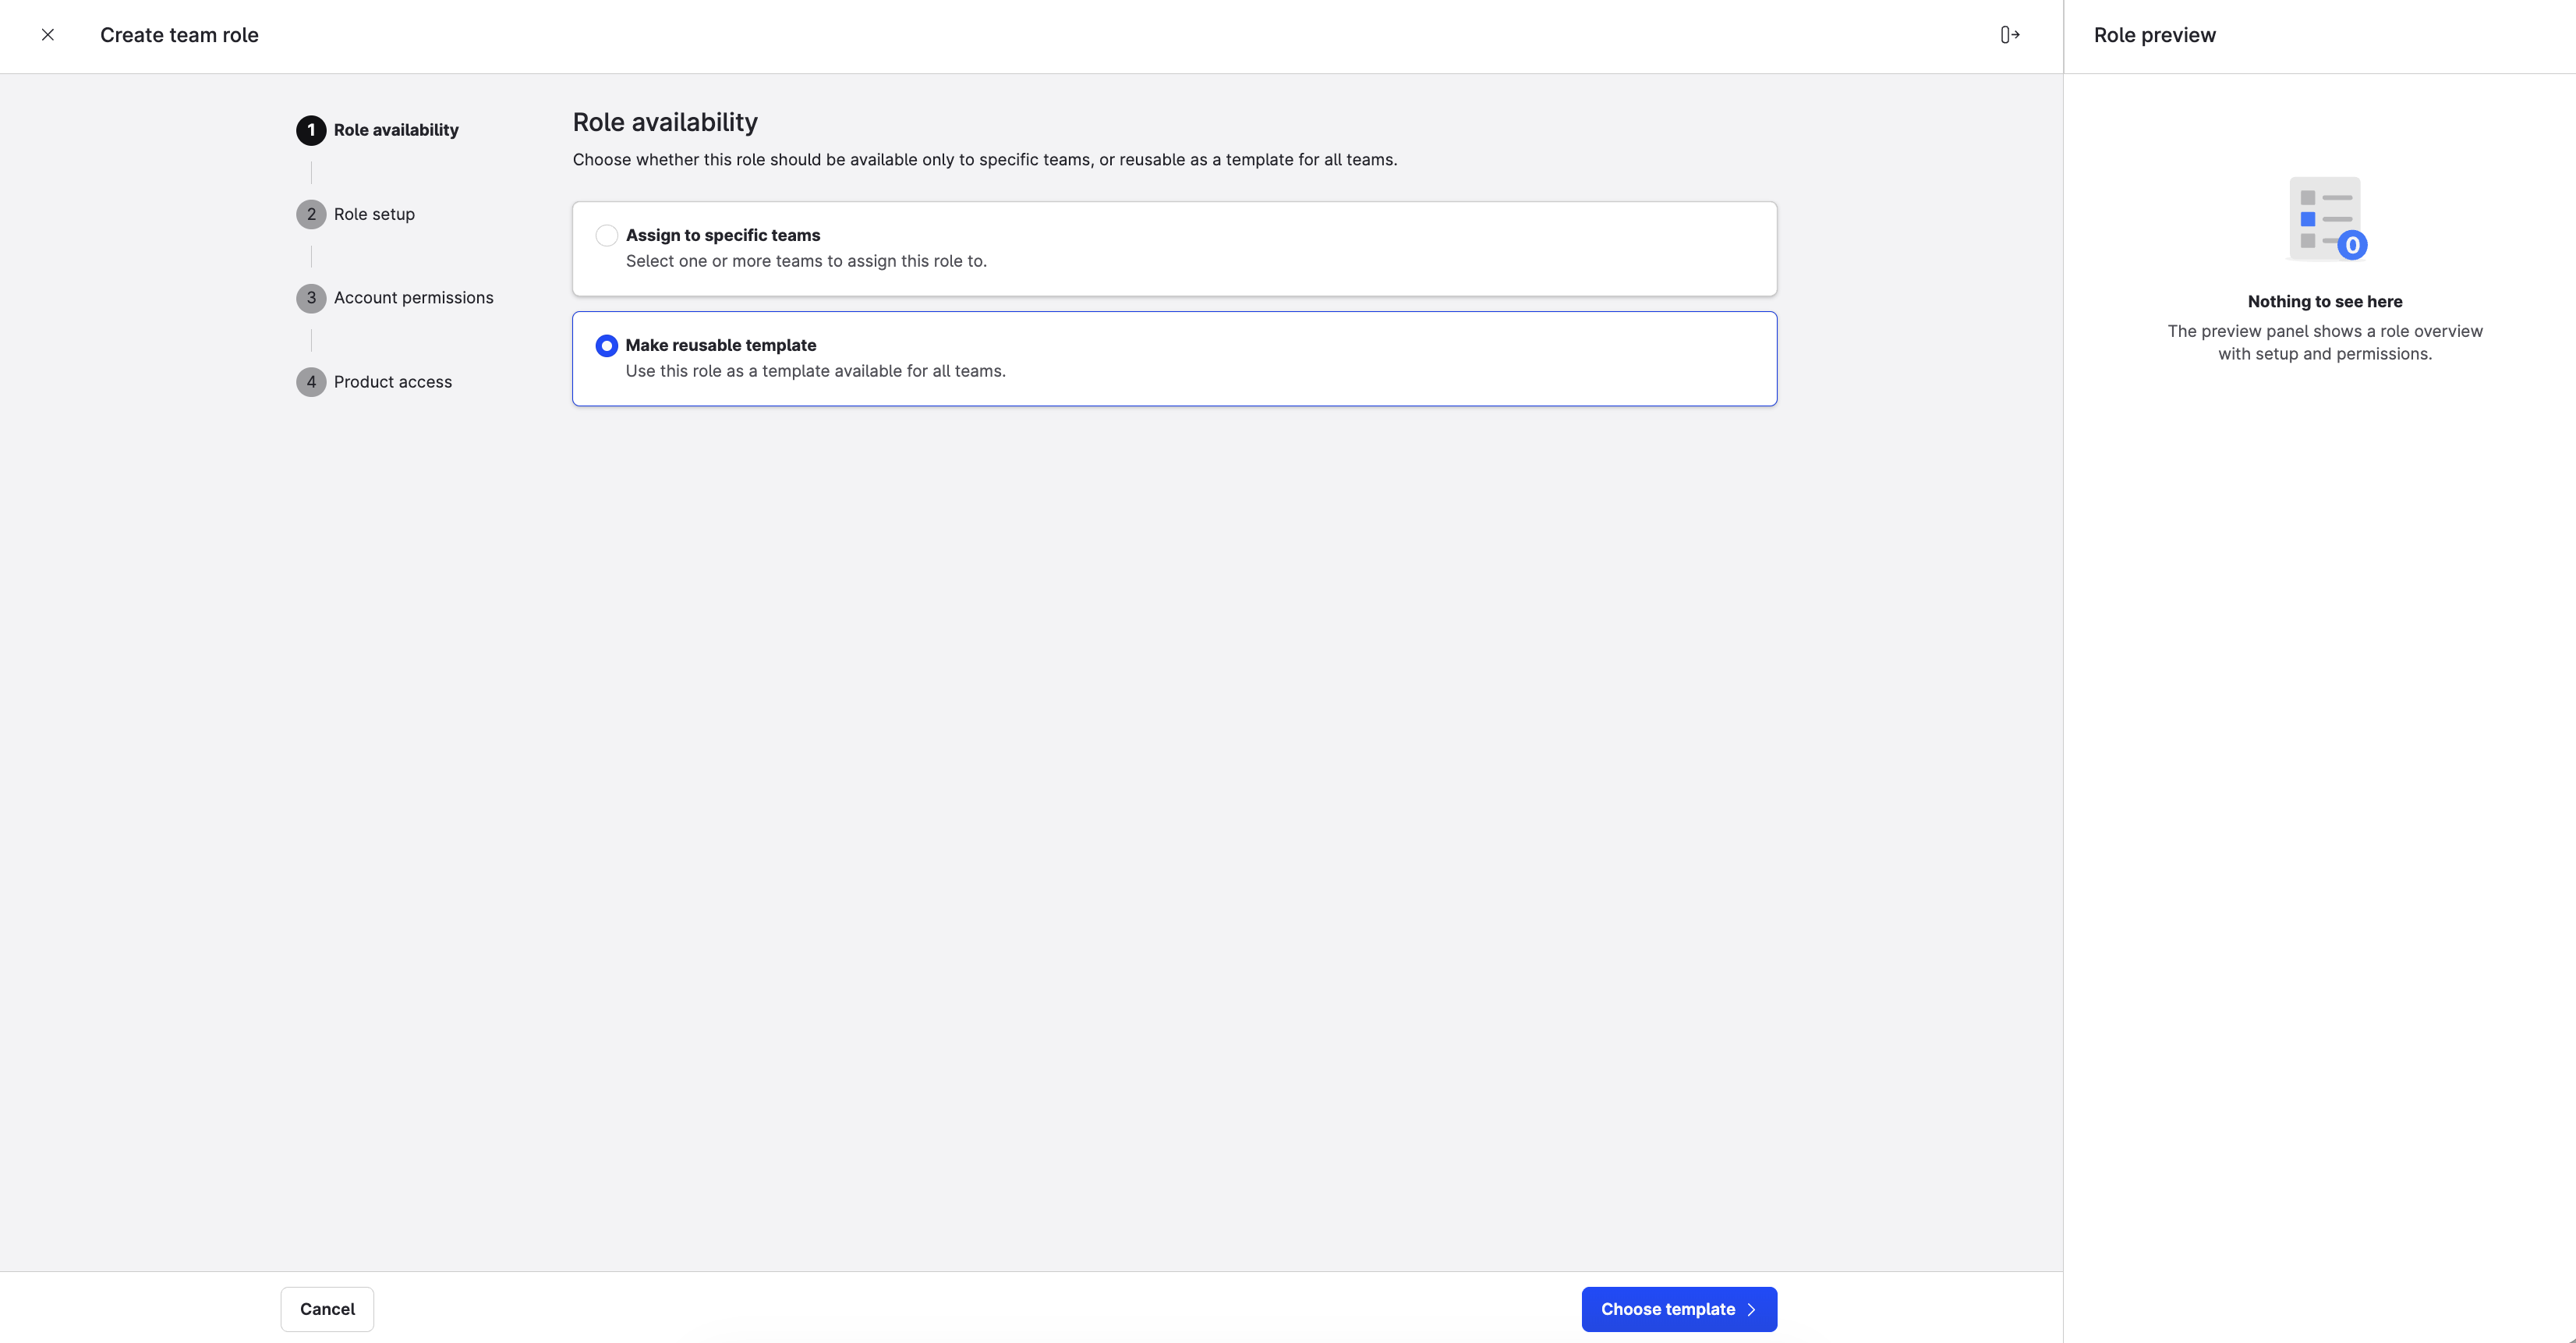
-
Click Choose template to move to the next step.
You are prompted to choose whether to define role permissions manually or to use
one of the pre-defined templates.
-
Select a pre-defined template that best matches the admin permissions you need.
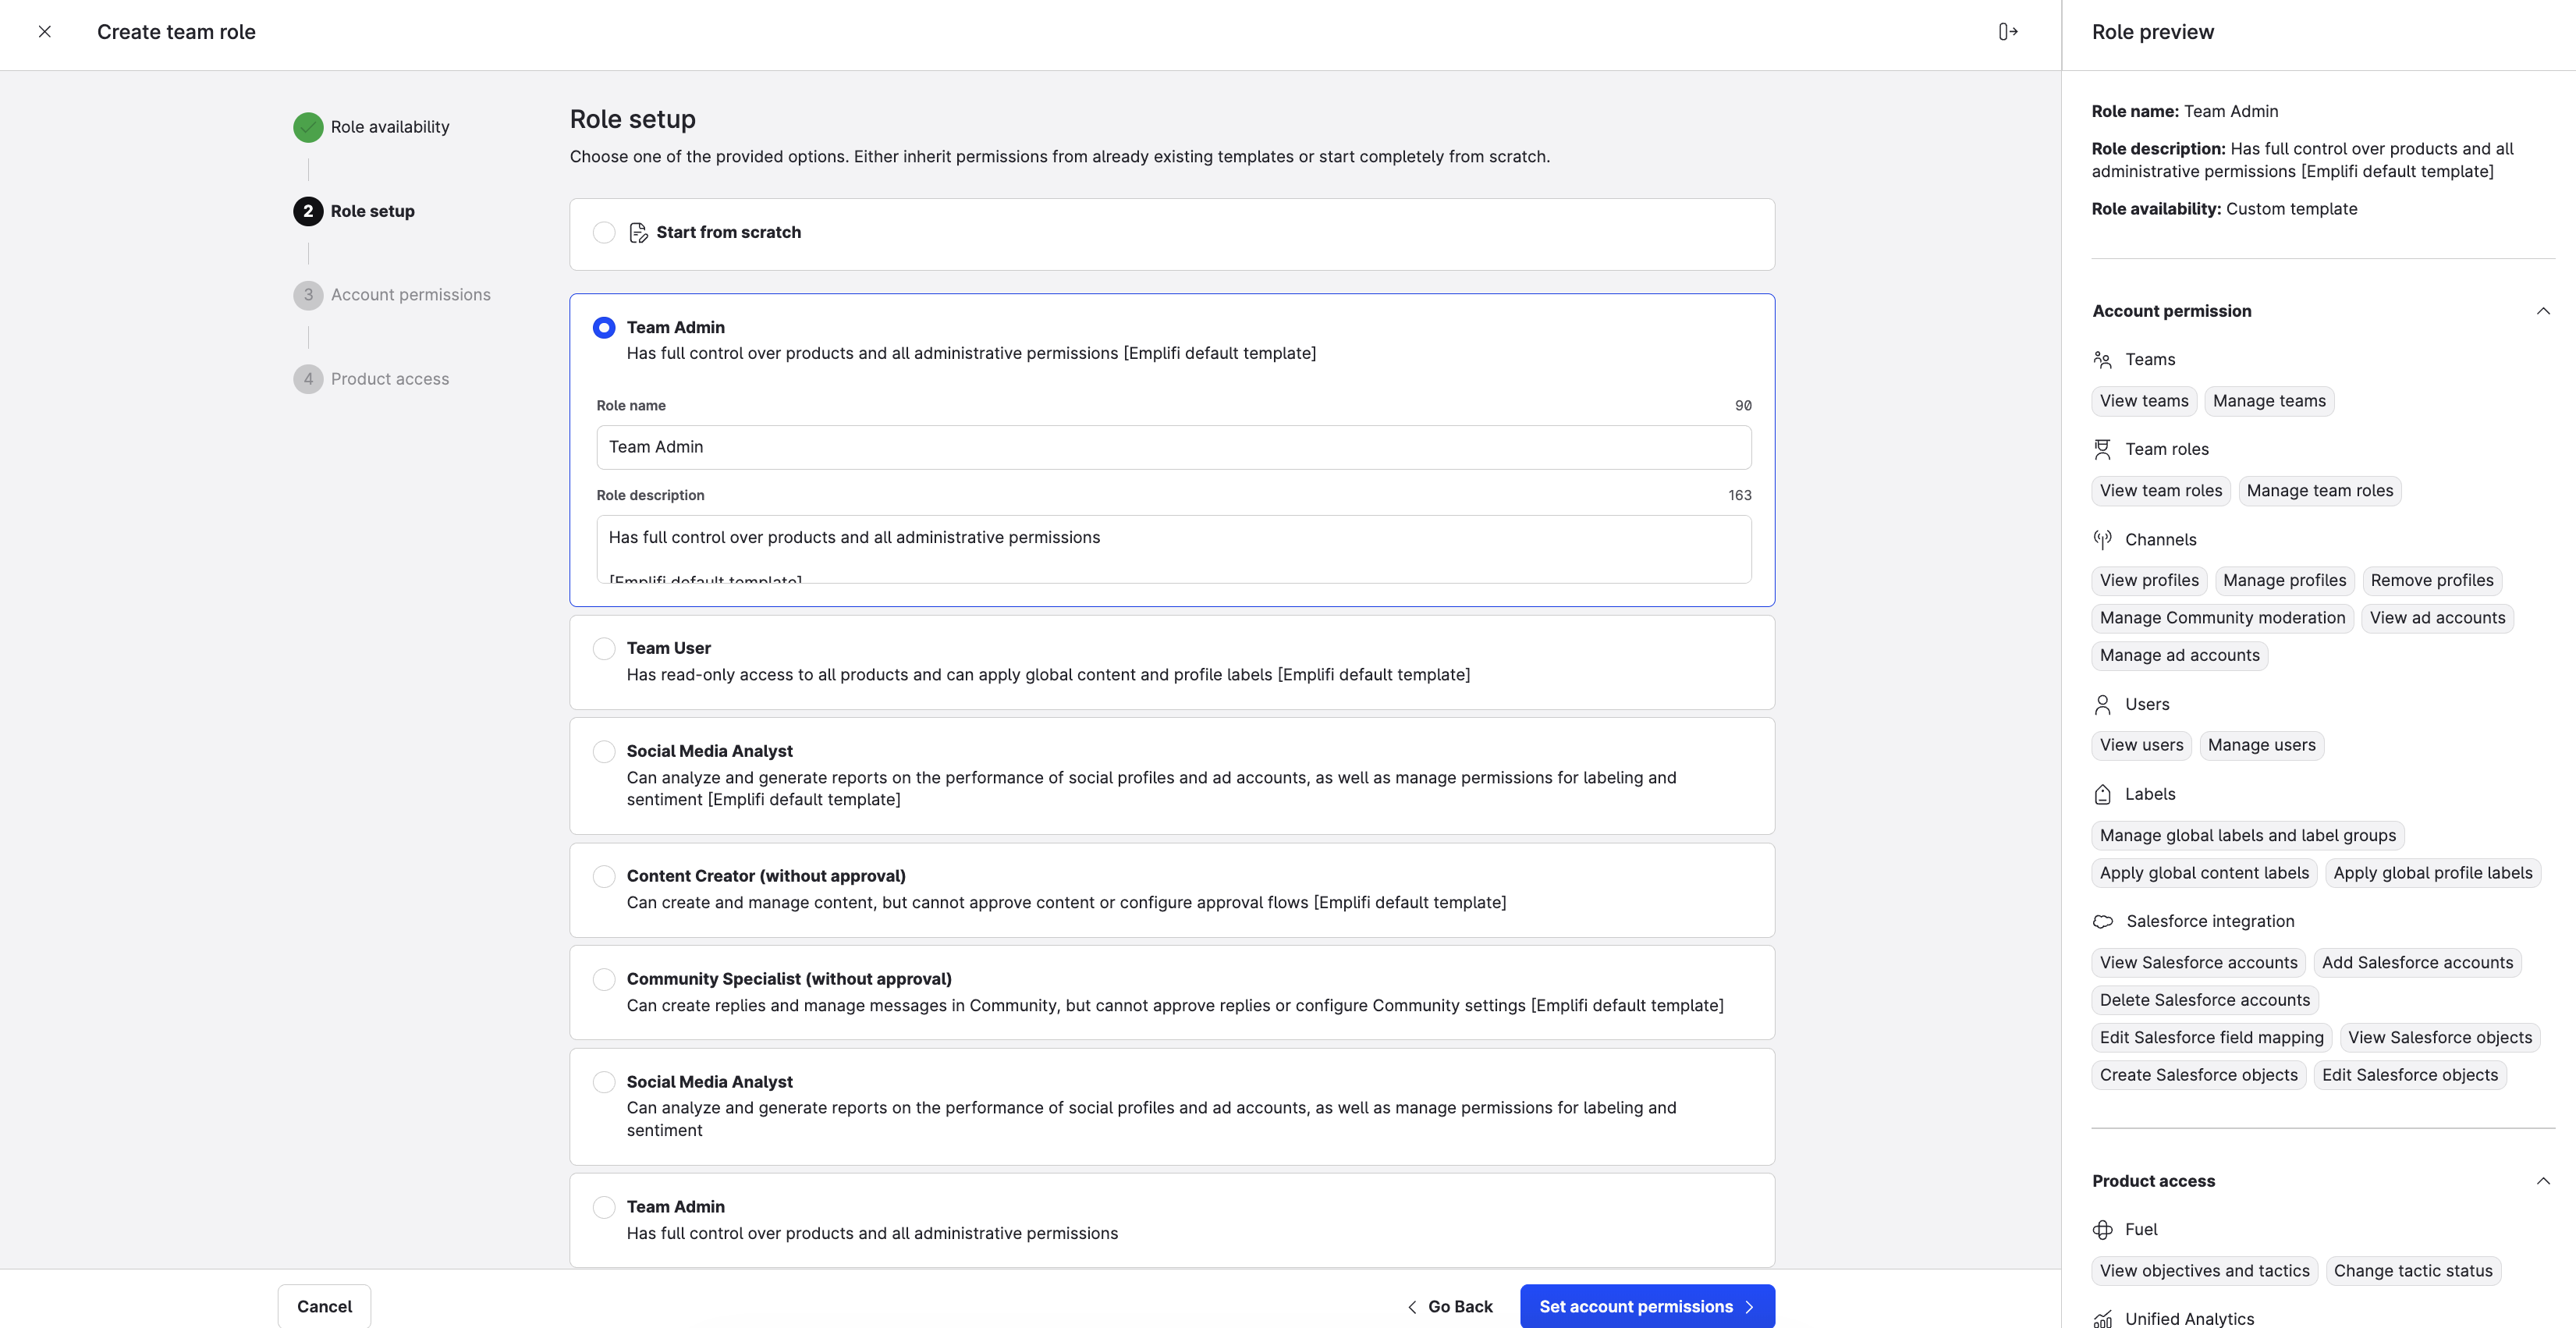
Notice the panel on the right: it shows a preview of all the permissions.
-
Enter a name for the template — for example, Team Admin.
-
Click Set account permissions to move to the next step.
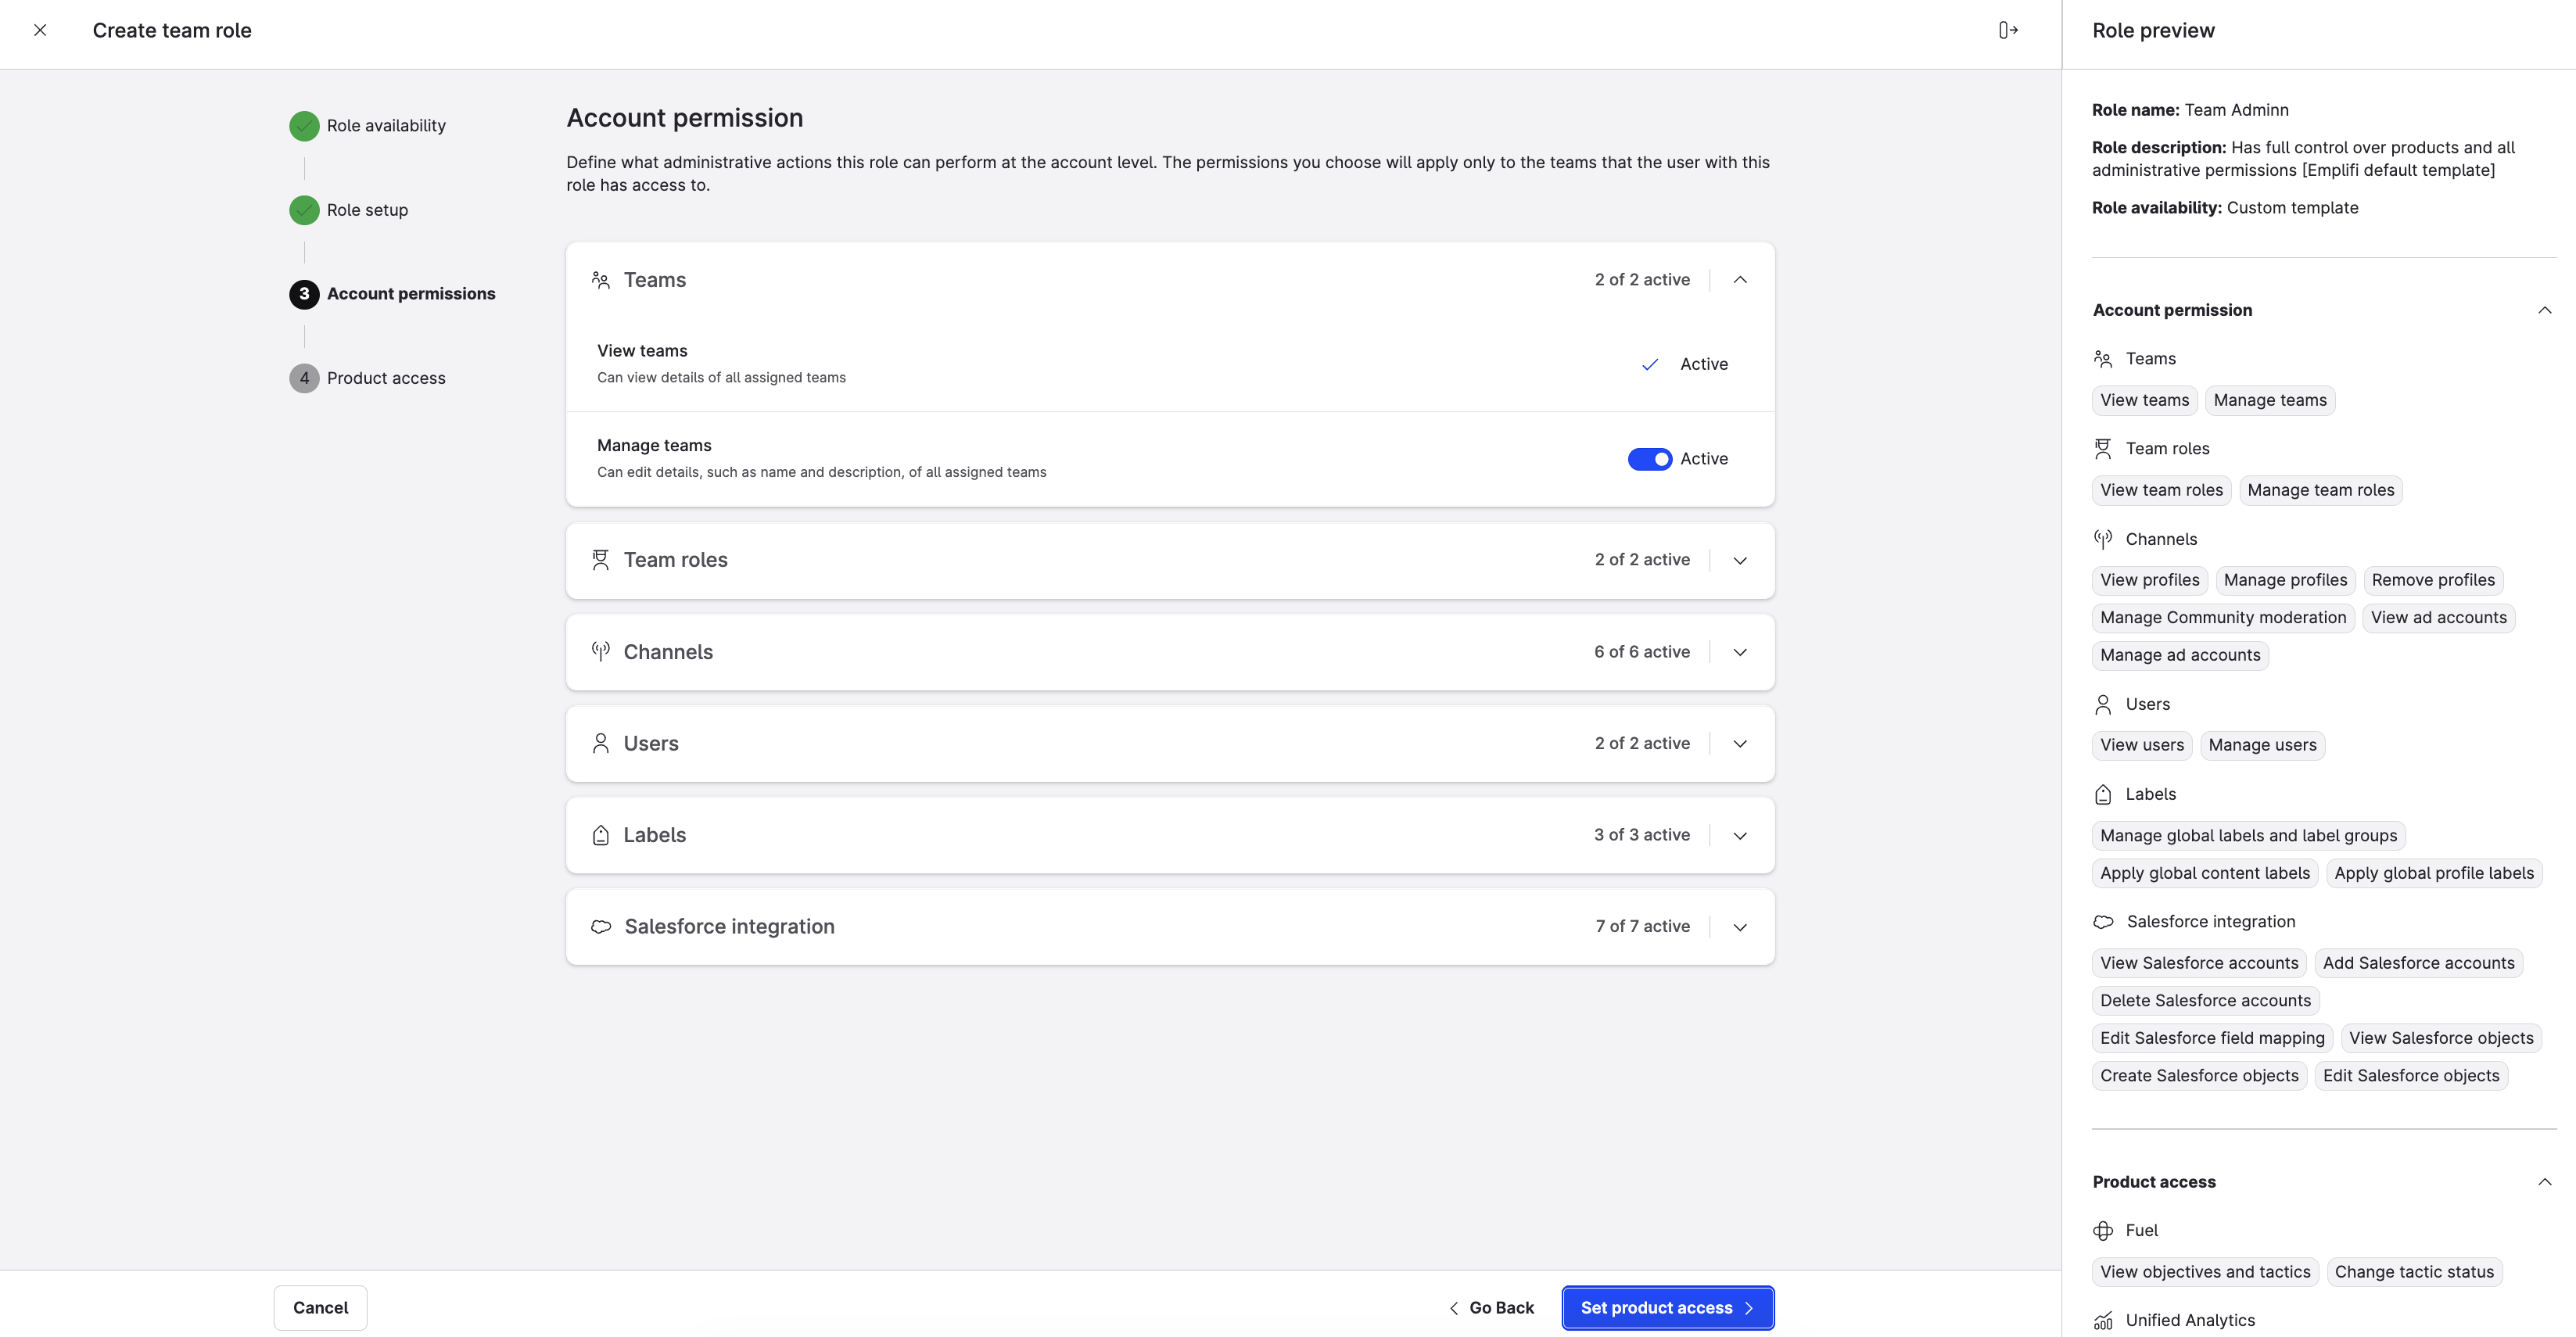
Review and customize the permissions as needed.
-
Click Set product access to move to the next step.

Review and customize the modules and actions as needed.
-
Once done, click Create role.
The custom template is created and listed under your team roles.
Phase 2: Create “Team admin” roles for each team
-
In the Team roles list, find the custom template you created in Phase 1.
-
Hover over it and click the Duplicate role icon.
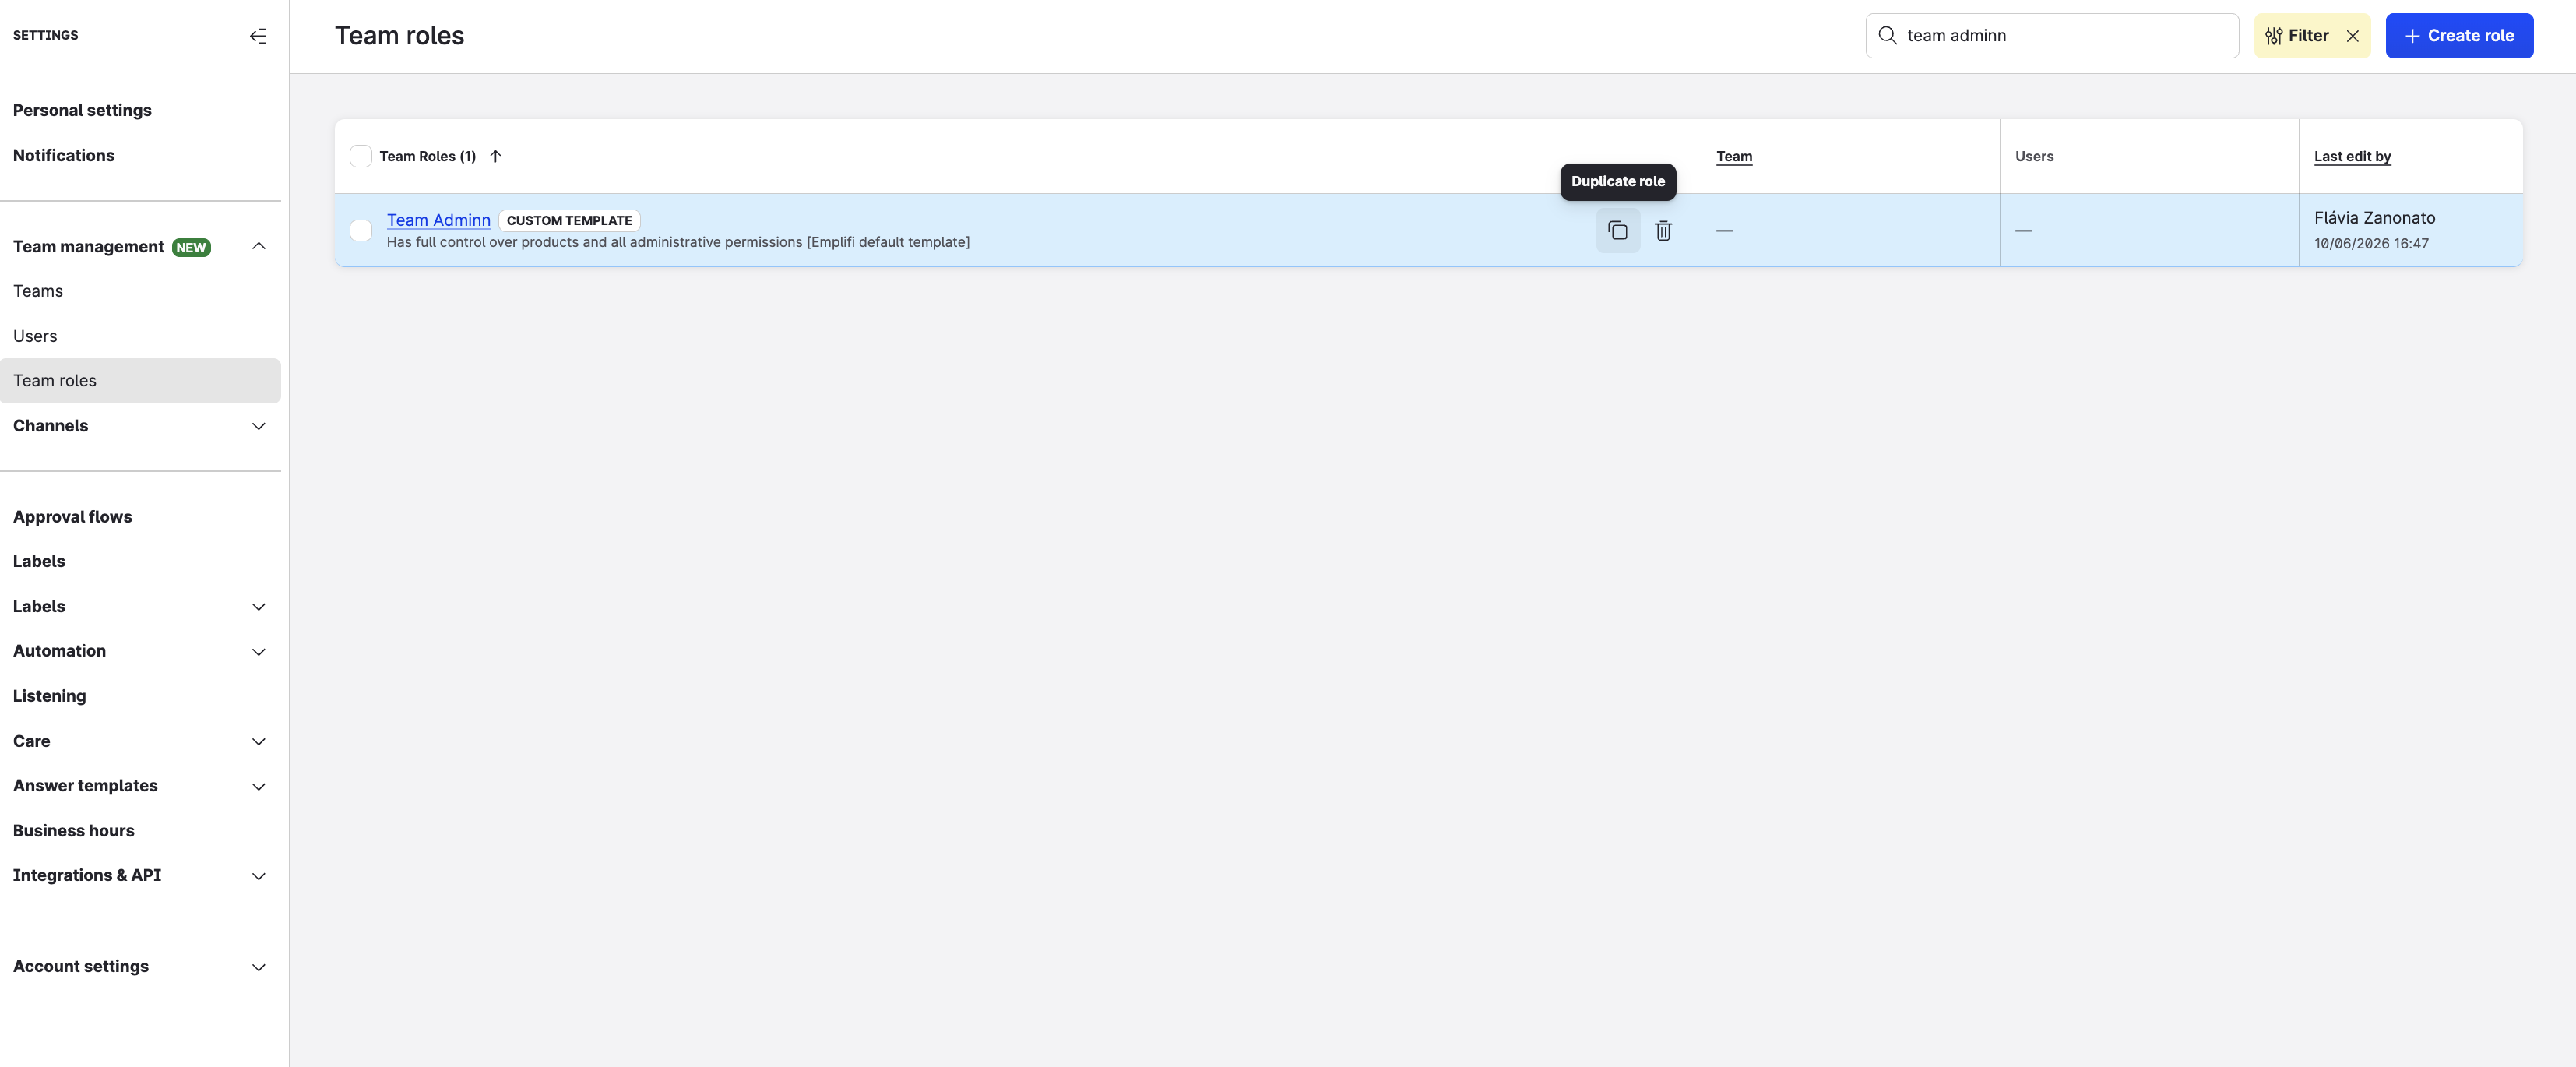
The Duplicate role to teams dialog opens.
-
Select all the teams you created.

-
Click Apply.
A “Team admin” role is created for each selected team, inheriting all permissions and product access settings from the custom template.
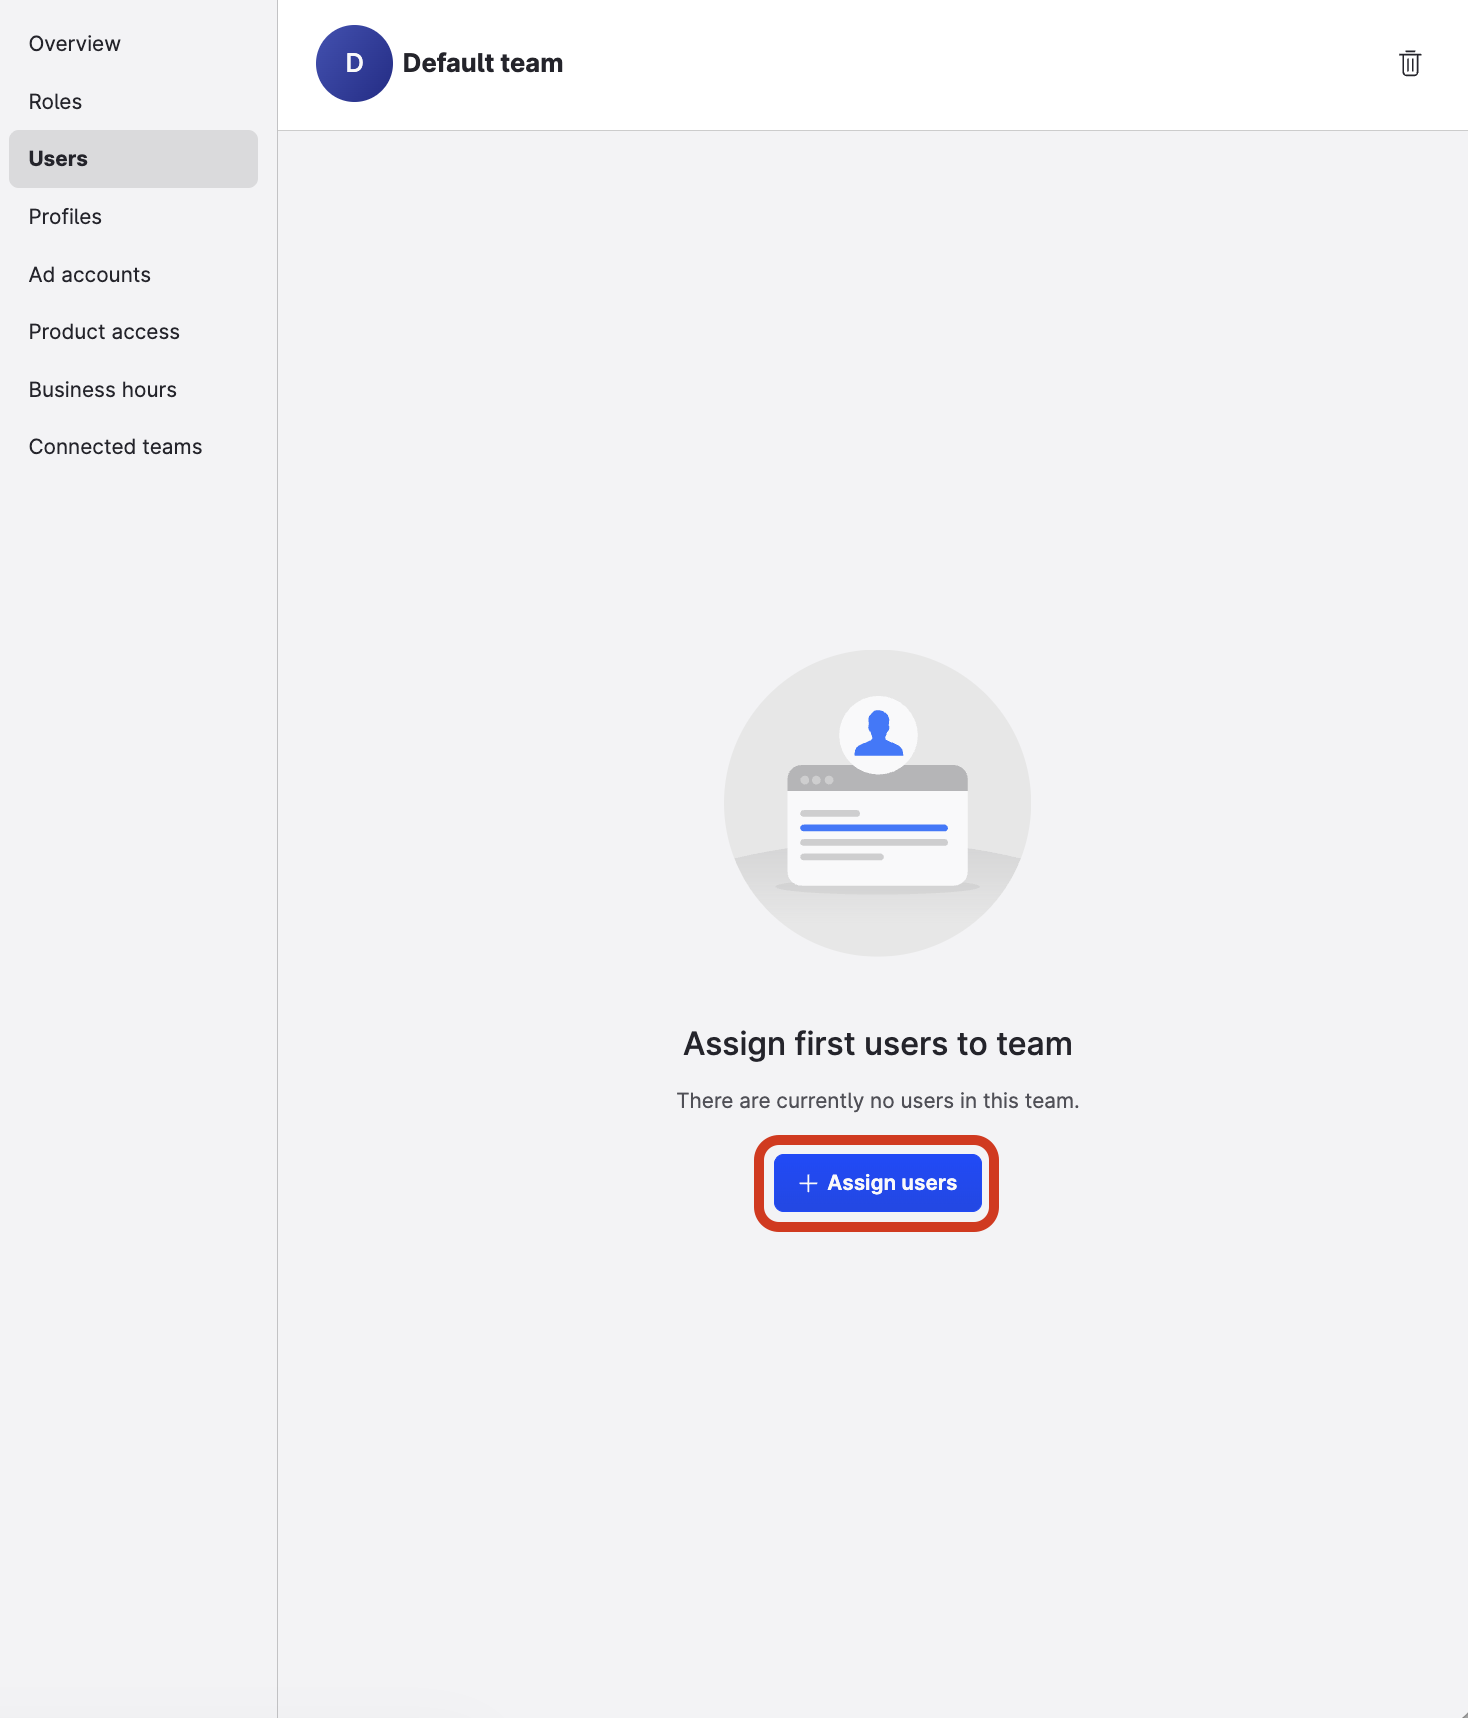
Add team admins to the teams
Now that you have a “Team admin” role for each team, assign an existing user to act as team admin in each team.
The users you assign as team admins already exist in your Emplifi account. If a user is not yet in the account, an invitation will be sent to their email address.
Steps:
-
Go to Settings → Team management → Teams.
-
Click one of your teams. The team panel slides out.
-
Click the Users tab.
-
Click + Assign users.
The dialog for adding users to the team opens.
-
In the Team role dropdown, select the “Team Admin” team role.
-
In the Users field, enter the email of the user.
-
Keep the Make invited users Platform Admins checkbox unselected.
Team admins should be added as platform users, not platform admins (see Access to the Emplifi Platform for more information).
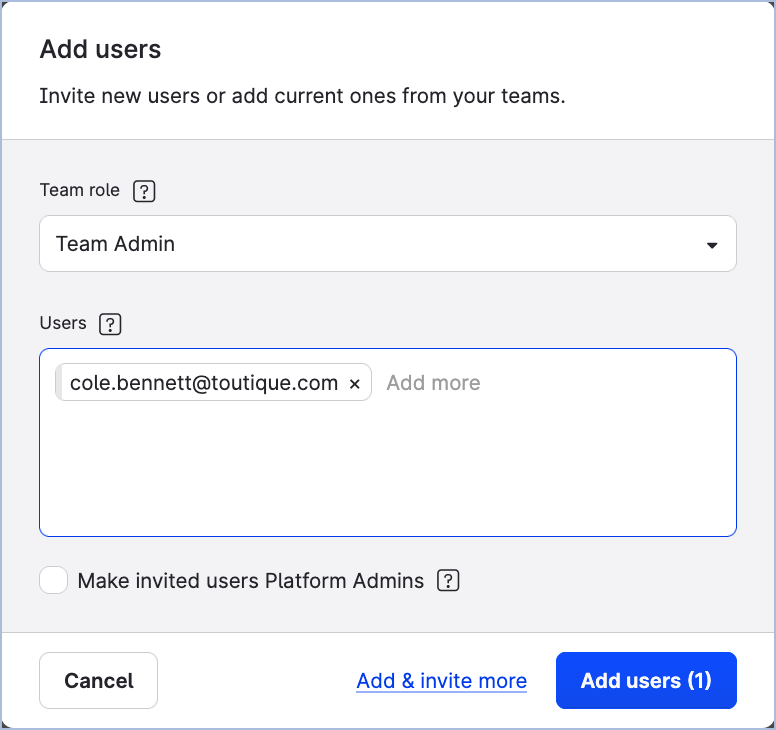
-
Click Add users. The user is added to the team with the “Team Admin” team role assigned.
-
Close the team panel.
-
Repeat Steps 2–9 for each of your teams.
Each of your teams now has a dedicated team admin to whom you can delegate further configuration and maintenance tasks.
Alternative: Assign a user as a team admin across multiple teams
If a user needs to be team admin in several teams, you can add them to all the relevant
teams at once from their user details panel, and then update their team role for each team individually.
Steps:
-
Go to Settings → Team management → Users.
-
Click the user you want to assign as team admin.
The user details panel slides out.
-
Click the Teams tab.

-
Click + Add to team.

The Add user to teams dialog opens.
-
Select all the teams you want to add the user to, and click Add to team.
The user is added to all selected teams with the default team role.
-
For each team listed, click the Team role dropdown and select the Team Admin role.
-
Repeat for each user you want to assign as team admin across multiple teams.
Create other team roles
Now that each of your teams has a team admin, you can delegate the task of creating other team roles to the team admins. As a platform admin, you can also create team roles yourself for any team in the account.
As with team admin roles, the recommended approach is to first create a custom template for each role type, then duplicate it to the relevant teams. This way, any future permission updates to the template can be propagated to all child roles derived from it.
How many team roles you need depends on how you decided to organize your teams (see “Decide what teams you need” earlier in this article). For one team you may need only one additional role; for another you may need several.
Steps:
Phase 1: Create a custom template for each role type
-
Go to Settings → Team management → Team roles.
The pre-defined templates and existing team roles are listed. -
Click Create role.
The team role panel slides out.
You are prompted to choose whether to create a team-specific role or a team role template. -
Select Make reusable template.
-
Click Choose template to move to the next step.
You are prompted to choose whether to define role permissions manually or to use one of the pre-defined templates. -
Do one of the following:
-
If the role follows a common use case (for example, a Care agent), select one of the pre-defined templates. The panel on the right shows a
preview of the permissions.
-
If none of the pre-defined templates fits your needs, select Start from scratch and
proceed to define the role permissions manually.
-
Enter a name for the template.
-
Click Set account permissions to move to the next step.
Review and customize the permissions as needed. -
Click Set product access to move to the next step.
Review and customize the modules and actions as needed. -
Once done, click Create role.
The custom template is created and listed under your team roles. -
Repeat Steps 1–9 for each role type you need to create.
Phase 2: Create team roles from each template
-
In the Team roles list, find the custom template you want to use.
-
Hover over it and click the Duplicate role icon.
The Duplicate role to teams dialog opens. -
Select the teams that should have this role.
-
Click Apply.
A role is created for each selected team, inheriting all permissions and product access settings from the custom template. -
Repeat Steps 1–4 for each custom template you created in Phase 1.
Add users to the teams
Assign the existing users in your Emplifi account to the appropriate teams with the appropriate team roles. You can delegate this task to the team admins you added in the previous steps.
A team admin can add users only to the teams where they are team admins. As a platform admin, you can add users to any team in the account.
Steps:
-
Go to Settings → Team management → Teams.
-
Click one of your teams.
The team panel slides out. -
Click the Users tab.
-
Click Assign users.
The dialog for adding users to the team opens. -
In the Team role dropdown, select the team role you want to assign to the users.
-
In the Users field, enter the emails of the users.
To add multiple emails, enter the first email, press Enter, enter the second email, press Enter, and so on. You can also copy emails from a CSV file, an Excel file, or a Google Sheets file and paste them into the field. -
Keep the Make invited users Platform Admins checkbox unselected.
-
Click Add users.
The users are added to the team with the selected team role. -
Repeat Steps 1–8 for each of your teams.
Alternative: Add a user to multiple teams at once
If a user needs to be added to several teams, you can assign them to all the relevant teams
at once from their user details panel, and then update their team role for each team individually.
Steps:
-
Go to Settings → Team management → Users.
-
Click the user you want to add to multiple teams.
The user details panel slides out.
-
Click the Teams tab.
-
Click + Add to team.
The Add user to teams dialog opens.
-
Select all the teams you want to add the user to, and click Add to team.
The user is added to all selected teams with the default team role.
-
For each team listed, click the Team role dropdown and select the appropriate team role.
-
Repeat for each user you need to add to multiple teams.
Add resources to the teams
Assign the profiles and ad accounts that already exist in your Emplifi account to the appropriate teams. Once added to a team, users in the team will have access to those resources according to their team roles.
A team admin can add resources only to the teams where they are team admins. As a platform admin, you can add resources to any team in the account.
To add a profile to a team, follow these steps:
-
Go to Settings → Team management → Teams.
-
Click one of your teams.
-
The team panel slides out.
-
Click the Profiles tab.
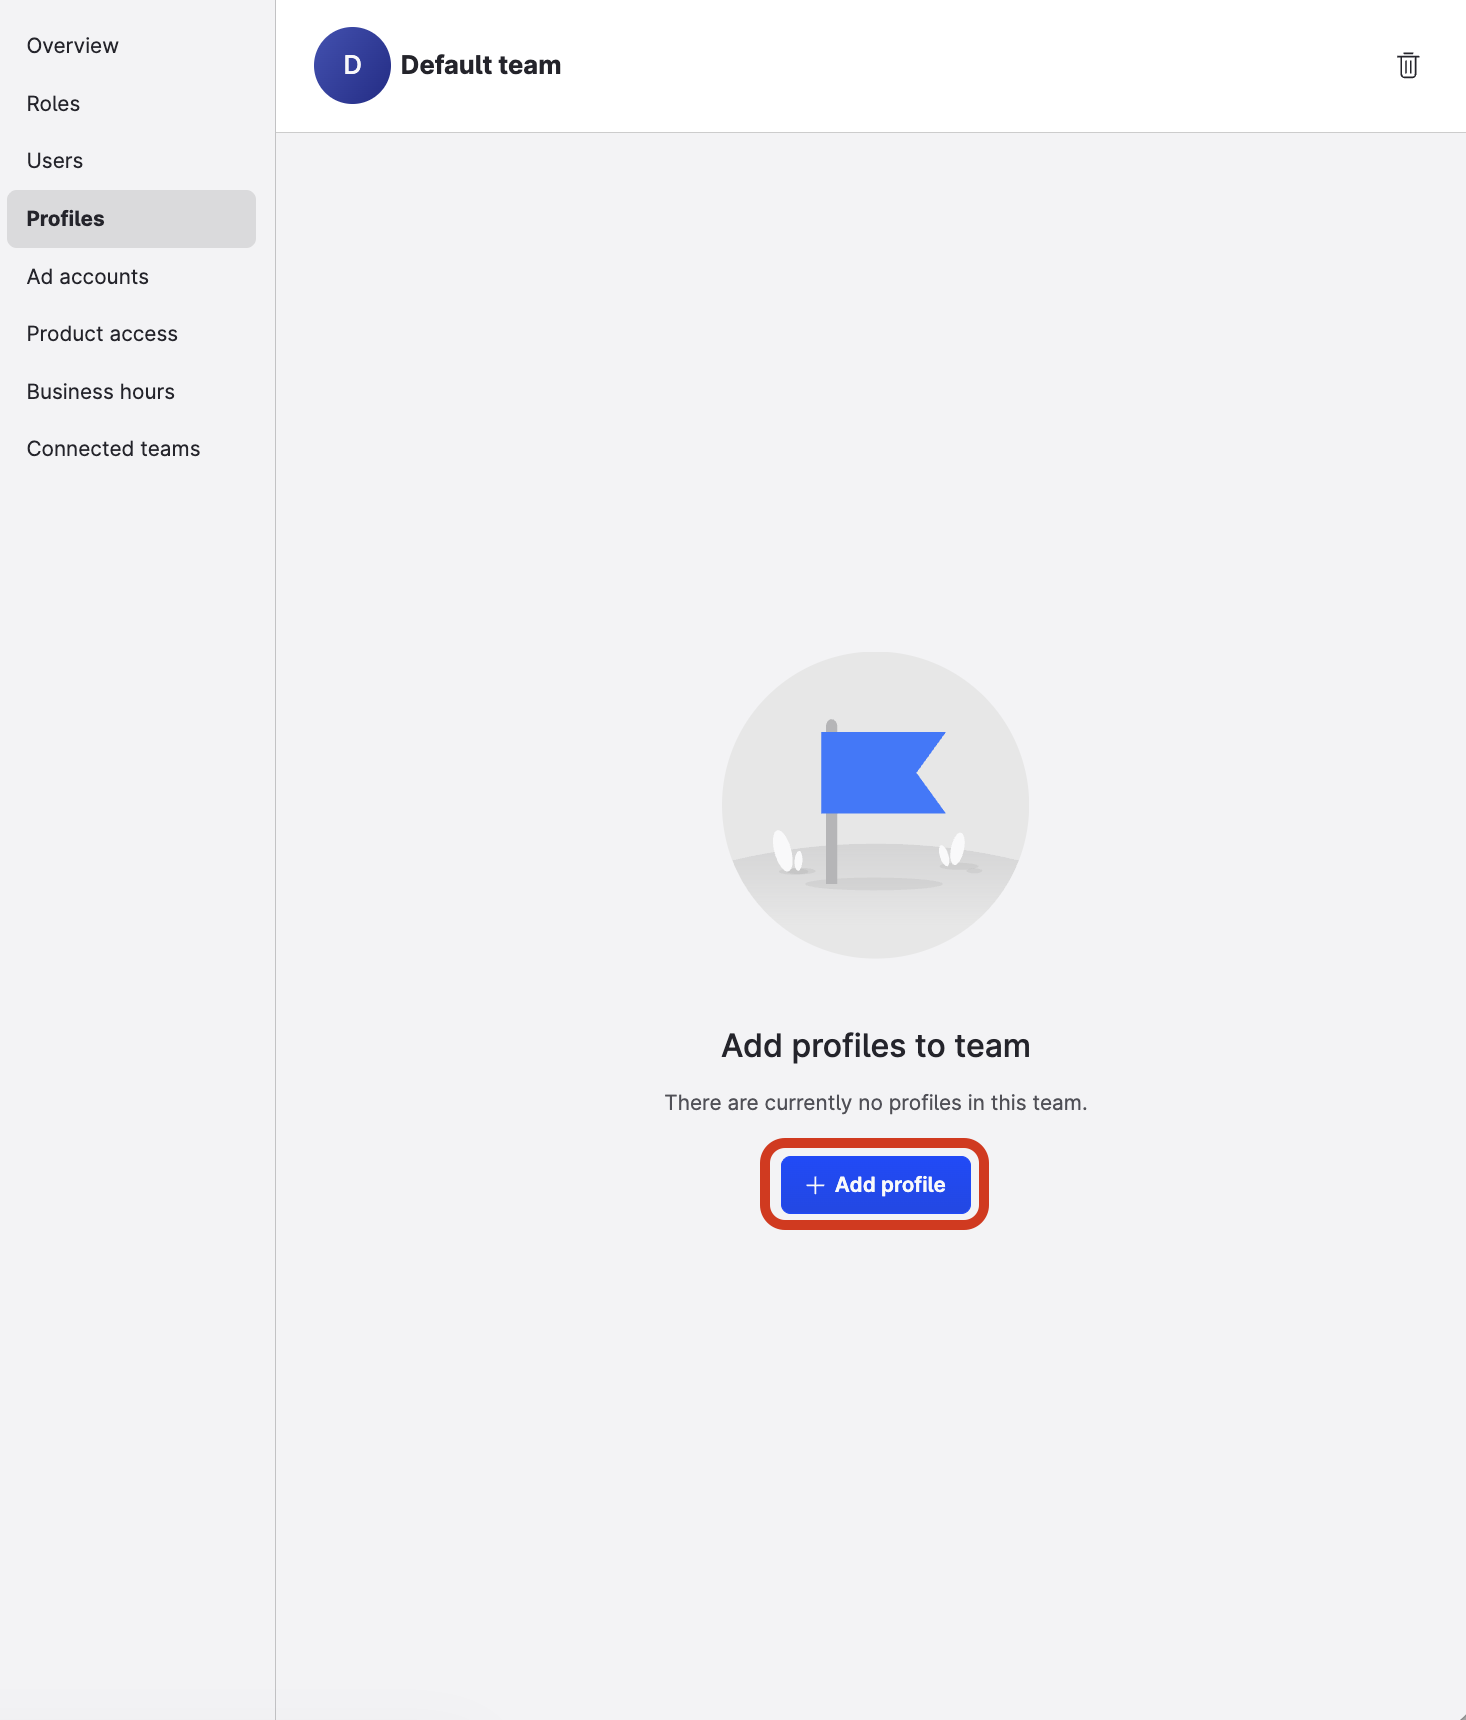
-
Click + Add profile.
-
The dialog opens, showing all profiles to which you have access in your Emplifi account.
-
Select the profiles you want to add to the team, and click Configure profiles.
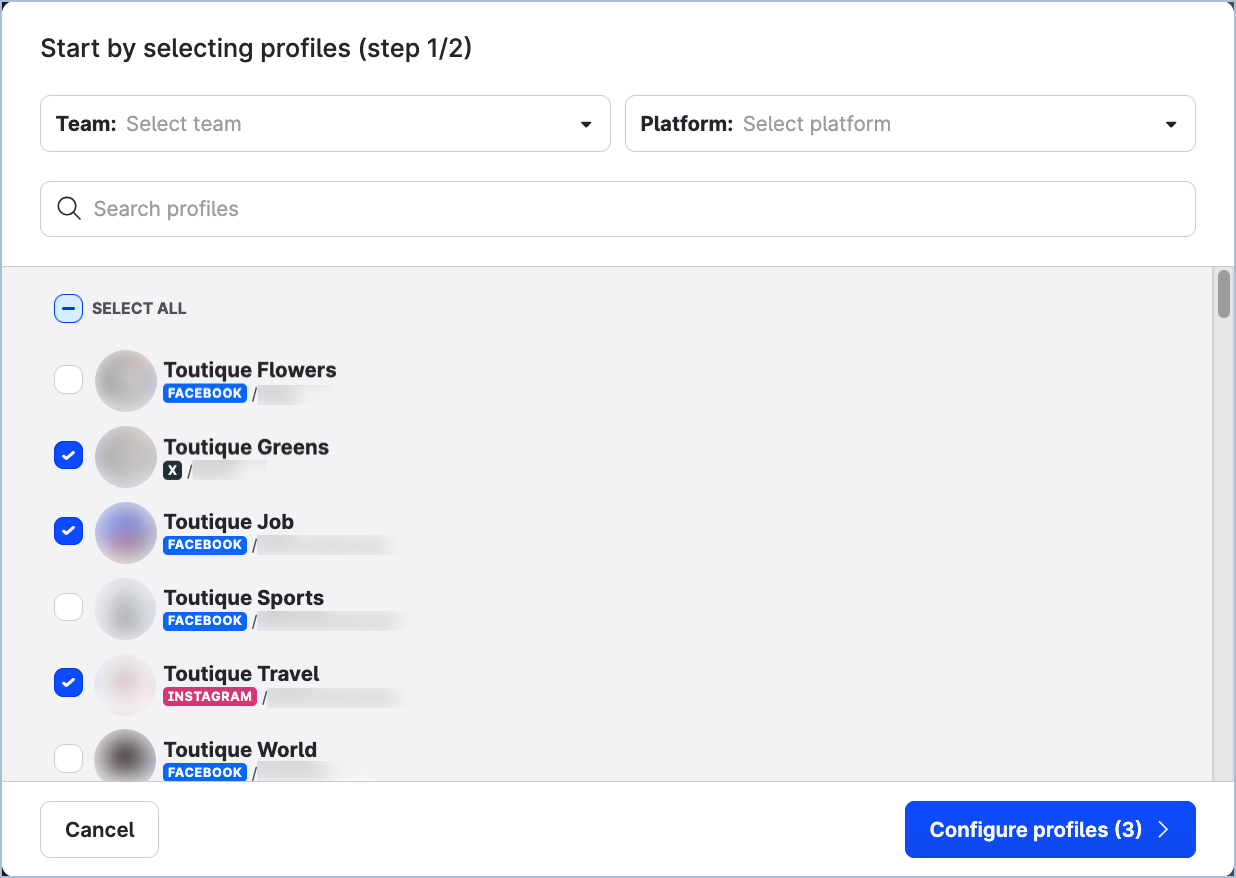
You are prompted to choose the profile connections you want to allow the team members to use.
-
For each profile, select the connections the team members will be able to use.
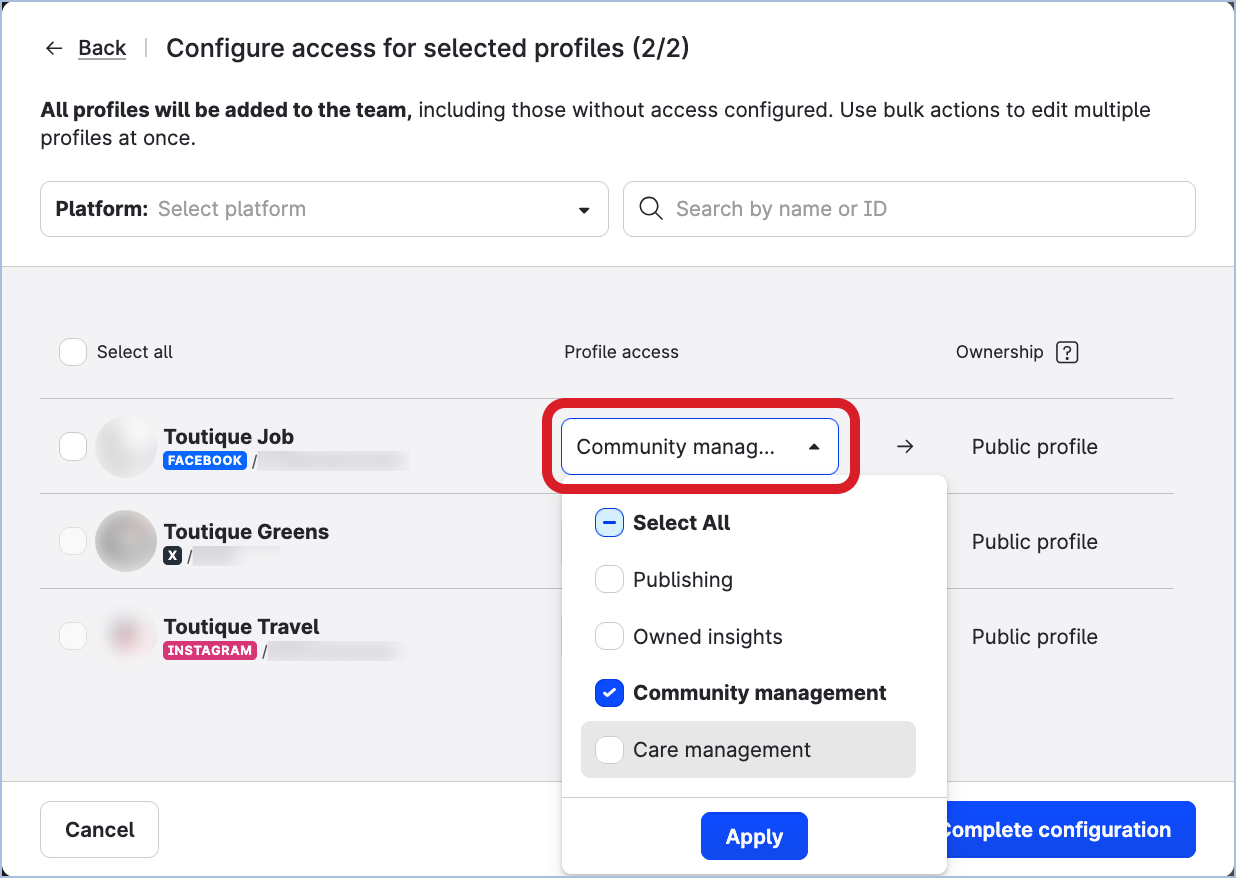
To add an owned profile as public, do not select any connection for it.
-
Click Complete configuration.
The profiles are added to the team and team members are granted access according to their team roles.
To add an ad account to a team, follow these steps:
-
Go to Settings → Team management → Teams.
-
Click one of your teams.
The team panel slides out. -
Click the Ad accounts tab.
-
Click + Add account.
The dialog opens, showing all ad accounts to which you have access in your Emplifi account. -
Select the ad accounts you want to add to the team, and click Add accounts.
The ad accounts are added to the team. -
Repeat the steps above for each of your teams.
Update feature-specific configurations
Some features in the Emplifi platform store configurations that reference user groups. If your account uses any of the following features, update their configuration to reference teams as part of your preview-state preparation. Failing to complete these updates before migration may break the affected workflows.
Do not remove existing user group assignments. User groups are part of your active configuration and must remain assigned until migration is complete. Instead, mirror your user group assignments by adding the equivalent team assignments alongside them. Both assignments will coexist until the migration is completed.
In both Collaborative and Restrictive accounts
Update the following configurations if applicable to your account:
-
UA saved views and boards: Add Dynamic Teams assignment to all saved views and boards that currently have Dynamic Groups assigned.
-
Approval flows: Create new approval flows linked to teams to reflect all account-level approval flows.
-
UA Care & Community widgets (Saved views and Dynamic Boards): Replace Groups filtering with Teams filtering in all Care and Community widgets that currently use Groups filtering.
-
Dashboard Community widgets (My Dashboards and Shared Dashboards): Replace Groups filtering with Teams filtering in all Community widgets in dashboards that currently use Groups filtering.
Ensure user team assignments are in place before updating these configurations. Unlike other configurations in this list, user group assignments are not carried over for Care and Community widgets and their saved views — teams will be used as the filtering and data source automatically, even before migration is completed. If team assignments are not set up first, users may temporarily lose access to their filtered views.
-
Care skills: Add Dynamic Teams assignment to all Care skills that currently have Dynamic Groups assigned.
-
Care views: Add Dynamic Teams assignment to all Care views that currently have Dynamic Groups assigned.
-
Case queues: Add Dynamic Teams assignment to all Case queues that currently have Dynamic Groups assigned.
-
Business hours: Add Dynamic Teams assignment to all Business hours that currently have Dynamic Groups assigned.
-
Answer template groups: Add Dynamic Teams assignment to all Answer template groups that currently have Dynamic Groups assigned.
-
Keyword lists: Add Dynamic Teams assignment to all Keyword lists that currently have Dynamic Groups or Global assignment.
-
Flow automations: Add Teams in triggers, conditions, and actions to all Flow automations that currently reference User Groups.
In Restrictive accounts only
In Restrictive mode, globally shared resources are not supported. The following resource types may contain items currently shared globally — meaning they are visible and accessible to all users in the account. These items need to be reassigned to specific users or teams instead.
Timing matters for this reassignment. If you reassign resources to users, do this before migration — this works within the current system and will not disrupt active workflows. If you reassign resources to teams, do this after migration is completed — teams will not be active before migration, so removing the Global assignment before migration without a valid team assignment in place will break access to these resources.
-
Dashboards, UA, Collections, Link in Bio, Care views, Labels, Label Groups, and Community feeds: Reassign all globally shared items to specific users (before migration) or teams (after migration), where supported.
If none of the above features are in use in your account, you can skip this step.
Review your Teams configuration
Before confirming that your account is ready for migration, review the Teams configuration you prepared to make sure it accurately reflects how you want access to be managed after migration.
For each team, verify the following:
-
Product access — Only the modules the team should access are enabled.
-
Team roles — The roles cover all required permission scopes. At minimum, there is one team admin role and one or more user roles per team.
-
Users — All users who should have access to the team resources are added with the correct team role.
-
Resources — All profiles and ad accounts the team needs are added with the appropriate profile access.
If you find gaps or mismatches during review, update the configuration before confirming readiness. Changes in Team management during the preview state do not affect live access.
Confirm readiness with your Customer Success Manager
When you are satisfied with your Teams configuration, notify your Customer Success Manager that your account is ready to migrate.
Emplifi will then complete the migration on your behalf. After migration is completed, Teams becomes the active governance solution, and the configuration you prepared takes effect.
No disruption to your regular workflows is expected during the migration. The migration is completed by Emplifi, and no action is required from you to perform the migration itself.
If you have questions at any point, contact your Customer Success Manager or Emplifi Support at support@emplifi.io.