Add an Owned Profile for Your Instagram Account
Add an Instagram account that you own or manage as an owned (private) profile to your Emplifi account. Having an Instagram account as an owned profile allows you to see the insights of the account and to post content to the Instagram account directly from Emplifi.
To know more about owned and public profiles, see Add a Profile as Owned (Private) or Public.
This article is for the users who have an account role with the “Add Pages & Profiles” permission (that is, for Account Admins and the users who have a custom account role with the “Add Pages & Profiles” permission under the Pages & Profiles section; see Account Roles).
This article describes the steps you need to perform in a third-party product. The process and changes in the user interface in third-party products are subject to changes beyond our control, and Emplifi therefore accepts no liability associated with them.
Prerequisites
Before adding an Instagram account as an owned profile, make sure that the following prerequisites are met:
The Instagram account is professional.
Personal Instagram accounts cannot be added to the Emplifi platform. For more information about switching to a professional account, see this Instagram help article. When switching to a professional account, you can choose between “Business” or “Creator”. You can choose either one for the purpose of adding the account to the Emplifi platform; however, if you are planning to post content to this account with Publisher or use this account to post comments in Community, choose “Business”. Publishing content via Publisher and posting comments in Community are not available for Creator accounts due to restrictions set by the Facebook API.
The Instagram account is connected to a Facebook page.
The Facebook page must be a business page managed by a business Facebook account.
To make sure that the Instagram account is connected to the Facebook page:Log in to the Facebook account that manages the Facebook page.
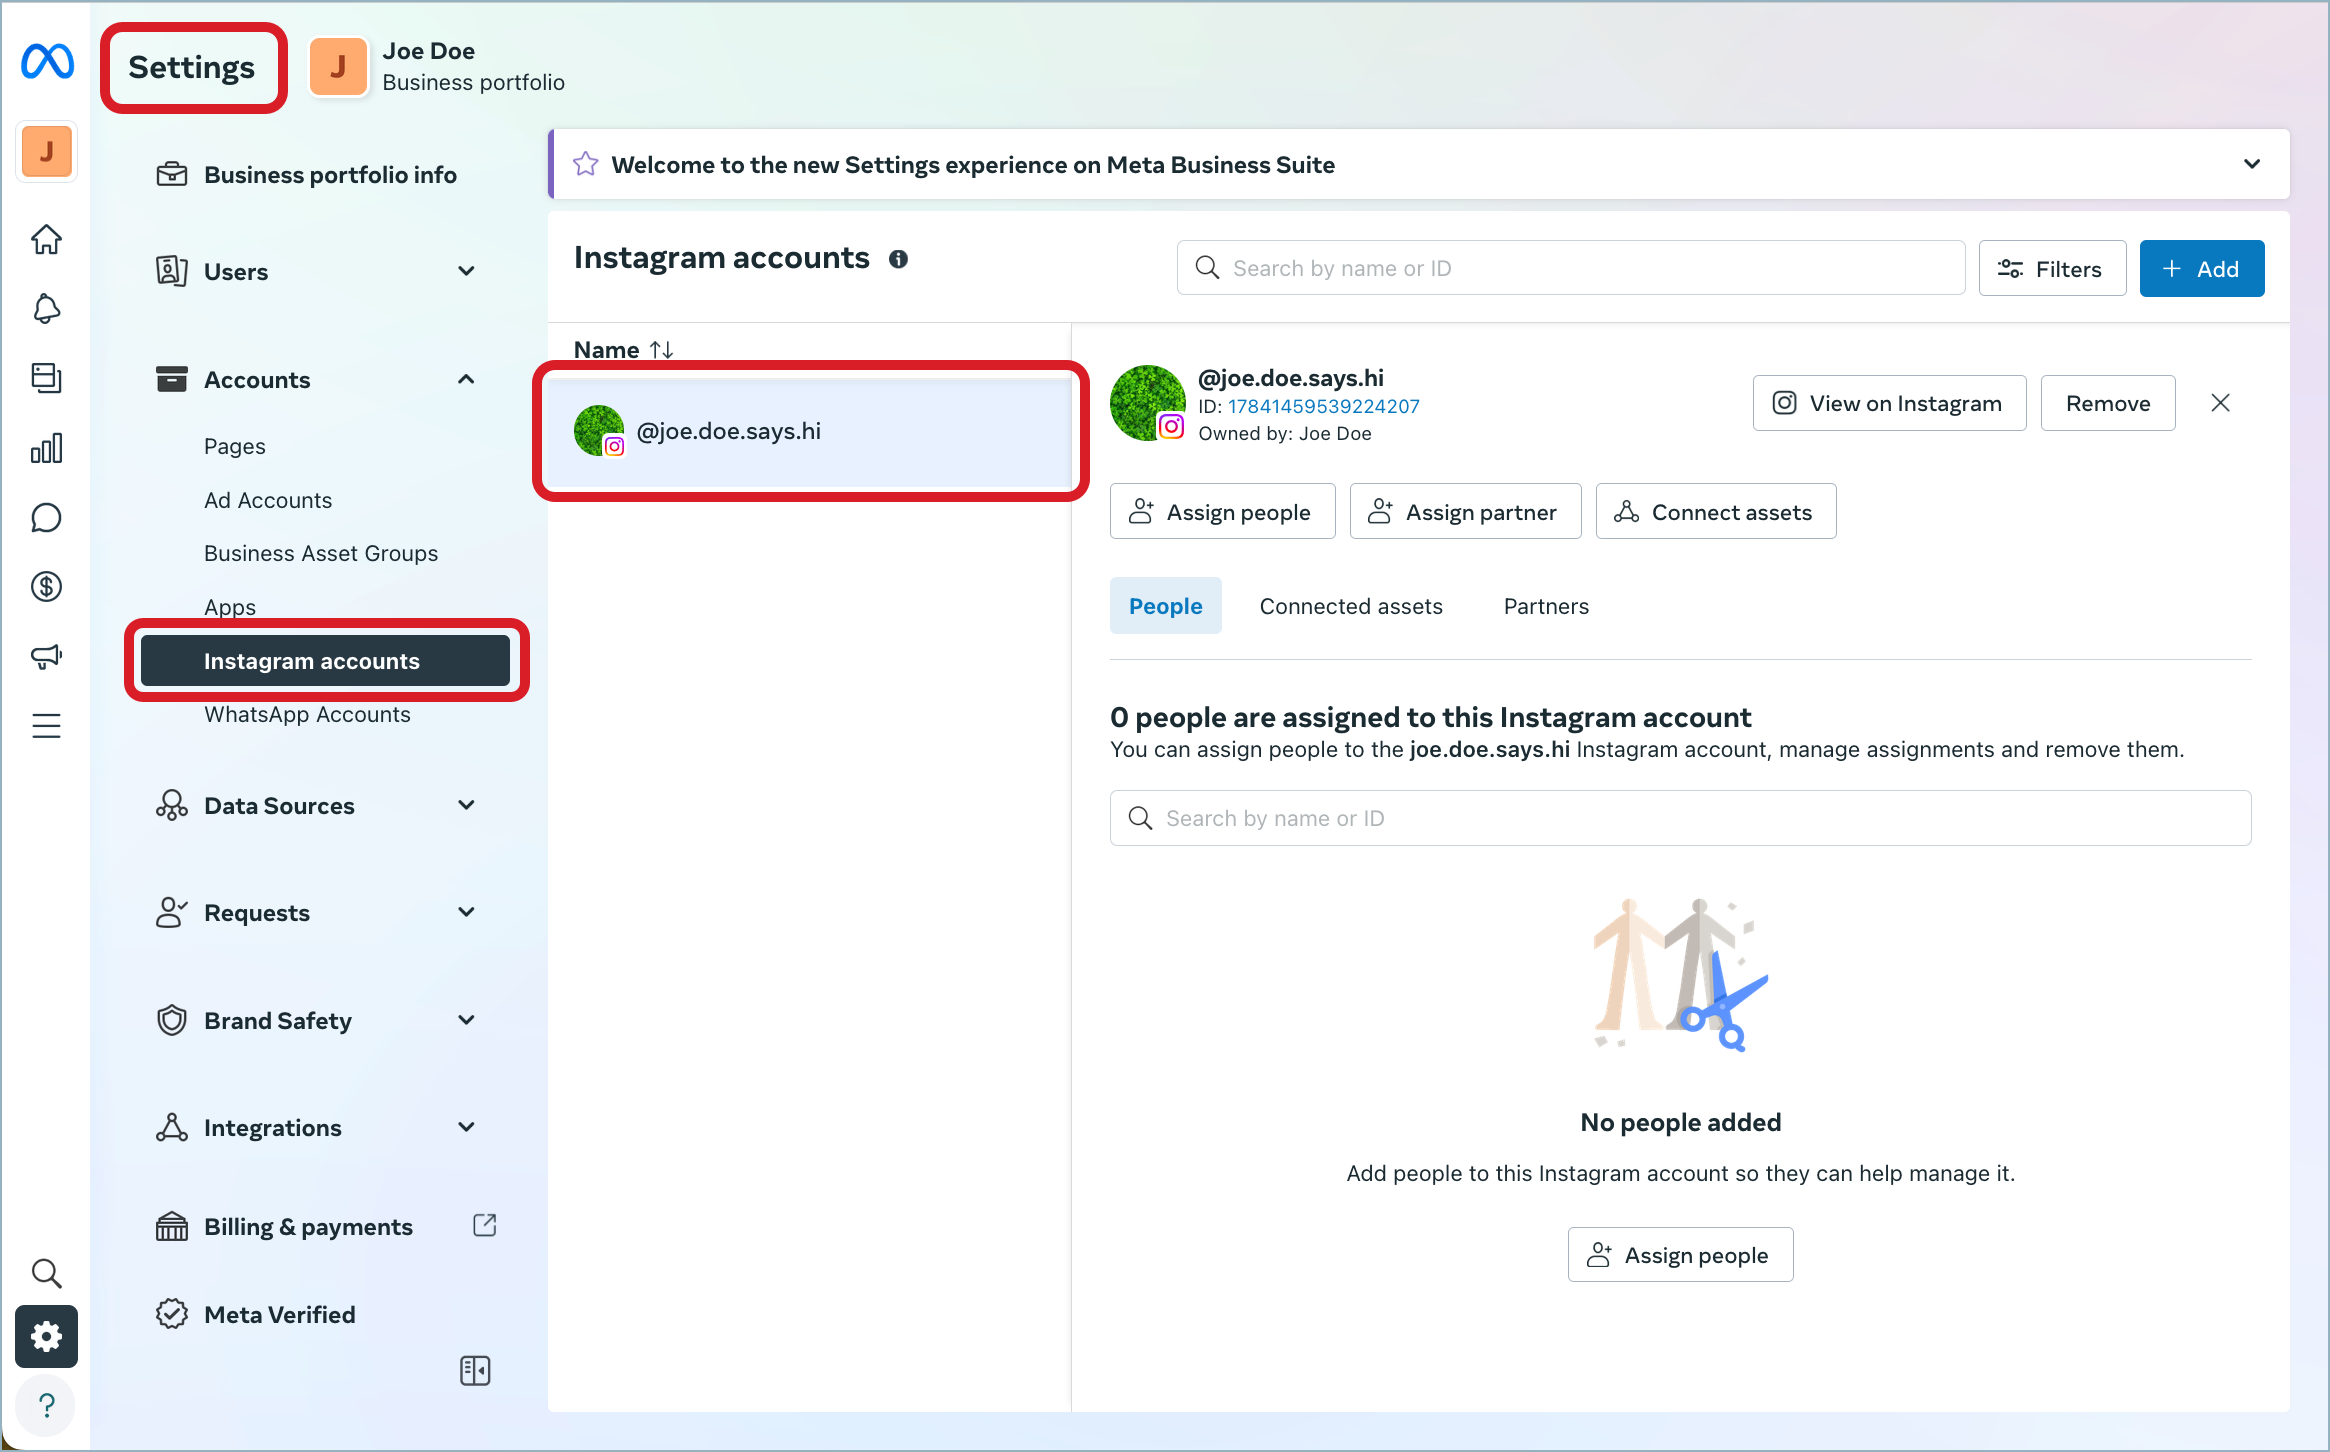
Go to the Meta Business Suite, and click Settings on the bottom left.
In the menu on the left, locate the Accounts section, and click Instagram account.
Make sure that the Instagram account is shown.
The Facebook account has proper permissions set up.
The Facebook account must have full or at least partial access to the Facebook page (if the page is in the New page experience) or must have a page role of admin or editor (if the page is in the Classic page experience). This will allow you to connect insights of the Instagram account to Emplifi and allow Emplifi to publish content to the Instagram account.
If the Facebook account has a different level of access or a different page role (for example, the moderator page role), Emplifi will not be able to add the Instagram account because the moderator page role has permissions to connect insights, but not the publishing permissions.
To check the permissions:Log in to the Facebook account that manages the Facebook page connected to the Instagram account.
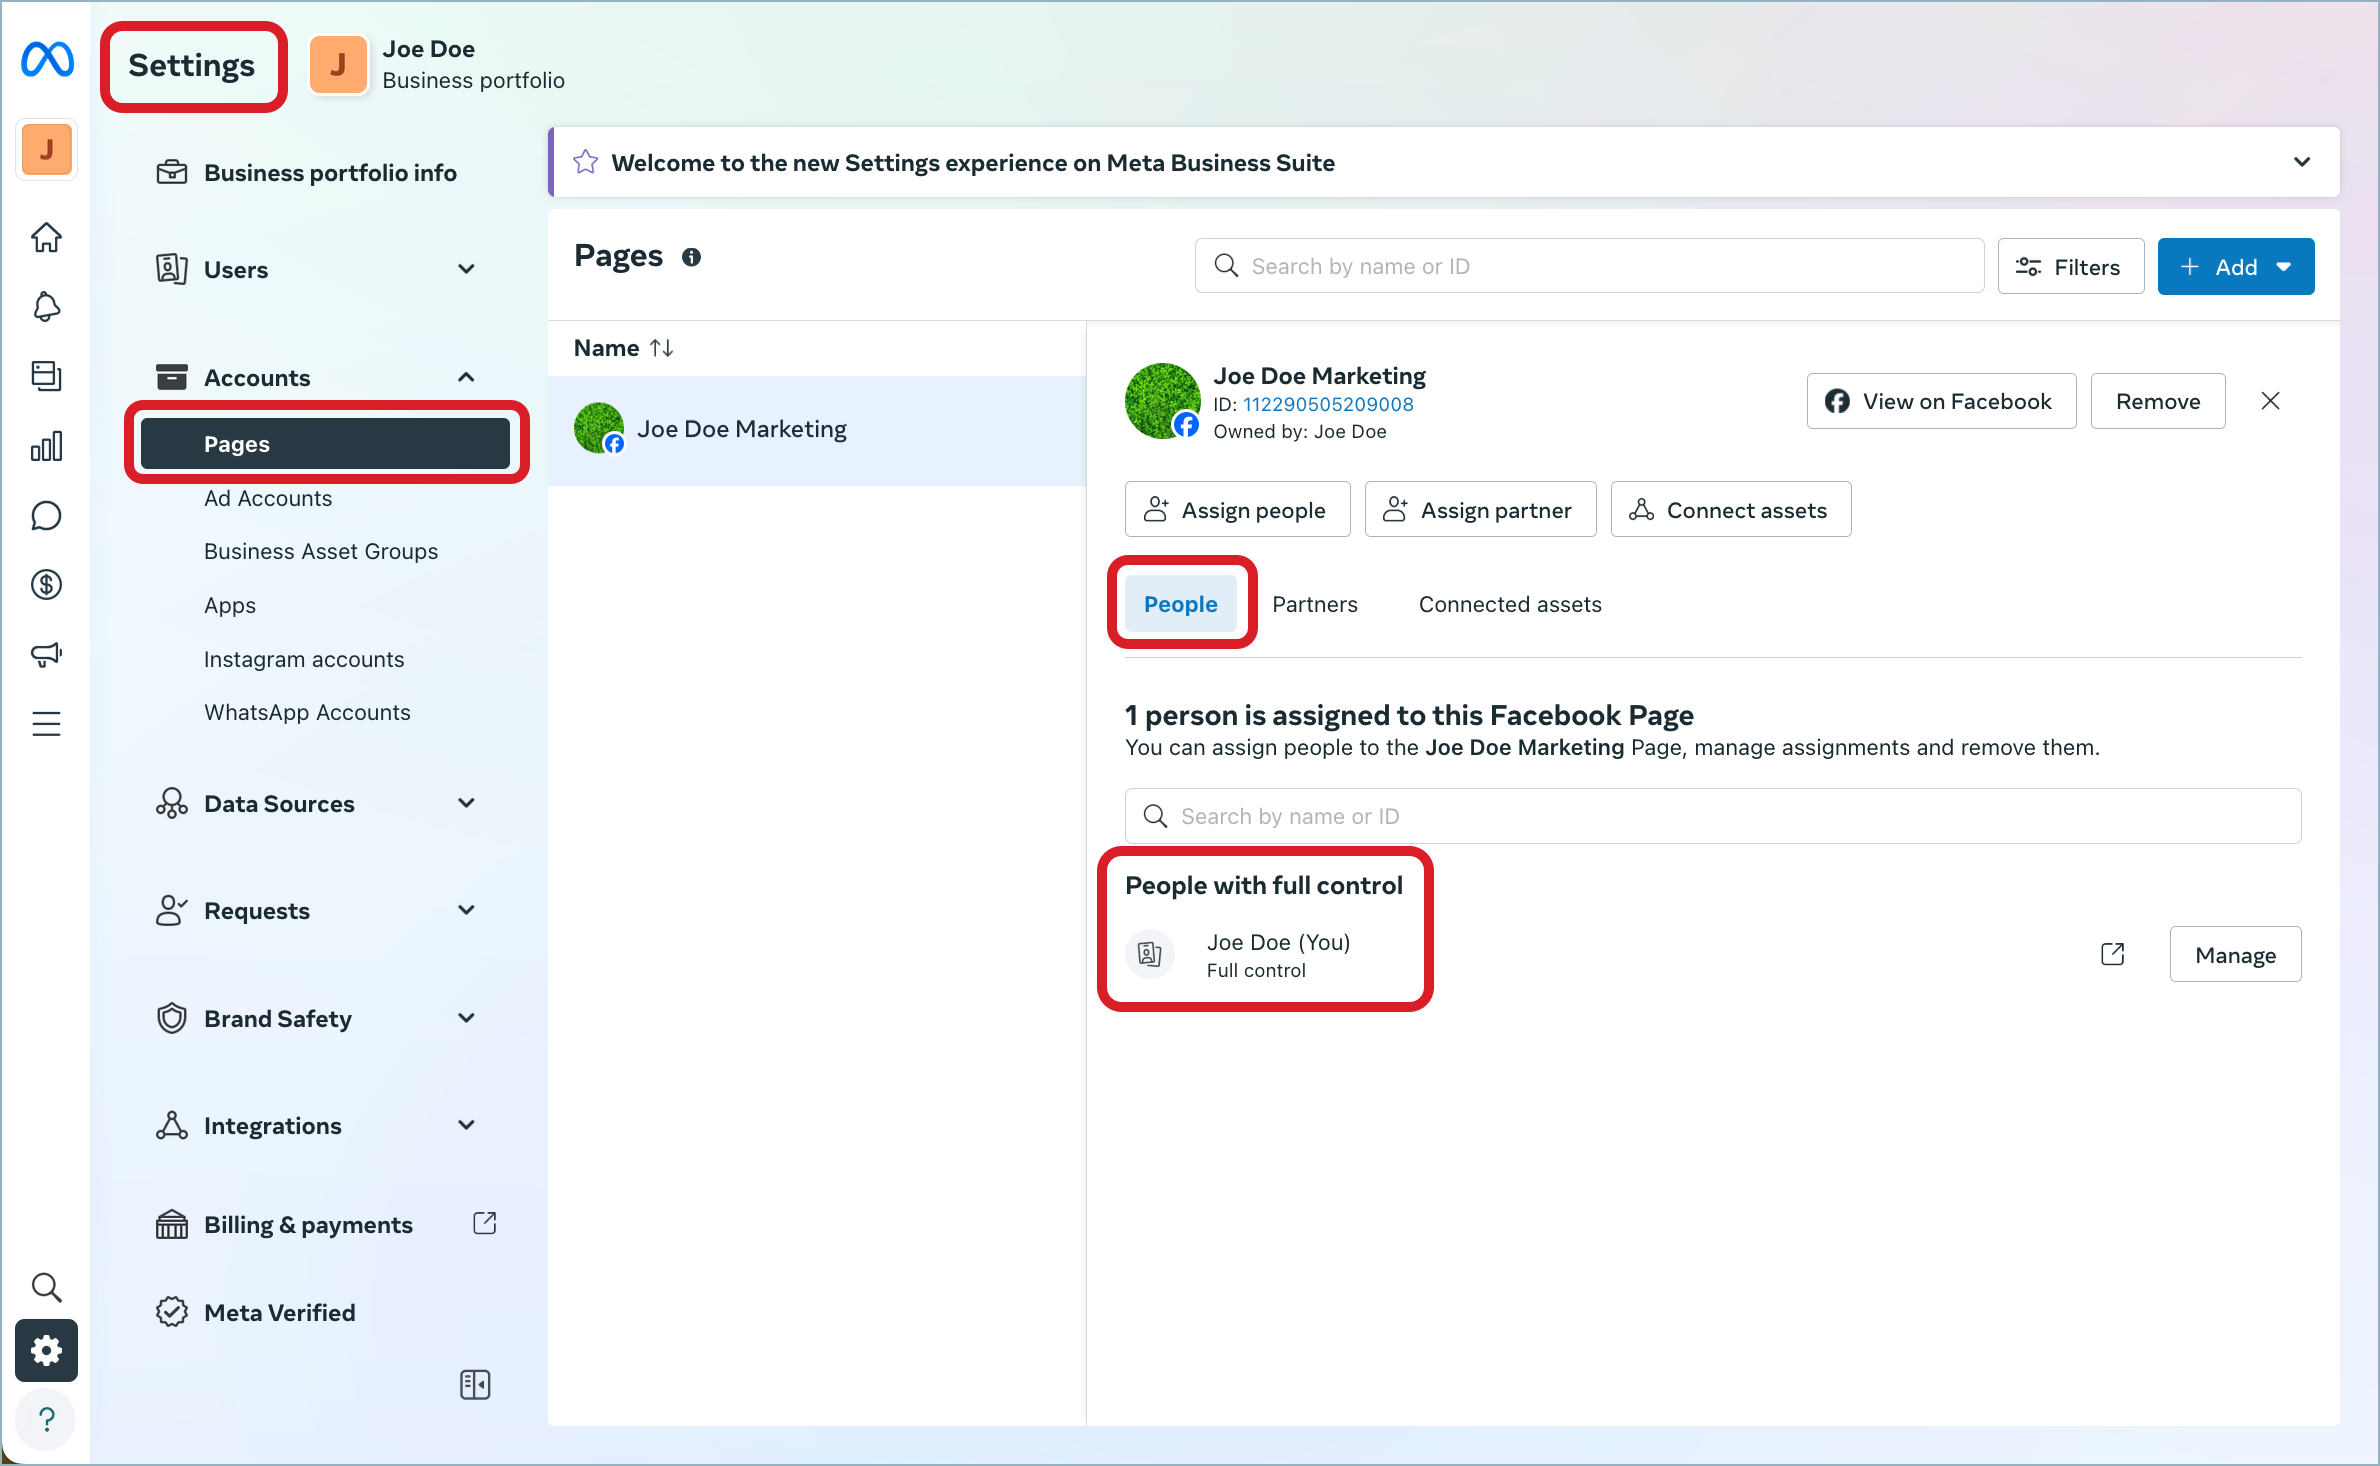
Go to the Meta Business Suite, and click Settings on the bottom left.
In the menu on the left, locate the Accounts section, and click Pages.
Select your page, and and review the account permissions on the People tab.
Add an owned profile for your Instagram account
Steps:
In a browser, log in to the Facebook account that manages the business Facebook page connected to the Instagram account.
In the same browser window, access Emplifi, and go to Settings -> Channels -> Social profiles.
Click +Add profile.
The dialog for adding a new data source pops up.Click Connect owned profiles.
You are prompted to select a social media platform.Click Instagram.
If it is the first time you are attempting to add a profile for an Instagram account to Emplifi, you are asked to allow Emplifi to access all the relevant data required. Review the requested data permissions and allow Emplifi to access the data.
Emplifi accesses the data from Facebook, and the dialog shows the Instagram account connected to the business Facebook page under the current Facebook account.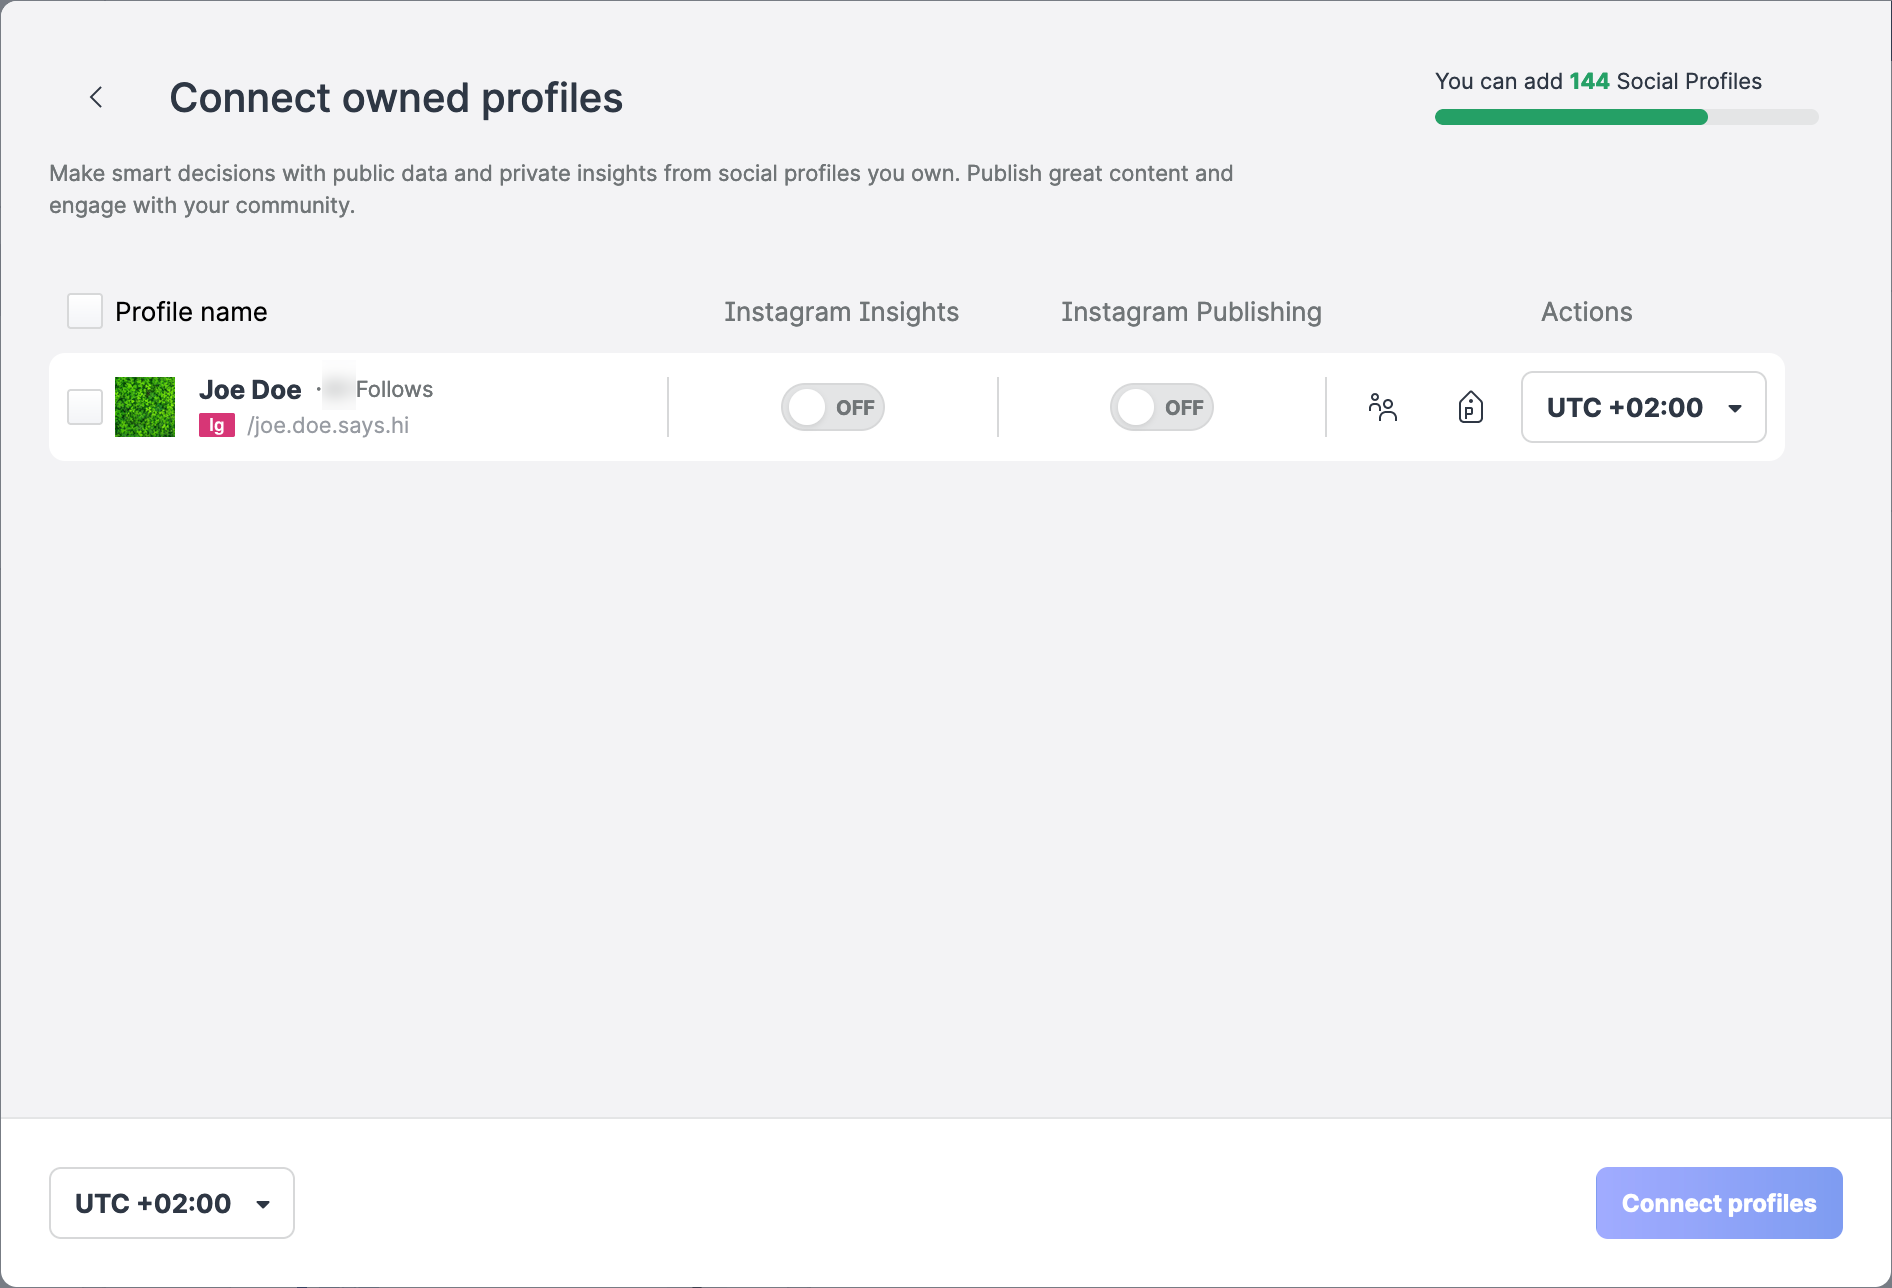 If no Instagram account is shown, see “Troubleshooting” further in this article.
Toggle the switch for the Instagram Insights option to ON to enable access to the insights of the Instagram account, and toggle the switch for the Instagram Publishing option to ON to be able to post content to the Instagram account from the Publisher module.
The Connect profiles button on the bottom right gets enabled.(Optional) Perform the following actions:
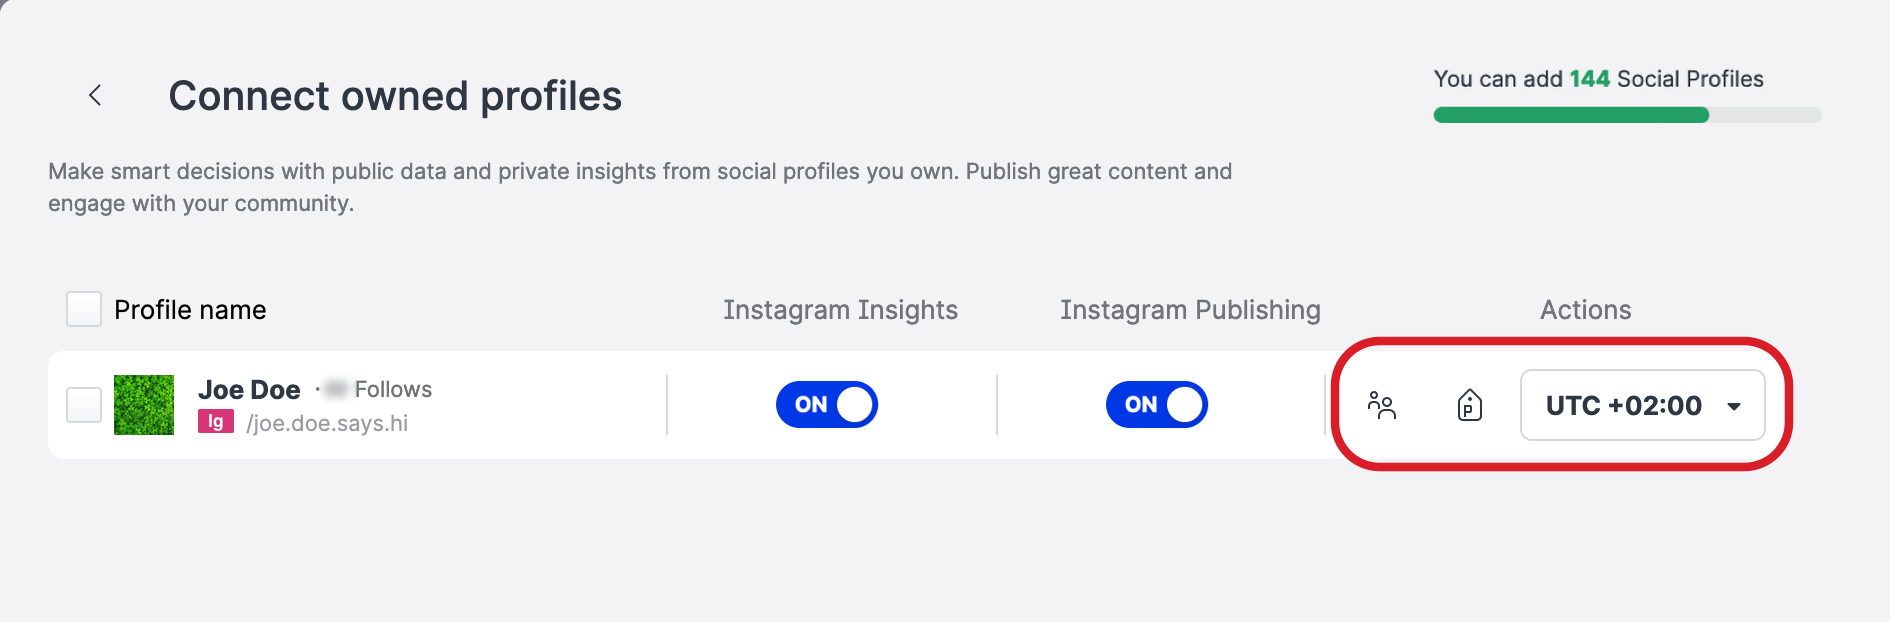
Click the group icon to set up the visibility of the profile in the Emplifi account.
By default, the profile is set to be visible only to you and Account Admins (for more information about visibility, see Set Up Visibility of a Profile).Click the label icon to assign labels to the profile (for more information about the labels, see Set Up Labels).
Select the timezone to apply to the profile (for more information about the timezones, see Customize the Properties of a Profile).
By default, the timezone is set to your default timezone.
Click Connect profiles.
The Instagram account is added as an owned profile and appears in the list of profiles.
If you want to track the profile in Community, enable Community management for the profile (see Activate Profiles for Community and Set Up Profile Roles).
Troubleshooting
If something is going wrong while you are adding an owned profile for an Instagram account, take the following actions, and try adding an owned profile again:
Check that all the prerequisites are met (see “Prerequisites” earlier in this article).
Check that you are logged in to the correct Facebook account.
You must be logged in to the account that manages the business Facebook page connected to the Instagram account - and not to the business Facebook page itself.Check the settings of the Emplifi business integration in your Facebook account:
Log in to the Facebook account that manages the Facebook page connected to the Instagram account.
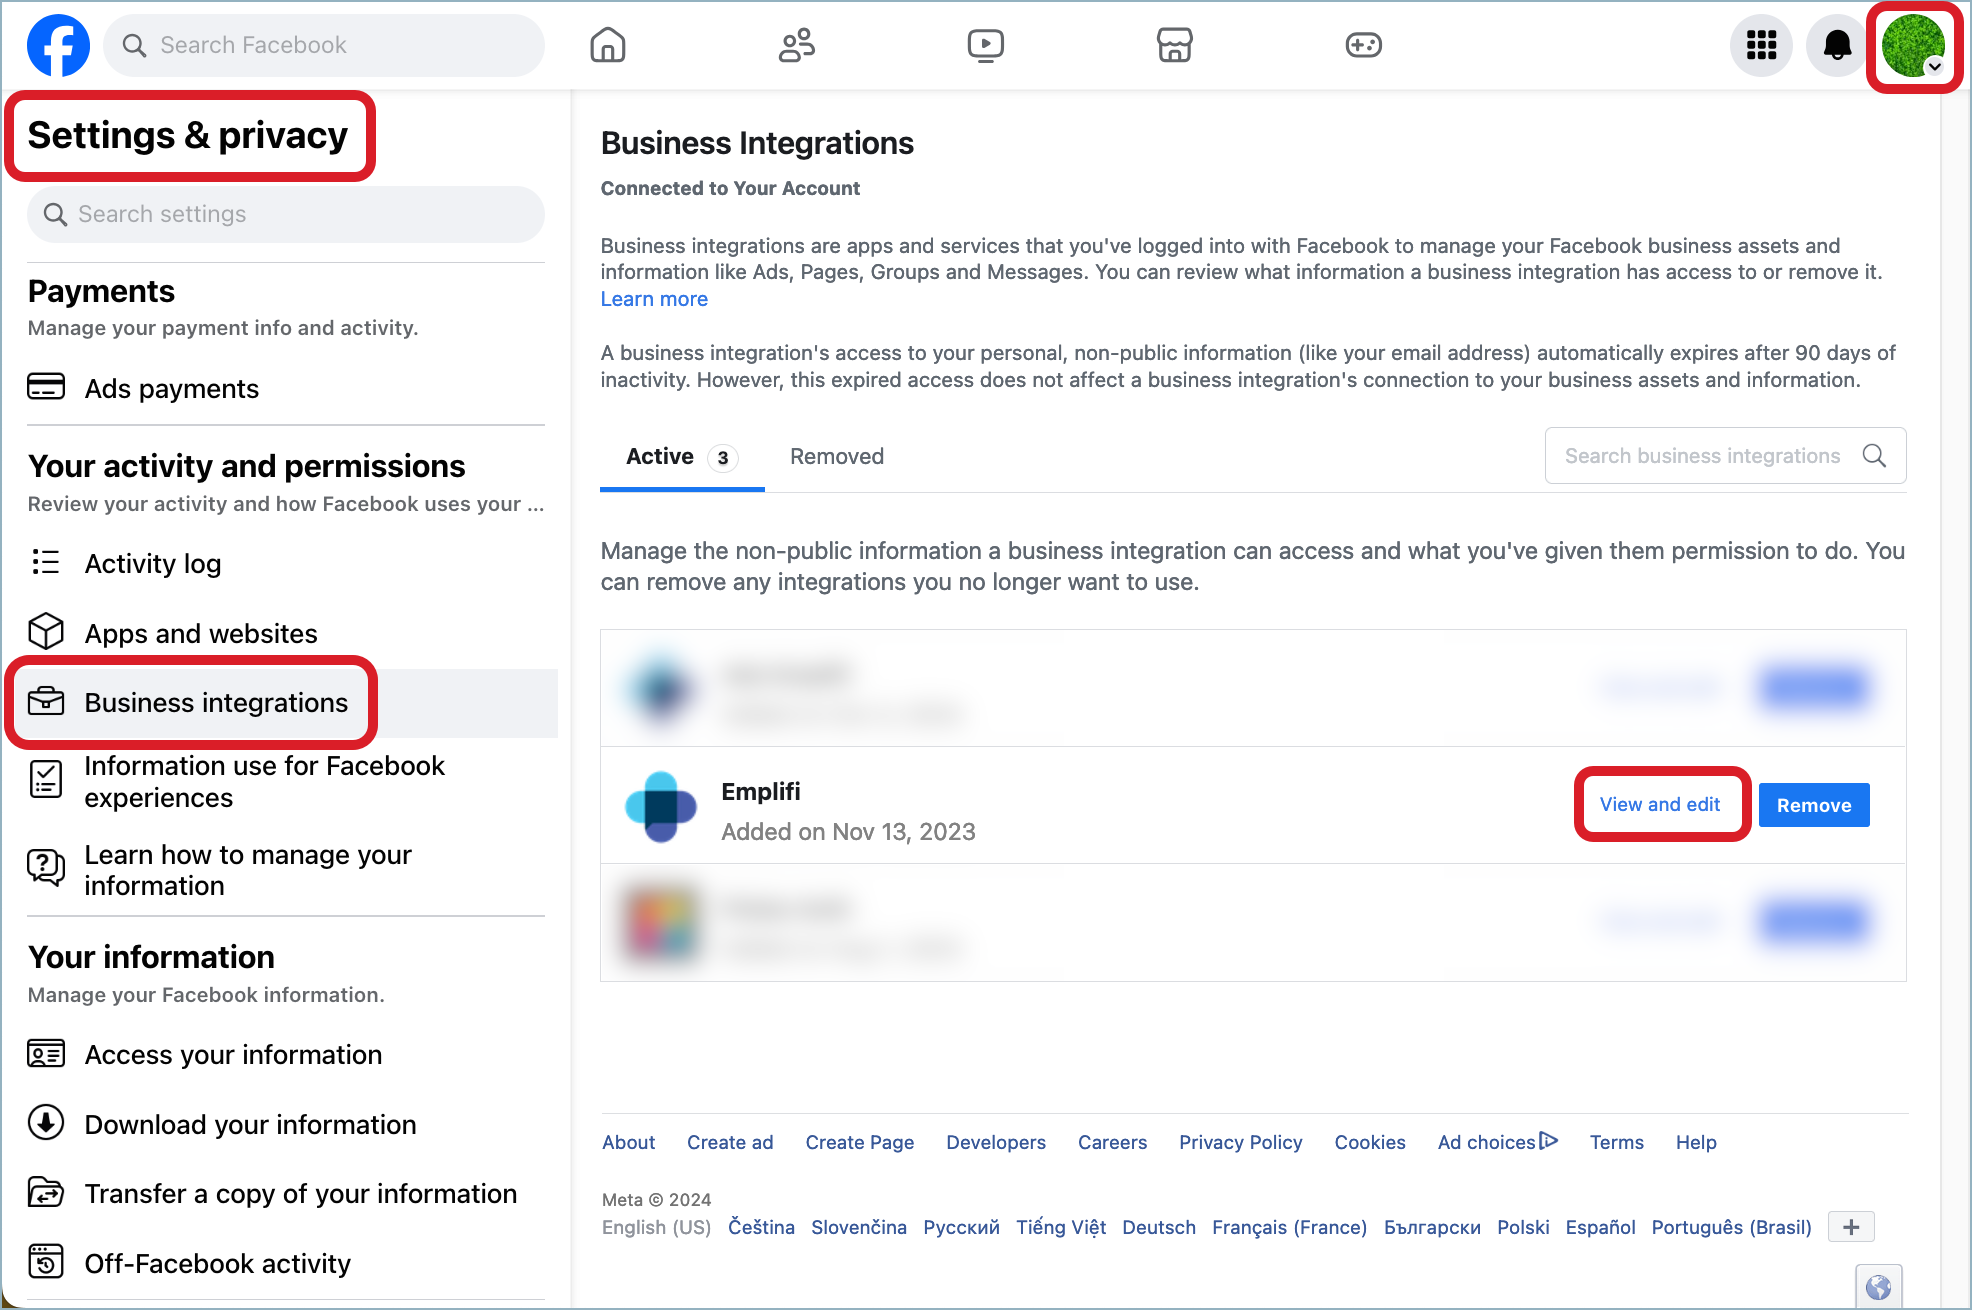
Click your profile picture on the top right, and go to Settings & privacy -> Settings.
In the menu on the left, locate the Your activity and permissions section, and click Business integrations.
Click View and edit for the Emplifi integration.
Do the following:
Make sure that the toggles for the page permission sections (such as “Read content posted on the Page”, “Create and manage ads for your Page”, “Manage accounts, settings, and webhooks for a Page”, and so on) are enabled.
If you have multiple pages managed under your Facebook account, make sure that the Facebook page that you want to add to Emplifi is checked under each of the page permission sections.
If none of those actions helped, contact Emplifi Support at support@emplifi.io. Include the following in your Support ticket:
The URL of the Instagram account that you want to add to the Emplifi platform
The URL of the Facebook business page connected to the Instagram account
A full-screen screenshot of the web page that shows that the Instagram account is connected to the Facebook page (for the information about how to navigate to this page, see “Prerequisites” earlier in this article)
A full-screen screenshot of the web page that shows the level of access or a page role that the Facebook account has (for the information about how to navigate to this page, see “Prerequisites” earlier in this article)