Activate profiles for Community
Community gathers data only from owned profiles that were activated for Community. Community does not gather data from owned profiles that were not activated for Community or from public profiles.
The number of profiles (slots) to be activated for Community available to you depends on your Emplifi plan (see Subscription Plan). You can activate owned profiles on the following platforms for Community:
-
Facebook
-
Google Business
-
Instagram
-
LinkedIn (company pages only)
-
Reddit (Reddit mentions come from Listening queries that are enabled for Community; connecting the account gives the possibility to engage with these mentions in Community and Care)
-
TikTok
-
WhatsApp
-
X (formerly Twitter)
-
YouTube
Activate one profile for Community
For you to be able to activate a profile for Community:
-
The profile must have an active “Publishing” connection (see Check and Establish Connections of Owned Profiles).
-
You must be an Account Admin or have a custom account role with the following permissions (see Account Roles):
-
Manage Community moderation
-
View Pages & Profiles
-
Add Pages & Profiles
-
Remove Pages & Profiles
-
Steps:
-
Go to Settings -> Channels, and then:
-
For profiles connected to accounts on social media platforms (such as Facebook, Instagram, LinkedIn, and so on), click Social profiles.
-
For profiles connected to accounts on review platforms (such as Google Business), click Google businesses.
-
-
Click the profile that you want to activate.
-
Under Community Engagement, toggle the switch next to the Community Management option to ON.
If the switch is disabled, check whether the profile has an active “Publishing” connection and that you are an Account Admin.
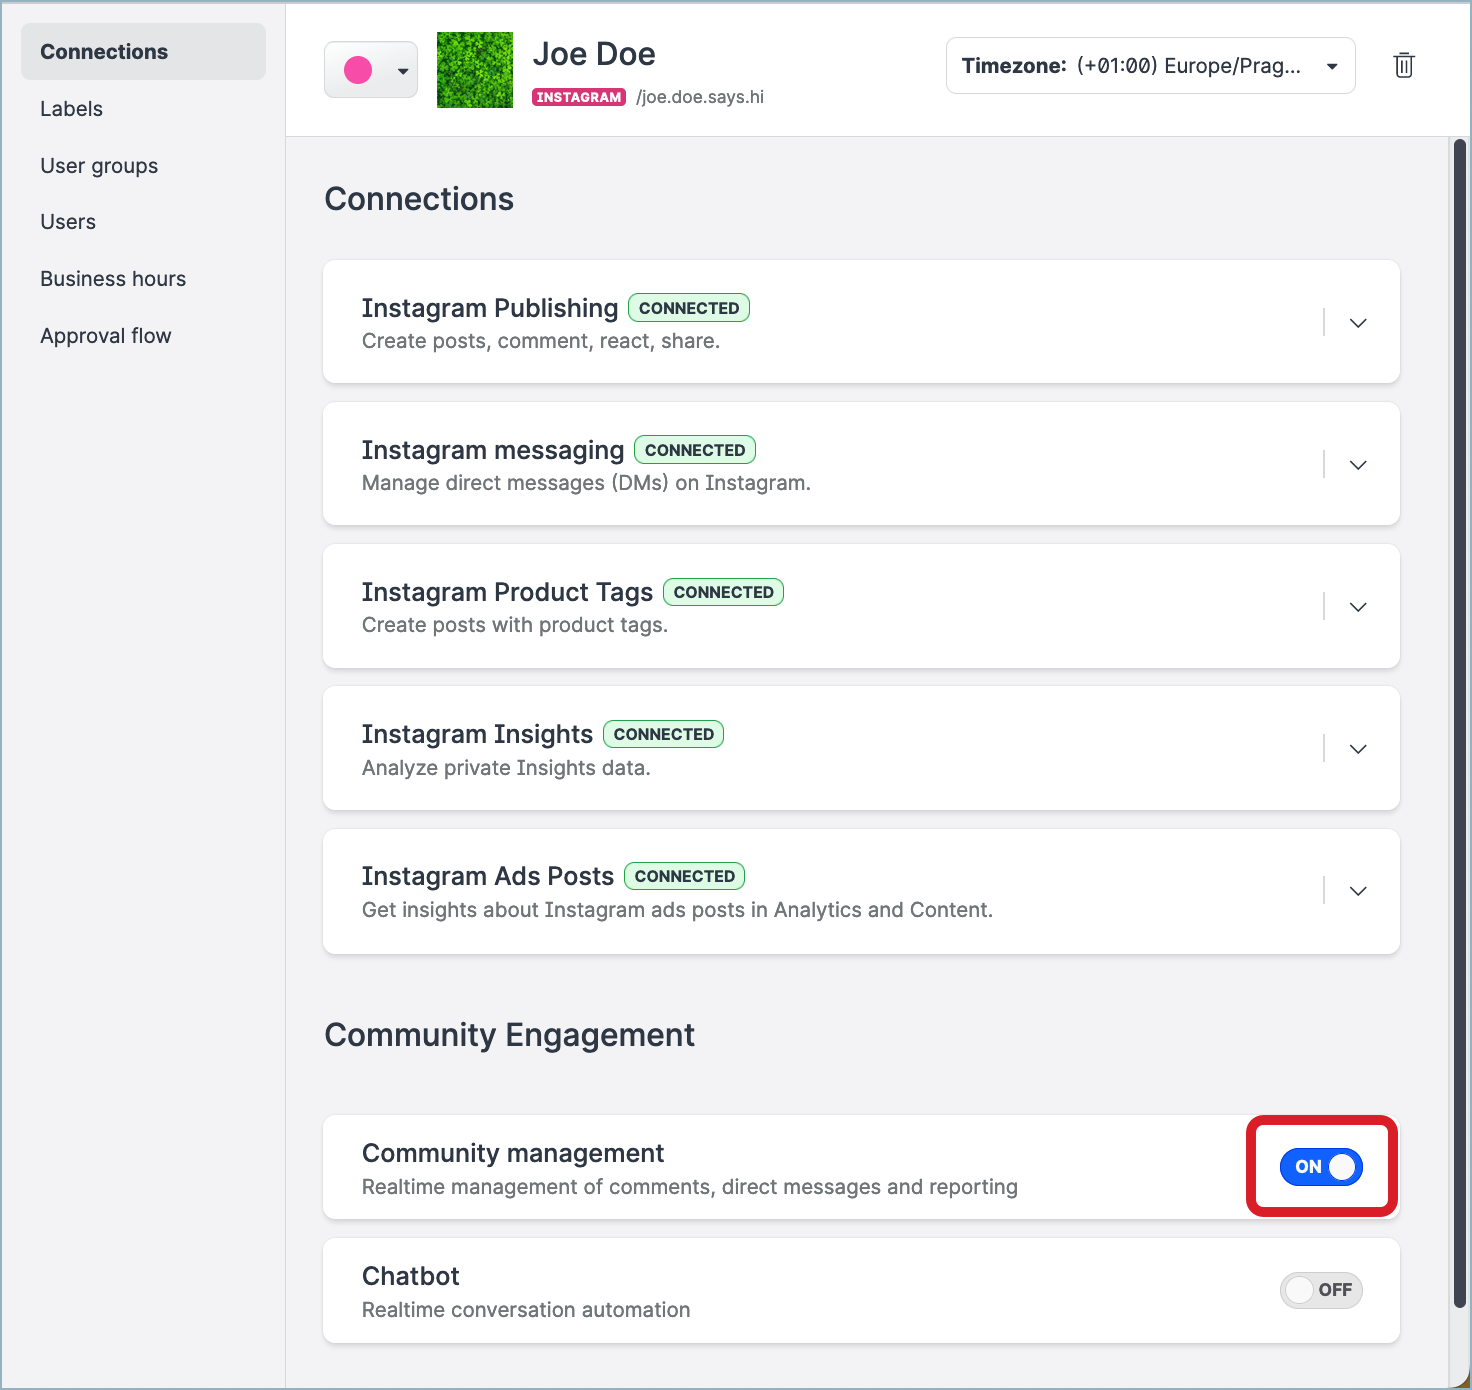
The profile is activated for Community.
Community now starts gathering the content.
You can deactivate a profile at any point. To do so, toggle the switch next to the Community Management option to OFF, and confirm the deactivation. Once the profile is deactivated, Community stops gathering its content.
Activate multiple profiles for Community
For you to be able to activate profiles for Community:
-
The profiles must have an active “Publishing” connection (see Check and Establish Connections of Owned Profiles).
-
You must be an Account Admin or have a custom account role with the “Manage Community moderation” permission under the Pages & Profiles section (see Account Roles).
Activating multiple profiles at once is supported only for profiles connected to accounts on social media platforms (such as Facebook, Instagram, LinkedIn, and so on). Activating multiple profiles connected to accounts on review platforms (such as Google Business) is not available.
Steps:
-
Go to Settings -> Channels -> Social profiles.
-
Click Filter on the top right.
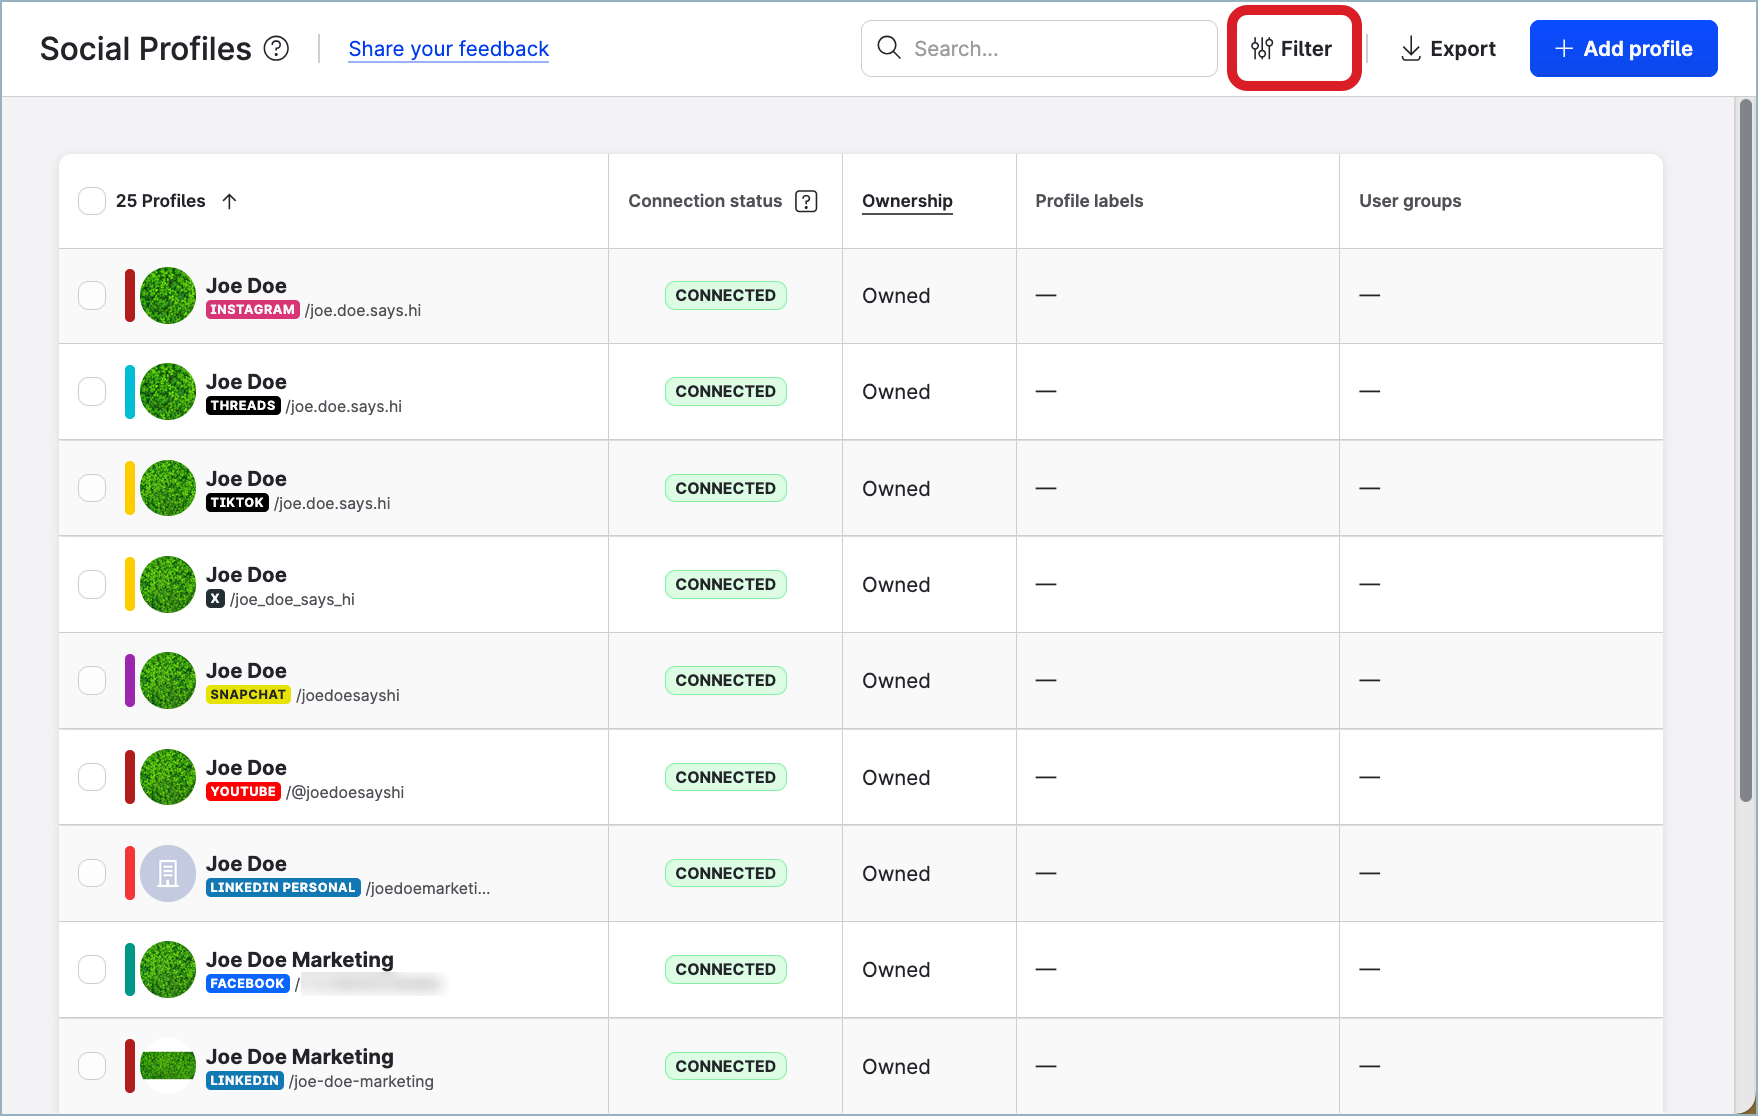
The filter panel opens.
-
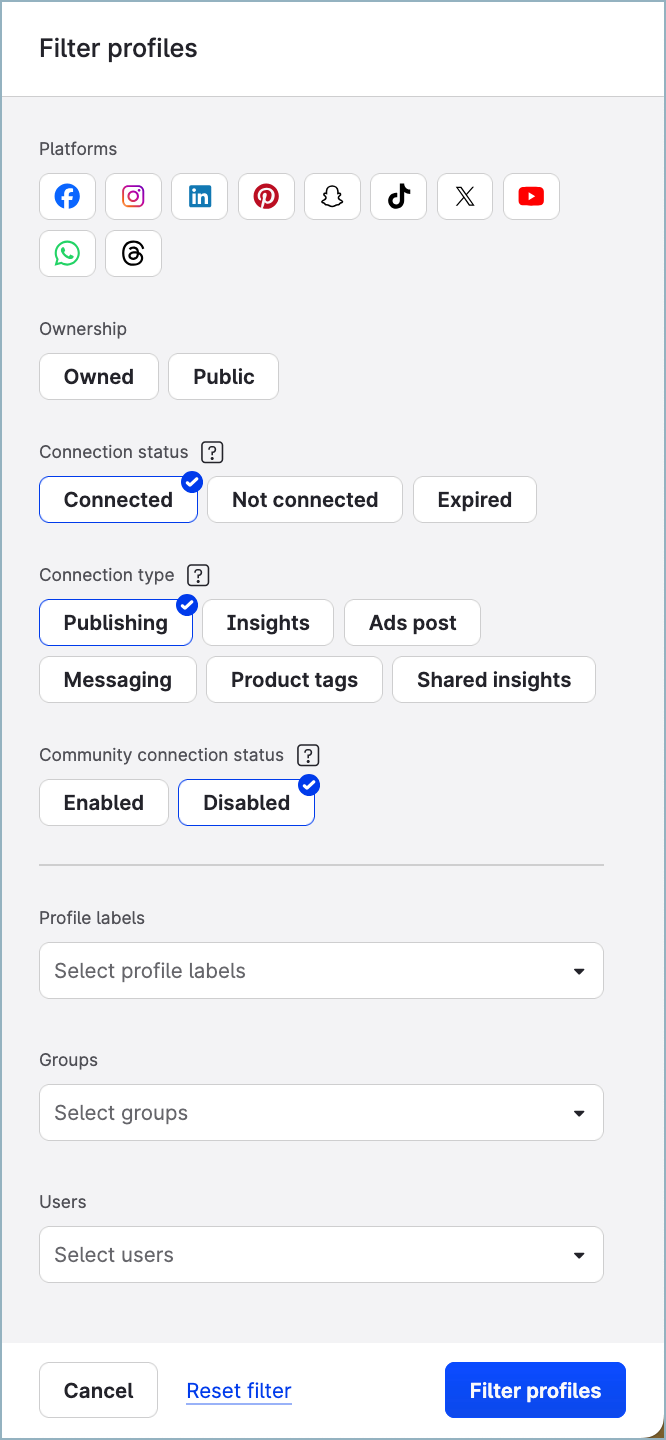
Select the following filtering criteria:
-
Under Connection status, select Connected.
-
Under Connection type, select Publishing.
-
Under Community connection status, select Disabled.
-
-
Select any other criteria that are relevant to your use case. For example, you may want to select specific social media platforms or user groups.
-
Click Filter profiles.
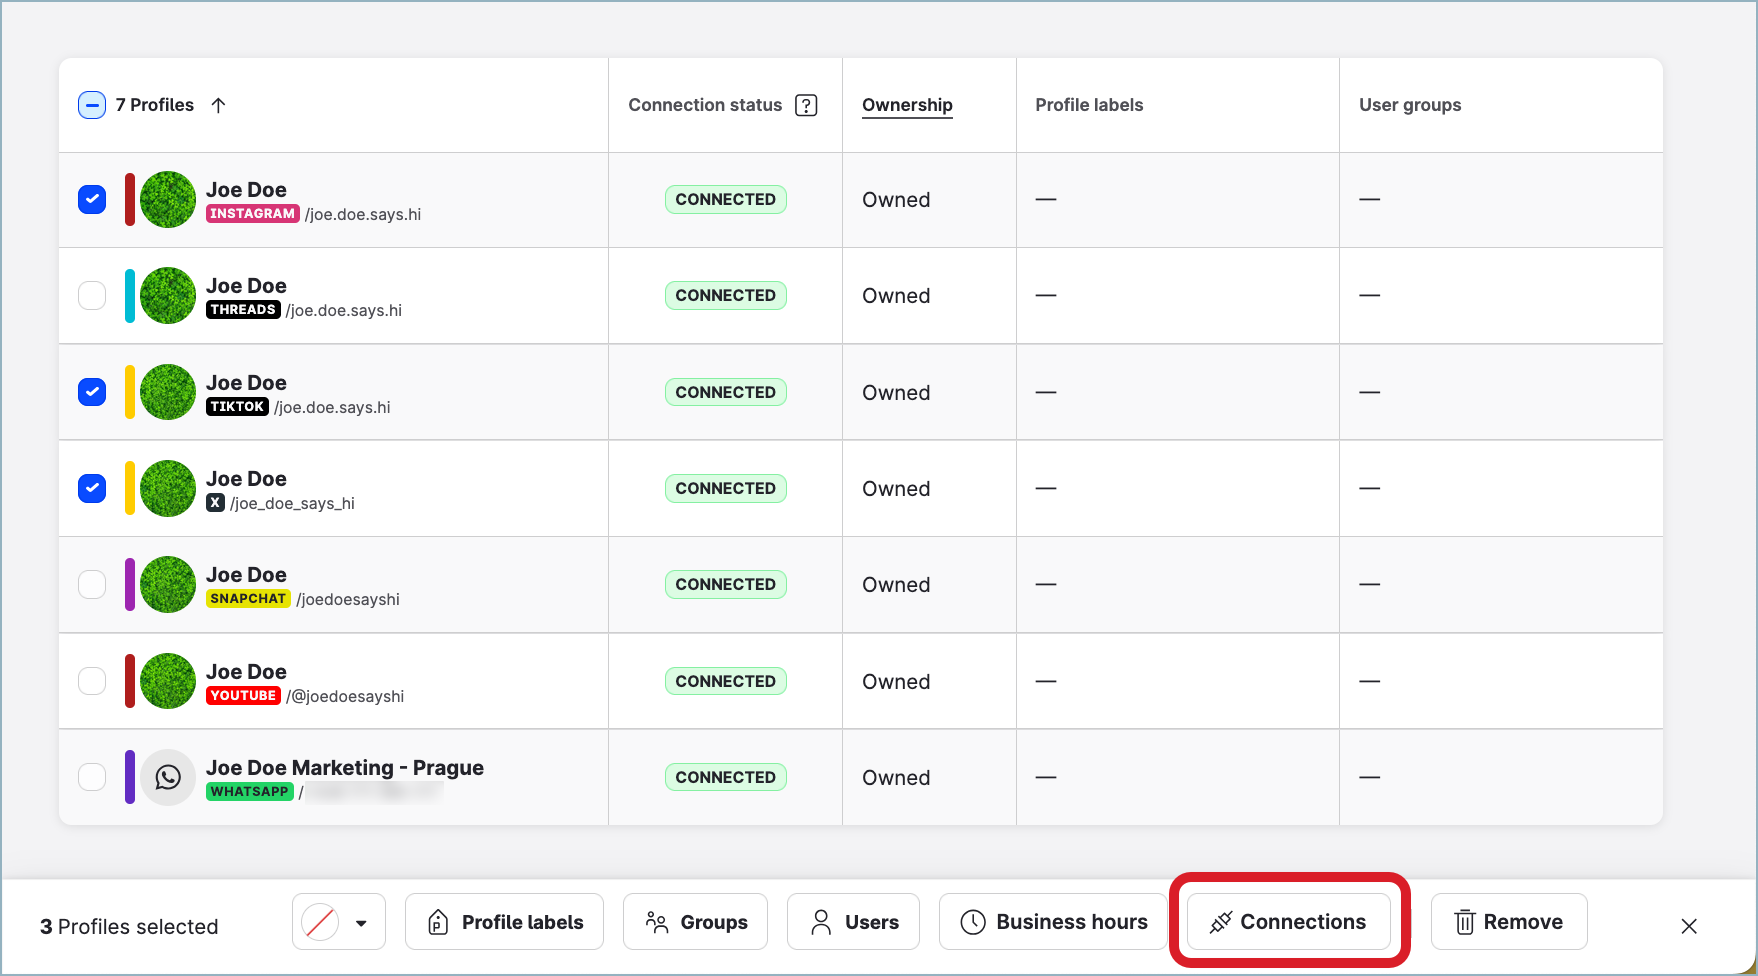
The profiles that meet the filter criteria are listed. -
In the list of profiles, select those that you want to activate for Community.
-
Click Connections on the bar with action buttons that appears at the bottom of the page, then click Community moderation and select Activate.
-
If some of the selected profiles cannot be activated for Community (for example, because they are already activated or because Community does not support the social media platform), a message with details appears.
Review the profiles that cannot be activated, and click Activate (n) where n is the number of profiles that will be activated. -
If all selected profiles are eligible for Community activation, the profiles are activated for Community.
-
You can deactivate profiles at any point. To do so, click Connections -> Community moderation -> Deactivate, and confirm the deactivation. Once the profiles are deactivated, Community stops gathering their content.
Set up profile roles for Community
For a user to be able to reply to a Community message (see Respond to a Community Message), their profile role for the profile on whose behalf they want to reply must have the “Create, Publish” or “Create, Publish, Approve” level of access in Community. In other words, for the profile on whose behalf they want to reply to the message, they must be assigned a default or custom profile role with the “Create, Publish” or “Create, Publish, Approve” level permission set under “Community”.
Therefore, make sure that all the users that will be working in Community have the profile roles with the “Create, Publish” or “Create, Publish, Approve” level permission.
For more information about profile roles in general, see Profile Roles.
Find out what profile role a user have
A user in the Emplifi account has a profile role defined for each profile that is assigned to them. Depending on business requirements and the user’s tasks in the account, the user can have the same profile role set for all the profiles assigned to them or can have different roles for different profiles.
To be able to find out what profile role a user has, you must be an Account User or Account Admin (see Account Roles).
Steps:
-
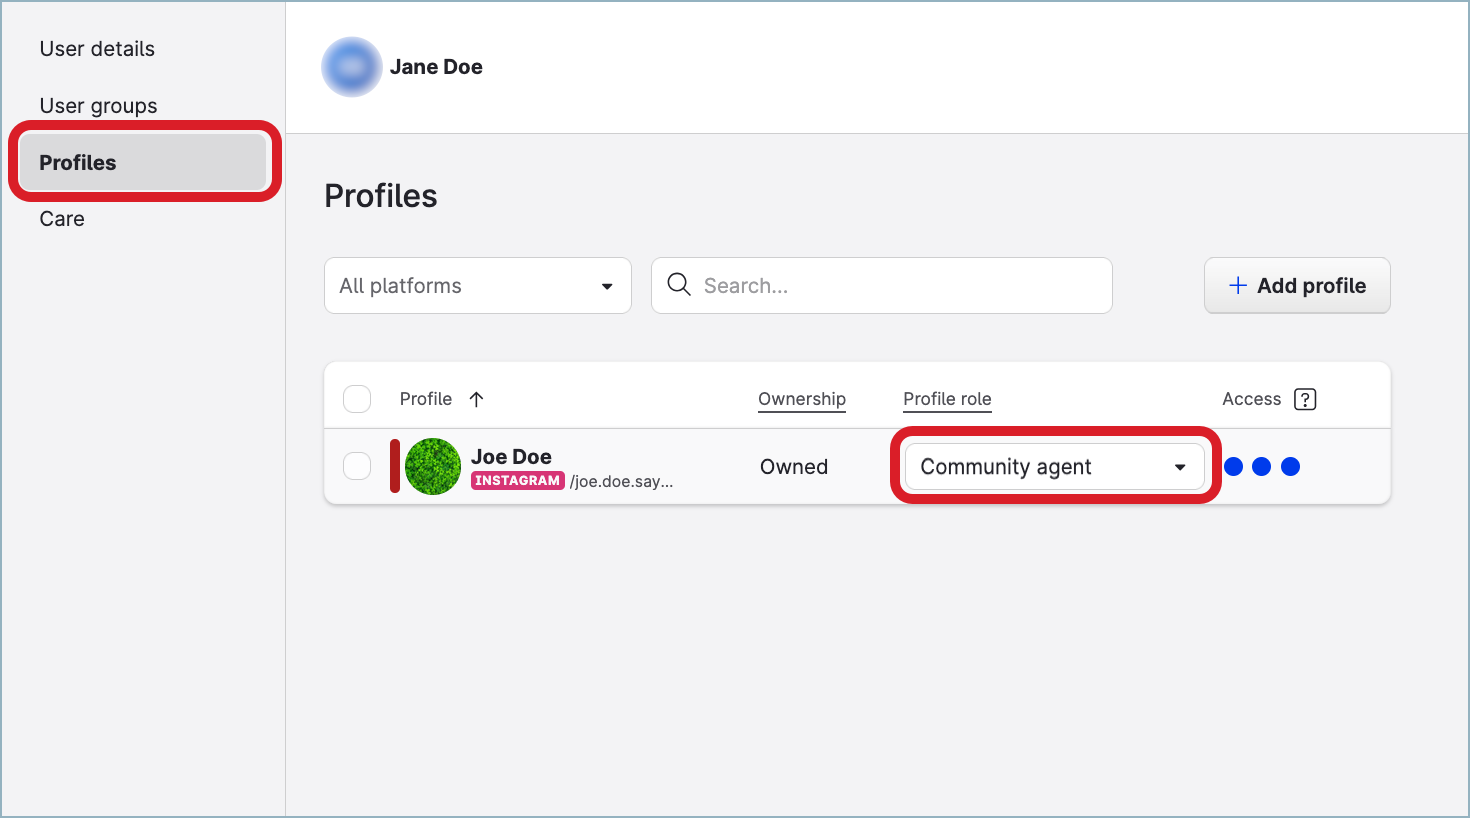
Go to Settings -> Users.
-
Find and click the user.
-
Click the Profiles tab.
The profile role is displayed in the dropdown next to each profile assigned to the user.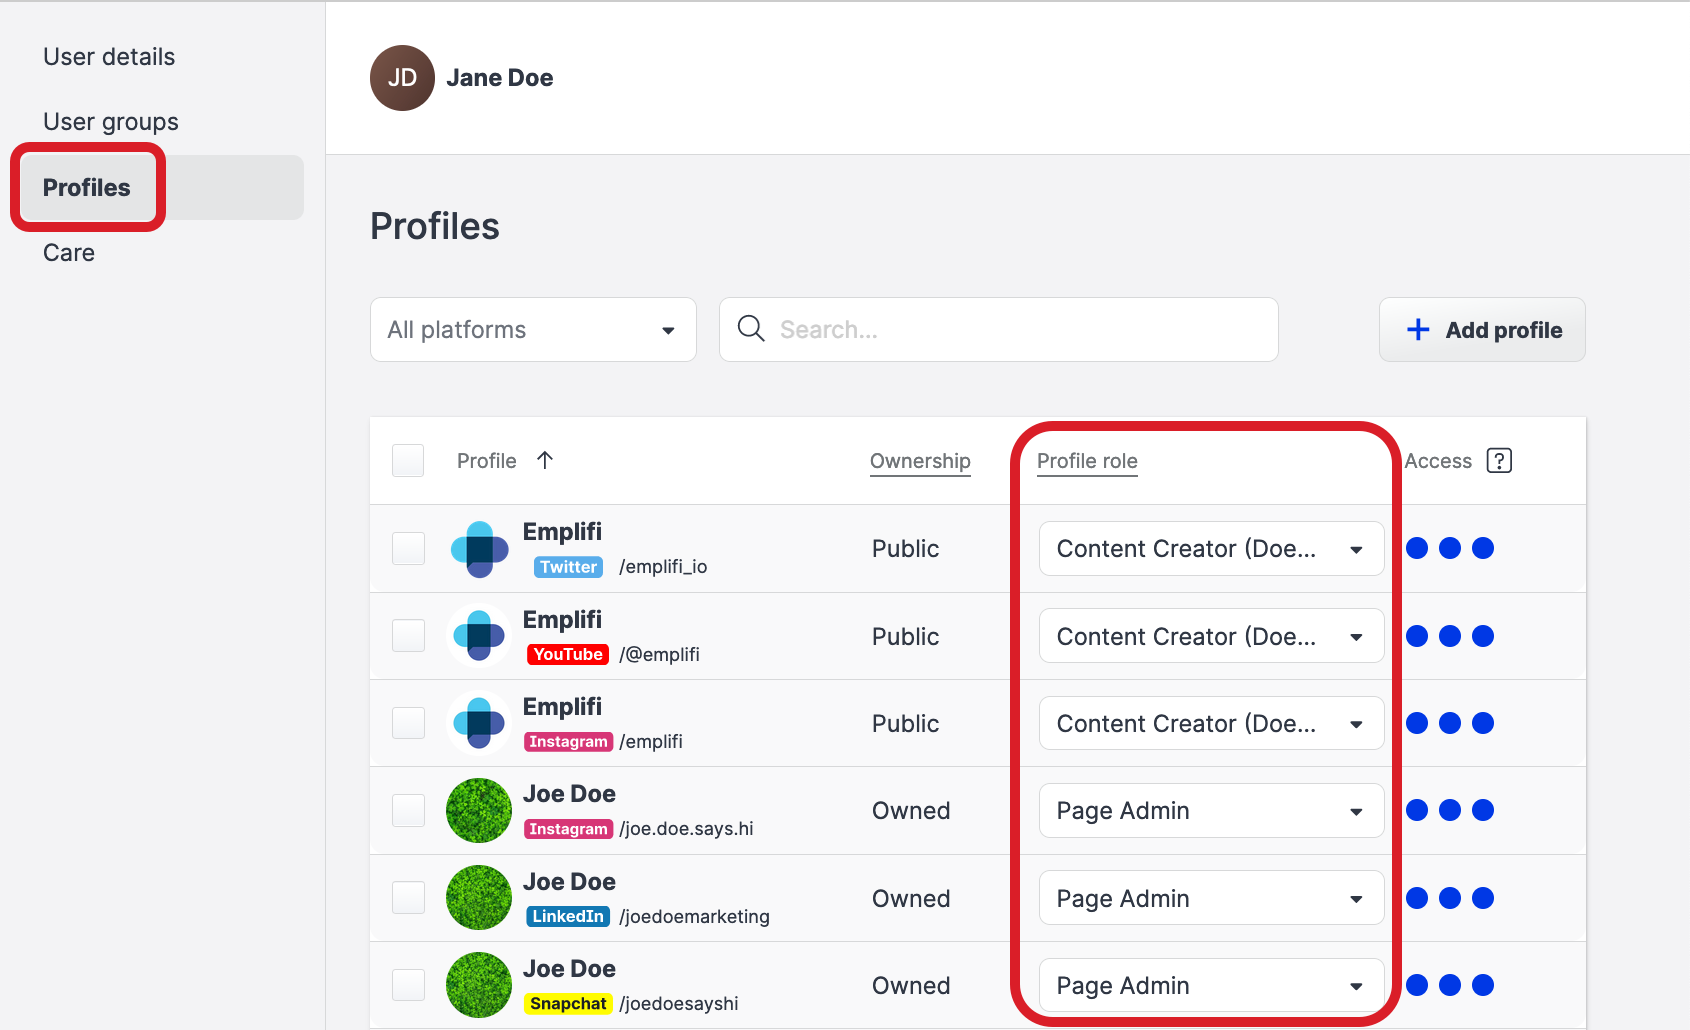
Review the profile role’s permissions for Community
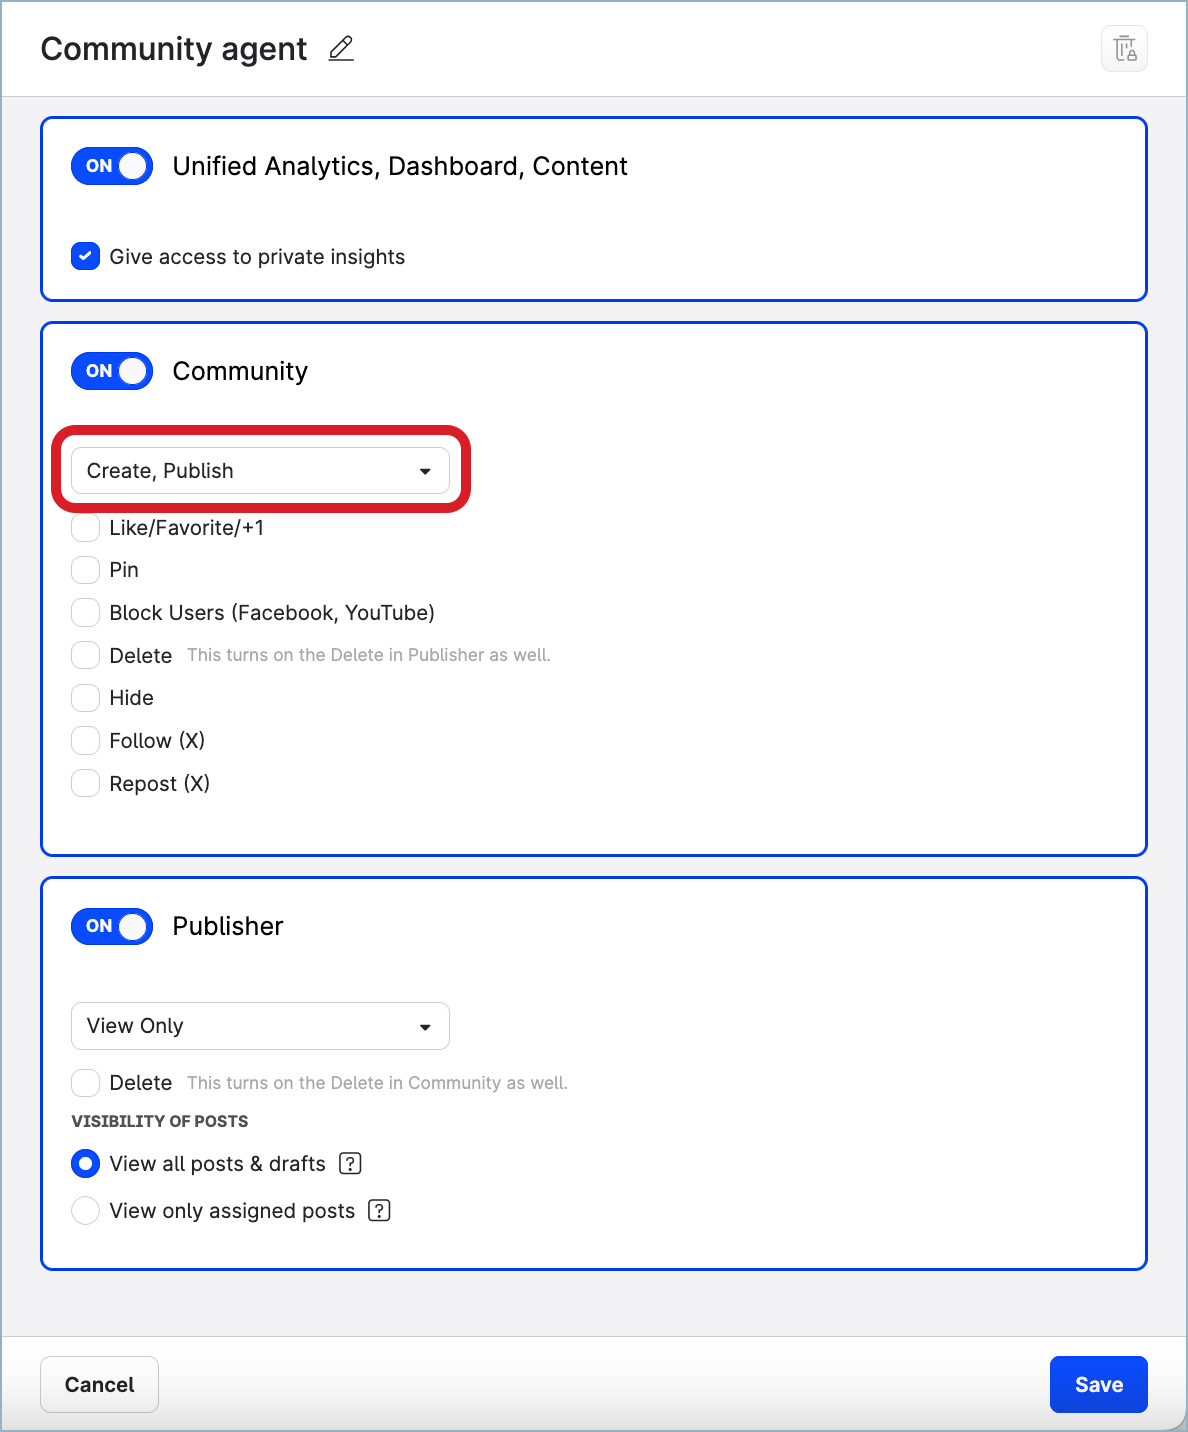
Once you know the profile role, find out what level of access and other permissions in Community this profile role has.
To be able to review the profile role, you must be an Account Admin (see Account Roles).
Steps:
-
Go to Settings -> Roles & permissions.
-
Click the Profile roles tab.
-
Click the profile role that you want to review.
The role permission panel slides out. -
Review the permissions the profile role has for Community.
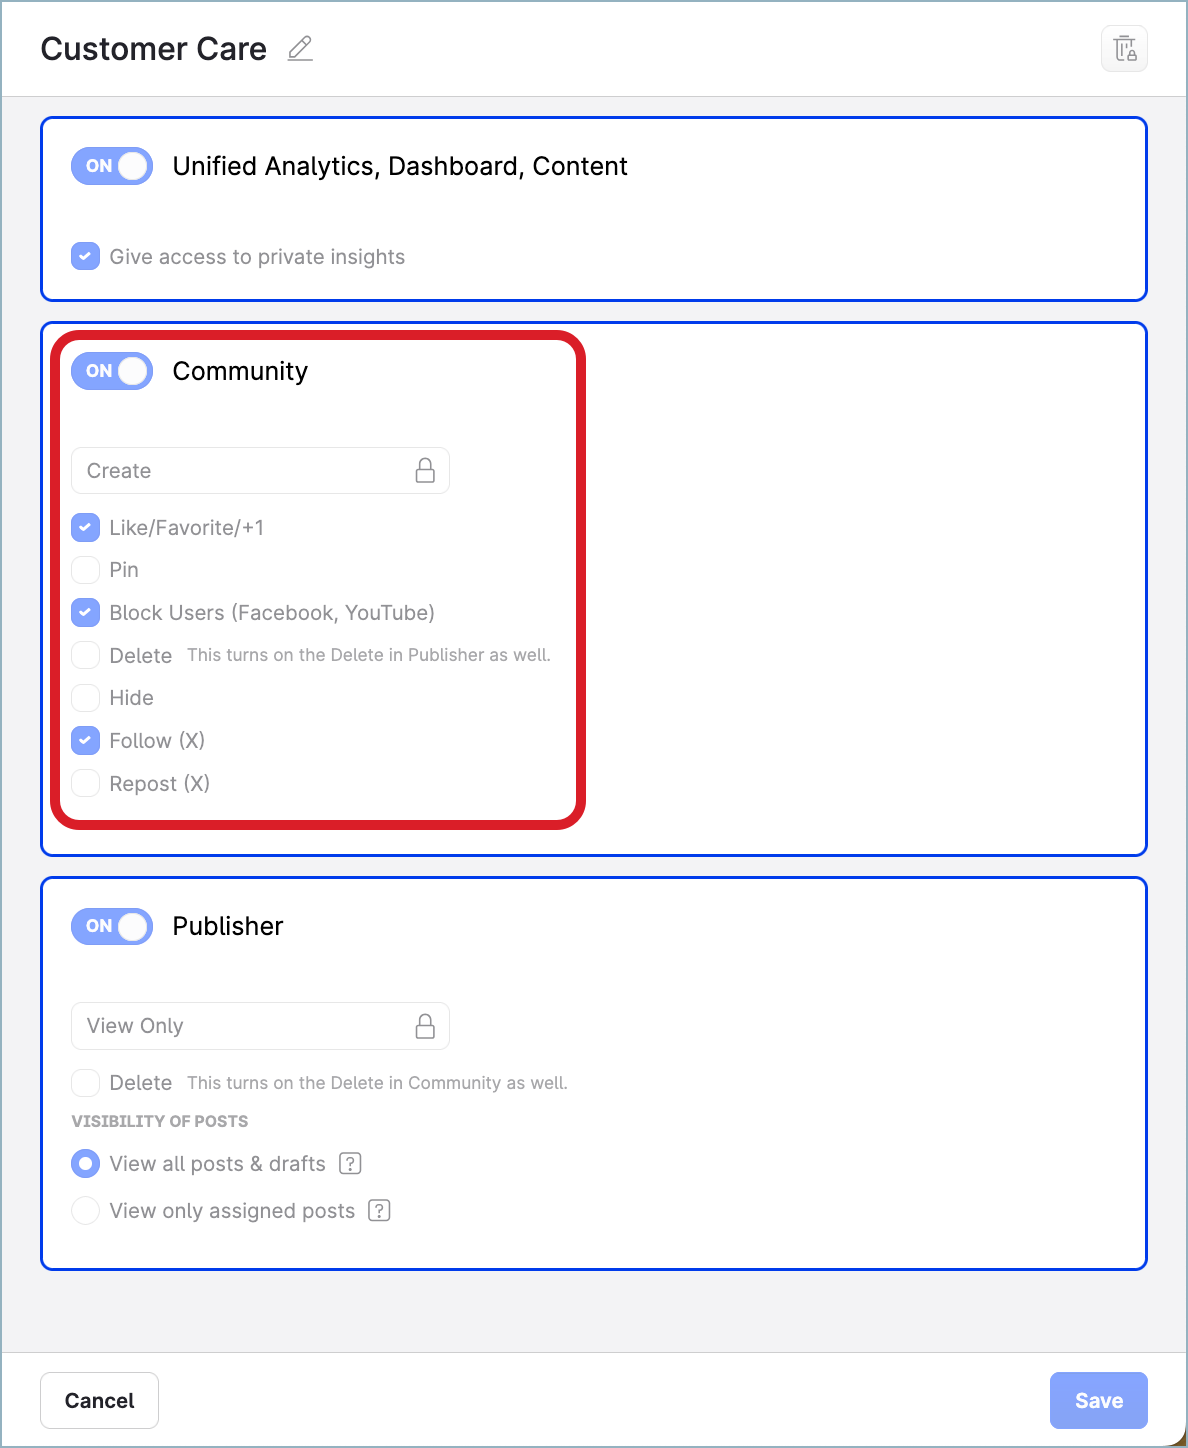
-
The profile role must have the “Create, Publish” or “Create, Publish, Approve” level of access in Community. If the profile role has a different level of access, see “Set up a profile role for Community” further in this article.
-
The other permissions determine how you can react to a Community message (like, hide, delete, and so on; see Respond to a Community Message).
-
-
Once done reviewing, click Cancel to close the panel.
Set up a profile role for Community
If the profile role that a user has assigned for a certain profile has a different level of access in Community than “Create, Publish” or “Create, Publish, Approve”, the user cannot reply to Community messages on behalf of that profile.
To enable the user to reply, do the following:
-
Create a custom profile role with the level of access to Community set to “Create, Publish” or “Create, Publish, Approve”.
-
Assign this profile role to the user for each profile on whose behalf they want to reply to Community messages.
To be able to create and assign profile roles, you must be an Account Admin (see Account Roles).
Create a custom profile role with the “Create, Publish” or “Create, Publish, Approve” access level
Choose from the following options:
-
Create a new profile role from scratch.
-
Create a new profile role by duplicating an existing profile role.
Create a new profile role from scratch
Steps:
-
Go to Settings -> Roles & permissions.
-
Click the Profile roles tab.
-
Click +Add Profile Role.
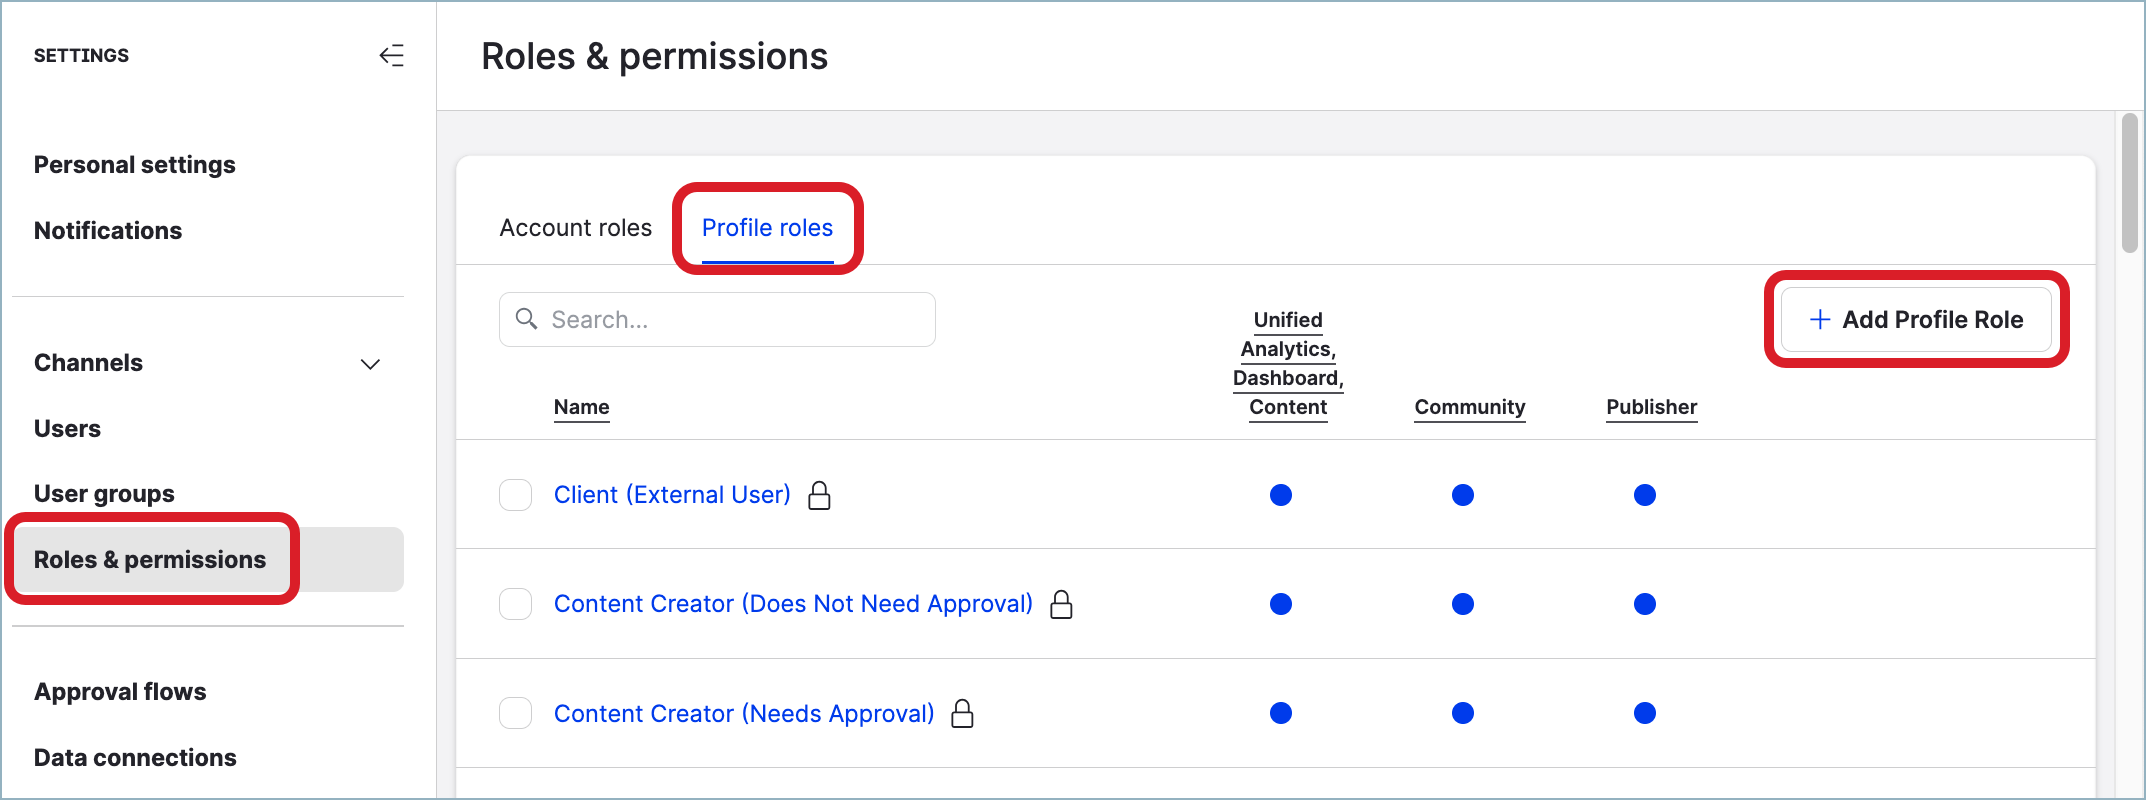
The role permission panel slides out.
-
Click the pencil icon next to the placeholder role name, rename the role, and press Enter.
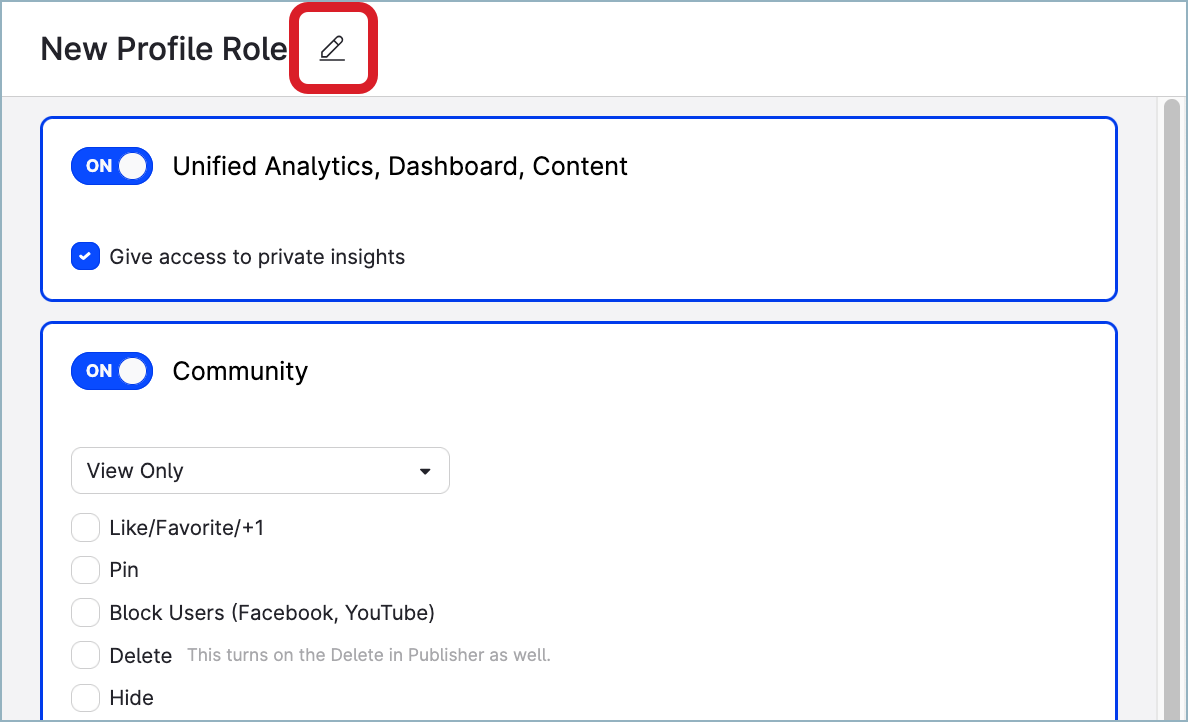
-
In the Community section, set the level of access to either “Create, Publish” or “Create, Publish, Approve”.
-
Select the other permissions that the profile role should have.
-
Once done, click Save.
The role is created and appears in the list of the profile roles. The new role is immediately available for assigning to users in the account.
Create a new profile role by duplicating an existing profile role
Steps:
-
Go to Settings -> Roles & permissions.
-
Click the Profile roles tab.
-
Hover over the profile role that you want to duplicate, and click Duplicate.
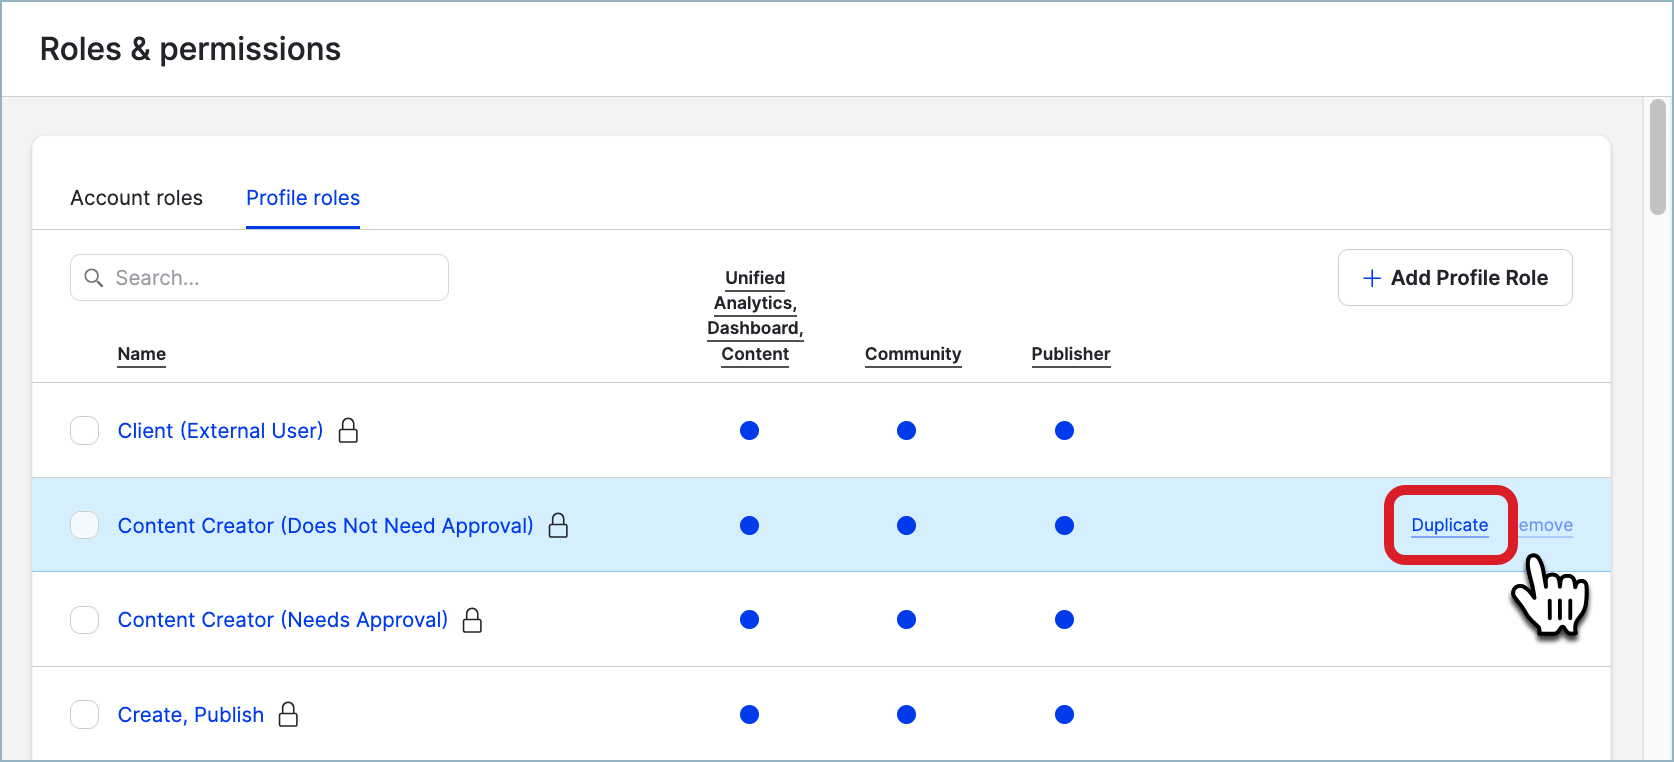
The new role gets the same name as the original profile role plus the
- copysuffix. For example, if you duplicated the profile role “Content Creator (Does Not Need Approval)”, the new profile role will be titled “Content Creator (Does Not Need Approval) - copy”. -
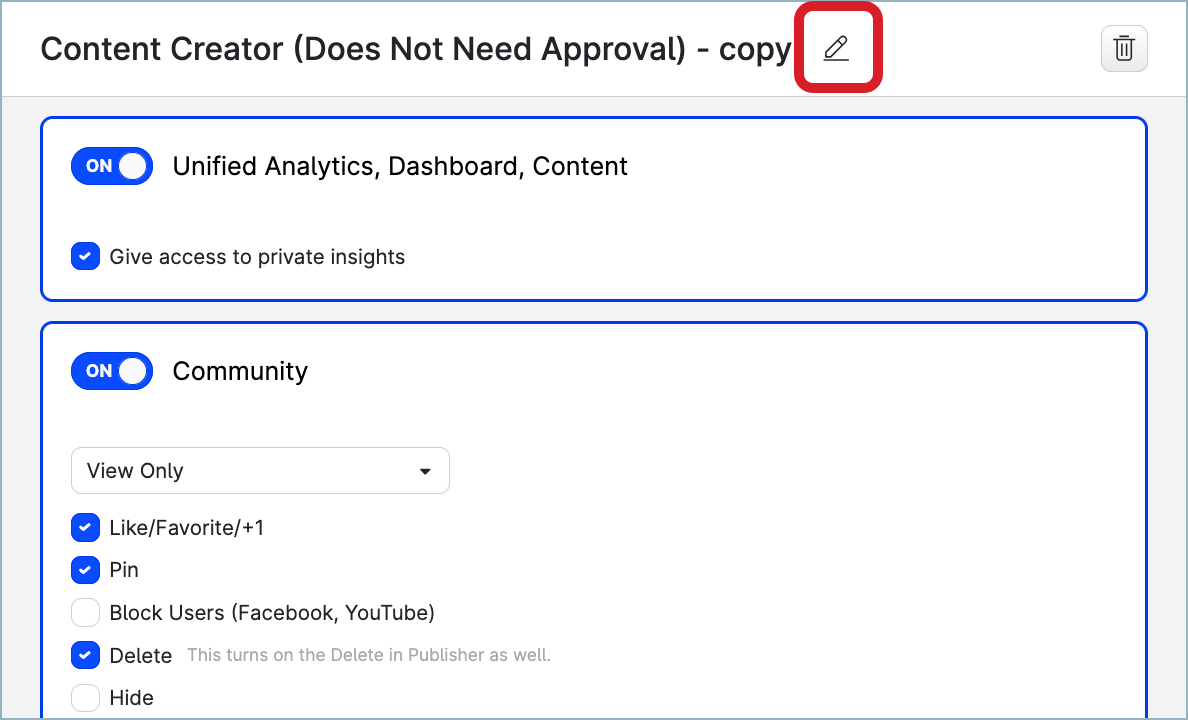
Click the newly created role.
The role permission panel slides out. -
Click the pencil icon next to the placeholder role name, rename the role, and press Enter.
-
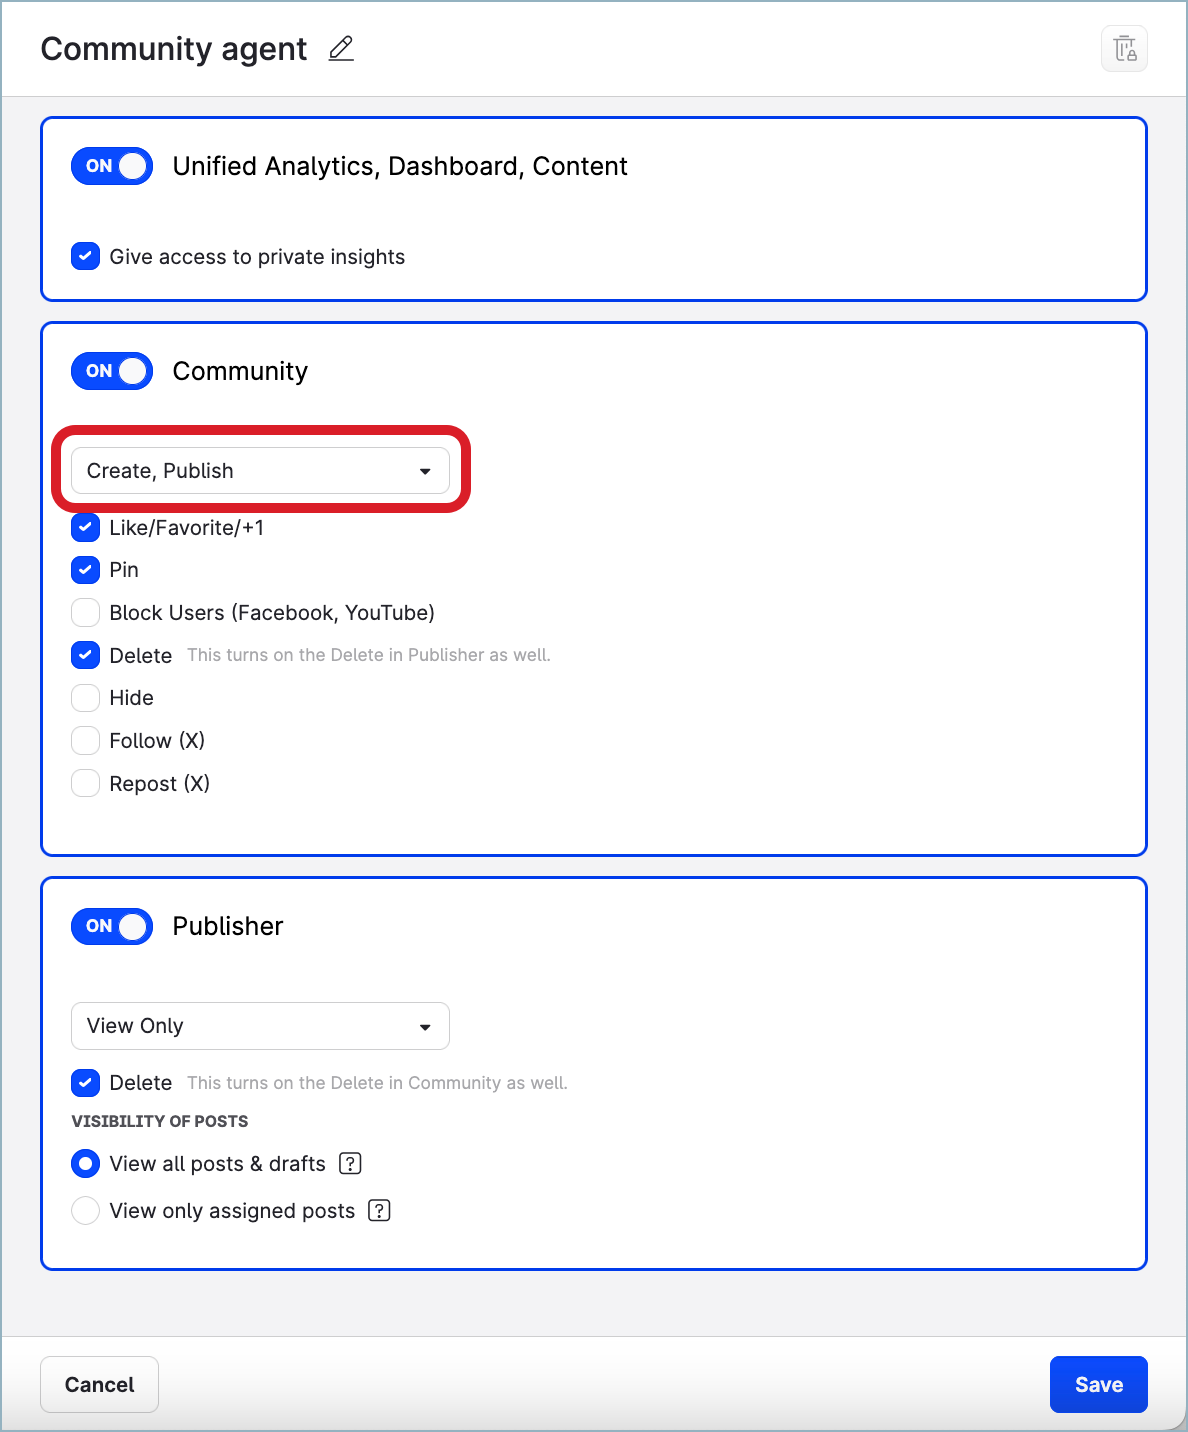
In the Community section, set the level of access to either “Create, Publish” or “Create, Publish, Approve”.
-
Select and de-select the permissions to define the scope of permissions that the new profile role should have.
-
Once done, click Save.
The role is saved with the defined permissions. The new role is immediately available for assigning to users in the account.
Assign the new profile role to the user
After you create the profile role, assign it to the user for each profile on whose behalf they want to reply to Community messages. This enables the user to reply to Community messages on behalf of this profile.
Steps:
-
Go to Settings -> Users.
-
Find and click the user.
-
Click the Profiles tab.
-
Find the profile on whose behalf the user wants to reply to Community messages.
-
In the drop down menu in the Profile role column, select the profile role that has the “Create, Publish” or “Create, Publish, Approve” level of access.
The change is applied and automatically saved.
The user now can reply to Community messages on behalf of the profile. -
Repeat Steps 4-5 for each profile on whose behalf the user wants to reply to Community messages.