Learn how to script chat flows so your users can get the right answer
On the Bot Authoring page, you can create scripted conversations to guide the user's interactions with your bot. This allows your bot to provide a specific resolution to each user's query based on the available information. While creating a conversation flow, you use an intuitive conversation diagram to visually map out the flow of the branching bot conversation in the Bot Authoring Area. Here, you can define every step of the conversation, from your bot's clarifying questions to the final response sent to the user.
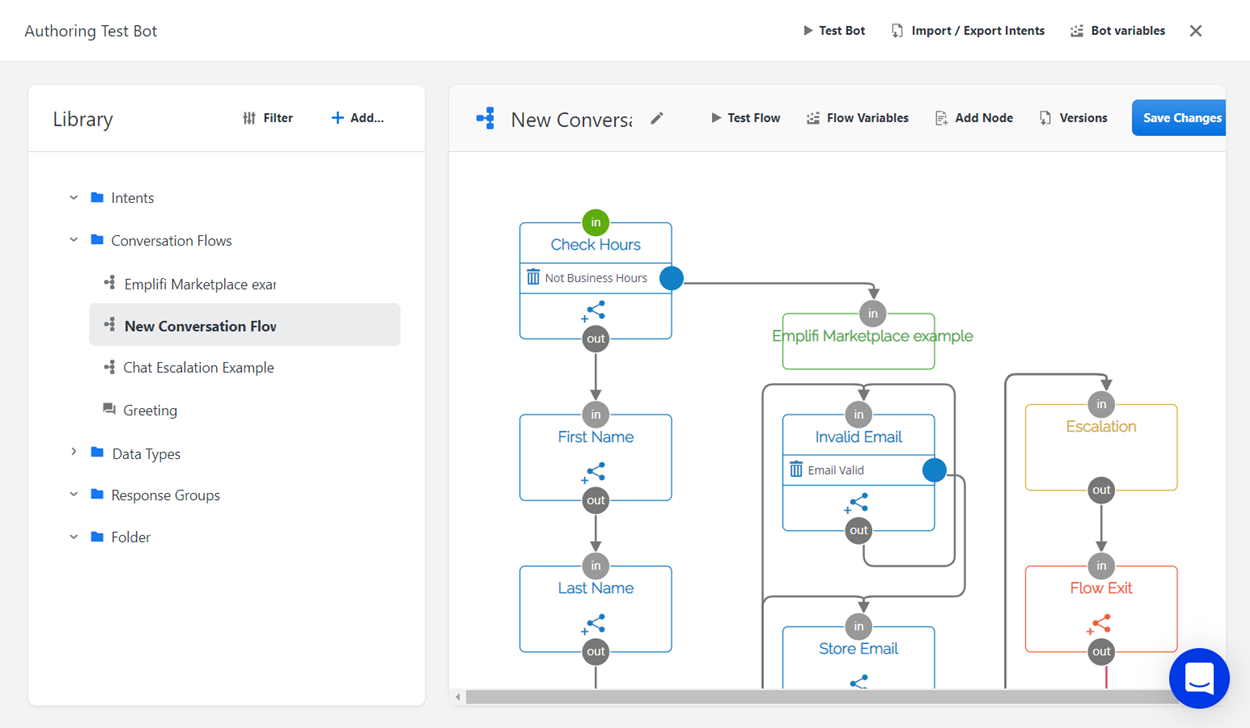
Authoring conversation flows
Accessing the Bot authoring page
-
On the Bots page, find the card with the name of the bot that you want to author content for.
-
On the bot card, click the Authoring button.
Adding a new conversation flow
-
From the Library section of the Bot Authoring page, click the Add button either in the upper right corner of the Library or next to the folder that you would like to add the conversation flow to.
If there is a folder titled "Conversation Flows" in your library, using the upper Add button will automatically store the new conversation flow in that folder (if no such folder exists, the new conversation flow will be stored in the general Library). Alternatively, using the Add button next to a specific folder's name will store the conversation flow in that folder.
-
From the drop-down menu, select Conversation Flow.
-
If your company has any pre-built shared conversation flows, a dialog box containing these flows appears after you click Add Conversation Flow. From this dialog box, select the flow that best suits your purpose (this will generally be Empty Flow, which initially contains only an Enter and an Exit node). If your company has no pre-built shared conversation flows, this dialog box does not appear, and an Empty Flow appears immediately in the Authoring Area.
-
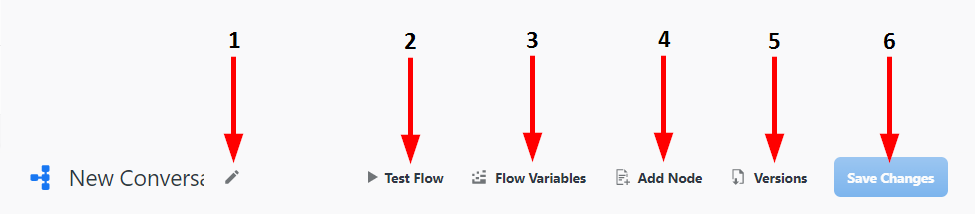
Conversation flow toolbar
|
Number |
Name |
Description |
|---|---|---|
|
1 |
Rename |
Click here to enter a new name for the conversation flow. When you are finished typing, click Enter to save the name. |
|
2 |
Test Flow |
Click here to test the conversation flow in a drop-down chat window. The following buttons are available in the chat window:
|
|
3 |
Flow Variables |
Click here to display a pop-up window where you can view and add flow variables, which are only usable within the current conversation flow. For more information, see Variables. |
|
4 |
Add New Node |
Click here to add a new conversation node to the Authoring Area below. Choose from the following types of nodes:
For more information, see the Types of Nodes section below. |
|
5 |
Versions |
Click here to view a history of the previously authored versions of the conversation flow. |
|
6 |
Save |
Click here to save the changes you have made to the conversation flow. |
Nodes
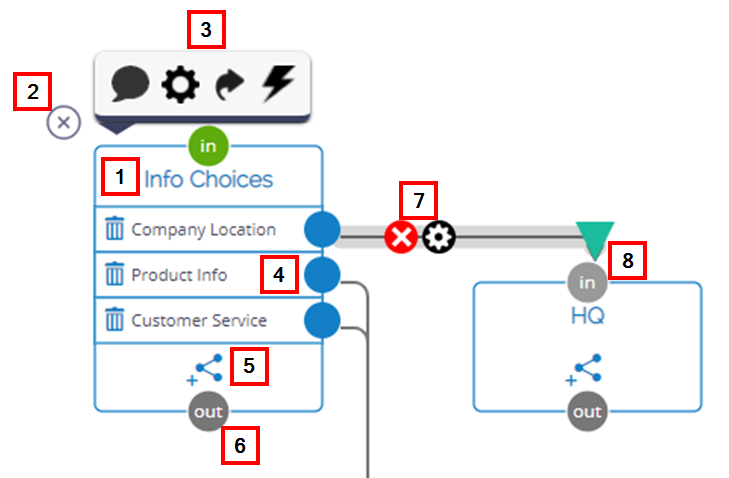
Anatomy of a node
|
Number |
Name |
Description |
|---|---|---|
|
1 |
Node Name |
Click in the text area at the top of the node to give it a name. When you are finished typing the name, click Enter to save it. |
|
2 |
Delete |
Click on a node to display this button. Clicking this button will delete the node from the conversation flow. |
|
3 |
Node Menu |
Click on a node to display this menu.
|
|
4 |
Branches |
These represent the paths the user can take from this node. They may be based on options provided to the user, or on the conversation context.
|
|
5 |
Add Branch |
Click here to manually add a branch off of this node. |
|
6 |
Out Circle |
Click and drag from this circle to create a path from this node to the next node of child flow, or to create an exit edge for this flow. |
|
7 |
Path |
Clicking and dragging from any Out circle will create a path. Hovering over a path will display two buttons.
|
|
8 |
In Circle |
Drag a path to this circle to connect nodes in a conversation flow. A green In circle indicates that it belongs to the start node for the flow. |
Types of nodes
There are five types of nodes that you can add to your bot's conversation flow, each with its own unique settings.
Standard node
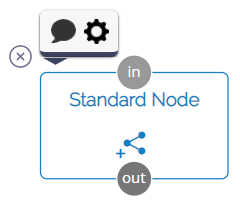
The Standard Node allows your bot to send responses to users and direct them through the conversation flow.
|
Button |
Description |
|---|---|
|
|
Click here to open the Bot Reply Settings dialog window, where you can configure the response(s) that you would like the bot to send the user at this point in the conversation.
For more information, see the "Types of Responses" section below. |
|
|
Click here to open the Node Settings dialog window, where you can adjust various aspects of the node's operation.
|
API request node
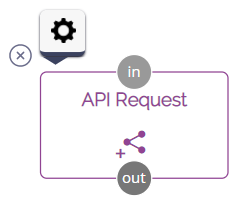
The API Request node allows your bot to request information from other applications as needed during a conversation.
This node is unavailable on the Social AI Chatbot interface.
|
Button |
Description |
|---|---|
|
|
Click here to open the Node Settings dialog window, where you can adjust various aspects of the node's operation.
|
Collect info node
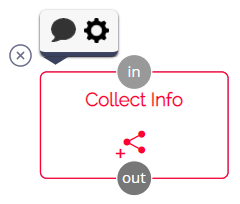
The Collect Info node allows your bot to request specific types of information from the user and store it for future use in the form of a variable. Currently, this node only supports the collection of dates.
|
Button |
|
|---|---|
|
|
Click here to open the Bot Reply Settings dialog window, where you can configure the response(s) that you would like the bot to send the user at this point in the conversation.
For more information, see the "Types of Responses" section below. |
|
|
Click here to open the Node Settings dialog window, where you can adjust various aspects of the node's operation.
|
Escalation node
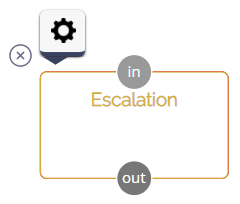
The Escalation node allows your bot to route the user to a live agent. For more information, see Agents.
|
Button |
Description |
|---|---|
|
|
Click here to open the Node Settings dialog window, where you can adjust various aspects of the node's operation.
|
Child Flow Node
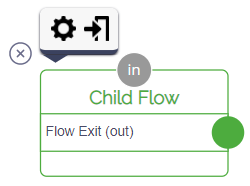
The Child Flow node allows you to link to another conversation flow within the one you are currently authoring, without having to display the nodes and paths of the other flow. It is useful for:
-
Common processes that may be used in several different flows
-
A branch to a different set of logical steps
-
Keeping flows from becoming too large and complicated
|
Button |
Description |
|---|---|
|
|
Click here to open the Node Settings dialog window, where you can adjust various aspects of the node's operation.
|
|
|
Click here to open the linked conversation flow in the Bot Authoring Area. A dialog window prompting you to save your changes to the current conversation flow will appear before the linked flow opens. |
Notes Node
The Notes node allows you to create text notes in the conversation flow. These notes are visible in Bot Authoring without clicking into the node. You can create notes to share information about the bot or other useful information about the conversation flow.
Types of responses
There are twelve types of responses that you can add to your bot's conversation flow.
Text
A Text response is a body of text capable of containing letters, numbers, and special characters.
-
To enter the text, click the text field. To save the text, click outside the text field.
Card
A Card response is a card containing an image, a title, a subtitle/description, and a configurable amount of custom buttons.
-
To add an image, paste the URL at which the image is hosted into the text field labeled "Image URL". In the text field labeled "Image Alt Text", enter the text that appears when the user hovers over the image.
-
To change the card type, use the Card Type drop-down menu.
-
To configure a custom button's type, text, payload, and other elements, click the adjacent Edit button. When you are finished, click Enter on your keyboard.
-
To prevent user-selected responses from activating an intent, select Skip Intent Processing.
-
-
To remove a button, click the adjacent Delete button.
-
To create a new button, click the + Add New Button button.
Quick Replies
A Quick Replies response is short body of text accompanied by a configurable amount of custom buttons.
-
To enter the text, click the text field. To save the text, click outside the text field.
-
To configure a custom button's type, label, payload, and other elements, click the adjacent Edit button. When you are finished, click Enter on your keyboard.
-
The two most important elements of a button are its label (i.e. the text displayed to the user on the button) and its payload/postback (i.e. the underlying command which is received by the bot's logic and which sends the user down the corresponding branch of the conversation flow). In most cases, it is recommended that the label and the payload match, although this is not strictly necessary to ensure bot functionality.
-
You can also select the button's type.
-
Text: The button displays a brief text option.
-
URL: The button contains a link to a webpage. In the button settings drop-down, the payload text field is replaced with a URL text field. Enter the webpage's URL here.
-
-
-
To remove a button, click the adjacent Delete button.
-
To create a new button, click the + Add Button button.
Multi Replies
A Multi Replies response is a short body of text accompanied by a configurable amount of custom buttons. Unlike Quick Replies, users can select multiple button options at once.
This response type is unavailable on the Social Chatbot interface.
-
To enter the title introducing the available replies, click the text field. To save the title, click outside the text field.
-
To configure a custom button's label, payload, and other elements, click the adjacent Edit button. When you are finished, click Enter on your keyboard.
-
To move the button up or down in the sequence, click the adjacent Arrow buttons.
-
To remove a button, click the adjacent Delete button.
-
To create a new button, click the + Add Button button.
Image
An Image response is an image hosted at a specific URL. To add an image, choose one of the following options:
-
Click Upload to select an image file to upload in the response.
-
Click Select from Media and a Library window will display a list of stored images. Select an image from the list. You may preview the image before selecting it.
Any area of Bot where an image can be displayed will allow you to access the Media Library of all available images. For example, Card, Carousel, etc.
-
Click Add from URL and paste the URL at which the image is hosted into the text field labeled "Image URL".
In the Image Alt Text field, enter the text that appears when the user hovers over the image.
Carousel
A Carousel response is a carousel of multiple cards, each containing an image, a title, a subtitle/description, and a configurable amount of custom buttons.
-
To enter a title for the carousel, click the text field. To save the title, click outside the text field.
-
To add an image, paste the URL at which the image is hosted into the text field labeled "Image URL". In the text field labeled "Image Alt Text", enter the text that appears when the user hovers over the image.
-
To list the carousel cards dynamically, click the Context List button. In the text field that appears, enter the name of the bot object variable containing the data that will determine the order in which the cards are displayed.
-
To configure a custom button's type, text, payload, and other elements, click the adjacent Edit button. When you are finished, click Enter on your keyboard.
-
To prevent user-selected responses from activating an intent, select Skip Intent Processing.
-
-
To remove a button, click the adjacent Delete button.
-
To create a new button, click the + Add New Button button.
Custom payload
A Custom Payload response is a custom response written in the syntax of the interface on which the response is sent.
-
To select an interface, click on one of the several options displayed above the text field.
-
To configure a custom response, enter it in the text field using the syntax appropriate to the selected interface.
Response groups
A Response Groups response is a series of multiple responses, each of which can be of any type. The responses can be sent as a sequential group, or as a single response randomly selected from the group.
-
To create a new response group, click the Add button. In the text field that appears, type the name of the response group and click OK.
-
To configure a response group, click the Edit button. The Response Group Settings window displays.
-
To create new responses within the response group, click the + Add New Response to Group button on the Response Group Settings window. Select a response type from the options that appear.
-
To move a response up or down in the sequence, click the adjacent Arrow buttons.
-
To change a response's type, click the adjacent button displaying its current type and select another type from the options that appear.
-
To delete a response, click the adjacent Delete button.
-
To change whether the responses are sent as a sequential group or as a single randomly selected response, click the Output Type button, then select Sequential or Random in the upper right corner of the Response Group Settings window.
-
When you are finished configuring the response group, click the Save button.
-
-
To select another response group, click the blue bubble containing the name of the currently select group. From the list that appears, select a response group and click OK.
Location
A Location response is information about a specific location, including geographic coordinates and (optionally) an address and phone number.
This response type is unavailable on the Social Chatbot interface.
Locations
A Locations response is information about multiple specific locations, including their geographic coordinates and (optionally) their addresses and phone numbers.
This response type is unavailable on the Social Chatbot interface.
-
To create a new location, click the + Add Locations button.
-
To configure the information for a location, click the adjacent Edit button. When you are finished, click Enter on your keyboard.
-
To delete a location, click the adjacent Delete button.
Event
An Event response is a command to the bot's logic, triggering the performance of a certain action by the bot.
This response type is unavailable on the Social Chatbot interface.
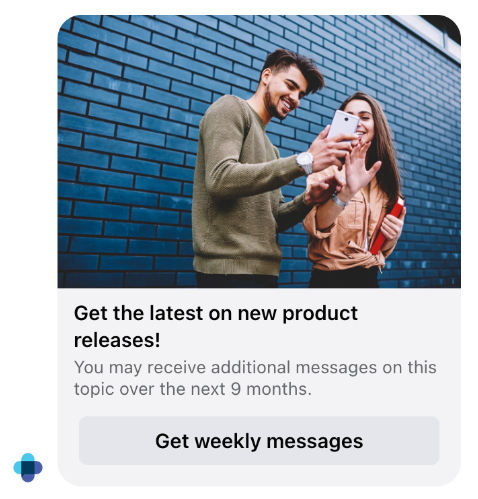
Notification request
A Notification Request is a request for the user to opt-in to receive regularly scheduled Facebook notifications from your company's Facebook page. The request and subsequent notifications are sent via Facebook Messenger and can include an image, title, and a button to subscribe (for an example, see the image below). For more information about configuring recurring Facebook notifications, see the "Facebook Notifications Settings Window Layout" section of the Distribution page.
-
To enter the title introducing the notification request, click the text field labeled "Title". To save the title, click outside the text field.
-
To add an image, paste the URL at which the image is hosted into the text field labeled "Image URL".
-
To select which notification the opt-in request is associated with, use the "Notification" drop-down menu.
Example conversation flow configurations
Greeting menu
-
Create a new conversation flow by clicking the Add button either in the upper right corner of the Library or next to the folder that you would like to add the conversation flow to.
-
On the Flow Enter node, click the Bot Reply Settings button to open the Bot Reply Settings dialog window.
-
Select the Send Direct Reply checkbox. The dialog window darkens, indicating that it has become available for editing.
-
From the row of response type options, select Response Groups. For more information about configuring Response Groups, see the "Types of Responses" section above.
-
In the Response Group, add a brief Text response welcoming users to your bot, then add a Quick Replies response. For more information about configuring Quick Replies, see the "Types of Responses" section above.
-
The Quick Replies buttons that you compose reflect the conversation options that will be available to users at this node.
-
-
When you are finished, click the Save button in the upper right corner of the dialog window, then return to the Authoring Area.
-
On the Flow Enter node, click the Auto-Populate button to create branches from the node that are labeled as your Quick Replies options.
-
Create new nodes corresponding to these options and connect them to the Flow Enter node using the latter's branches. Configure the new nodes accordingly.
-
To ensure that the greeting menu conversation flow is triggered when a user begins messaging your bot, click the Shortcut button. The Shortcut dialog window displays.
-
In the Shortcut dialog window, configure the following rule:
Recommendations
-
Make sure that the second "Matches" rule (containing the "Event type" and "Is initial user contact event" rules) is set to "any," so that it will be activated by the fulfillment of either of its constituent rules, rather than requiring the fulfillment of both.
-
It is recommended to include both the "Event type is Get Started" and "Is initial user contact event is True" rules because the conversations on certain channels (e.g. Facebook and Instagram) are saved until they are manually deleted by the user. This means that the Get Started event won't occur when a user resumes an existing bot conversation, because the event already occurred when the user first began the exchange. Therefore, in this context, the "Is initial user contact event is True" rule is necessary to trigger the greeting menu conversation flow.
-
You can add additional rules that will return the user to the greeting menu if they wish to restart the conversation. These rules could be "Postback contains 'Restart,'" "Content is 'Start over,'" or other similar variations.
Escalation flow
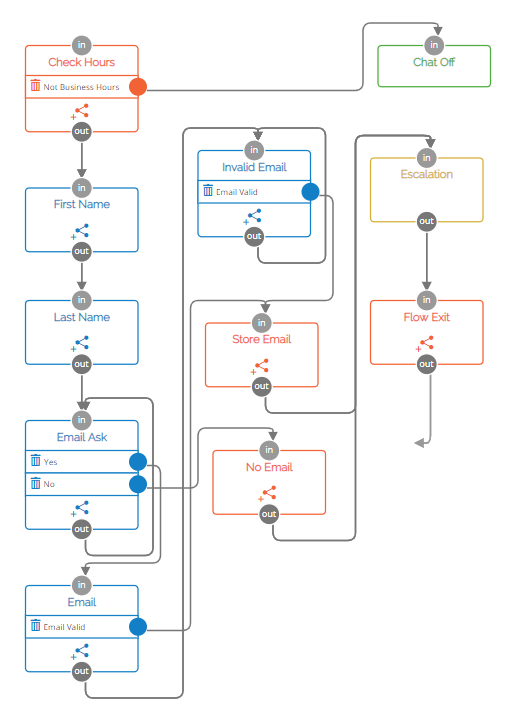
In order for live agents to provide the best assistance to escalated users, it is important to have a flow that obtains some basic information from the users prior to the escalation. Below is a guide for configuring an effective escalation flow.
-
Create a new conversation flow by clicking the Add button either in the upper right corner of the Library or next to the folder that you would like to add the conversation flow to.
-
On the Flow Enter node, double click the text reading "Flow Enter" and rename the node "Check Hours." When you are finished, click in the Authoring Area.
-
On the Check Hours node, click the Add Branch button. A new branch appears. Double click the text reading "Branch 1" and rename the branch "Not Business Hours." When you are finished, click in the Authoring Area.
-
-
From the Conversation Flow toolbar, click the Add New Node button and select the Child Flow node that the user should be routed to if the escalation occurs outside your company's hours of operation.
-
Connect the Check Hours node's "Not Business Hours" branch to the Chat Off node's In branch.
-
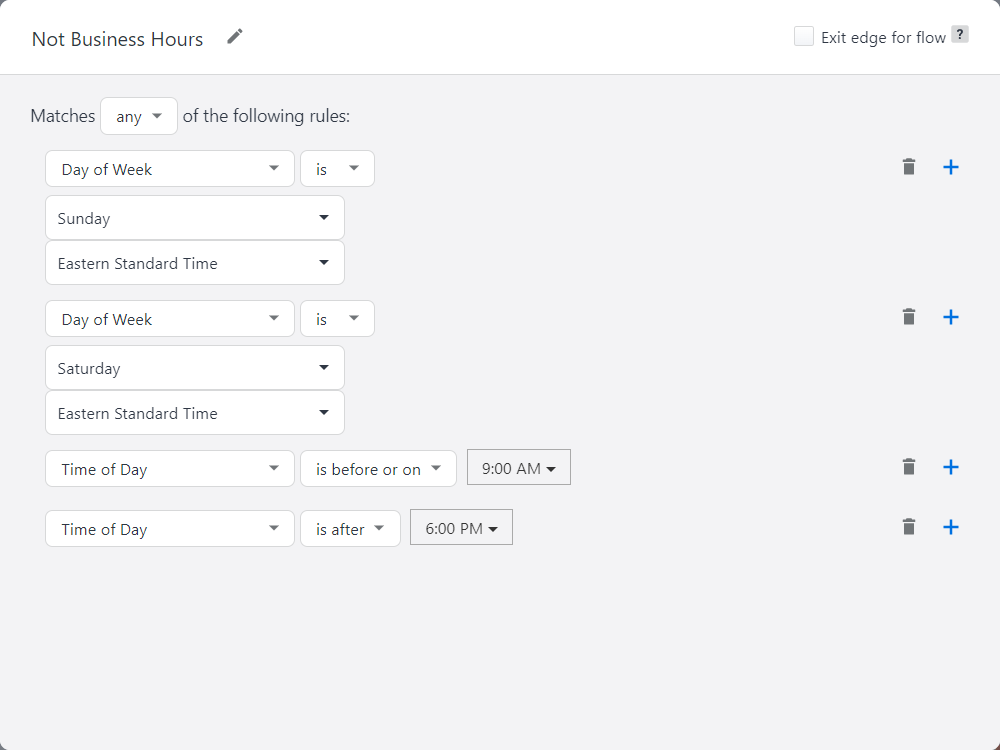
Hover over the path between the branches and click the Path Settings button to open the Path Settings window, which contains the rules that determine whether users take this path in the conversation flow.
-
Configure the following rule (with the days and times adjusted to reflect your company's hours of operation), then exit the Path Settings window.
-
-
-
Click the Add New Node button and select a Standard node. The new Standard node appears in the Authoring Area. Rename the node "First Name."
-
On the First Name node, click the Bot Reply Settings button to open the Bot Reply Settings dialog window.
-
Select the Send Direct Reply checkbox. The dialog window darkens, indicating that it has become available for editing.
-
From the drop-down list of response type options, select Text. For more information about configuring Text responses, see the "Types of Responses" section above.
-
Click the text field and compose the following message: "Before we connect you with an agent, what's your first name?" When you are finished, exit the Bot Reply Settings window.
-
-
On the First Name node, click the Node Settings button to open the Node Settings dialog window.
-
On the Node Settings dialog window, make sure that the "Wait for user input before advancing to the next node" checkbox is selected.
-
-
Connect the Check Hours node's Out branch to the First Name node's In branch.
-
-
Click the Add New Node button and select a Standard node. The new Standard node appears in the Authoring Area. Rename the node "Last Name."
-
On the Last Name node, click the Bot Reply Settings button to open the Bot Reply Settings dialog window.
-
Select the Send Direct Reply checkbox. The dialog window darkens, indicating that it has become available for editing.
-
From the drop-down list of response type options, select Text.
-
Click the text field and compose the following message: "Thanks {{userInfo.firstName}}! What's your last name?" When you are finished, exit the Bot Reply Settings window.
-
-
On the Last Name node, click the Node Settings button to open the Node Settings dialog window.
-
On the Node Settings dialog window, make sure that the "Wait for user input before advancing to the next node" checkbox is selected.
-
Select the "Apply variable modifications" checkbox, then click the Add button. A new variable appears.
-
On the new variable, click the Edit button and configure it as follows:

-
When you are finished, click Apply, then exit the Node Settings window.
-
-
Connect the First Name node's Out branch to the Last Name node's In branch.
-
-
Click the Add New Node button and select a Standard node. The new Standard node appears in the Authoring Area. Rename the node "Email Ask."
-
On the Email Ask node, click the Bot Reply Settings button to open the Bot Reply Settings dialog window.
-
Select the Send Direct Reply checkbox. The dialog window darkens, indicating that it has become available for editing.
-
From the drop-down list of response type options, select Quick Replies. For more information about configuring Quick Replies responses, see the "Types of Responses" section above.
-
Click the text field and compose the following message: "Would you like to provide your email address so we can follow up with you if needed?" Then, change the labels and payloads of the buttons to "Yes" and "No," respectively. When you are finished, exit the Bot Reply Settings window.
-
-
On the Email Ask node, click the Auto-Populate button to create branches from the node that are labeled as your Quick Replies options.
-
On the Email Ask node, click the Node Settings button to open the Node Settings dialog window.
-
On the Node Settings dialog window, make sure that the "Wait for user input before advancing to the next node" checkbox is selected.
-
Select the "Apply variable modifications" checkbox, then click the Add button . A new variable appears.
-
On the new variable, click the Edit button and configure it as follows:
-
-
When you are finished, click , then exit the Node Settings window.
-
-
Connect the Last Name node's Out branch to the Email Ask node's In branch.
-
Connect the Email Ask node's Out branch to the Email Ask node's In branch.
-
-
Click the Add New Node button and select a Standard node. The new Standard node appears in the Authoring Area. Rename the node "Email."
-
On the Email node, click the Bot Reply Settings button to open the Bot Reply Settings dialog window.
-
Select the Send Direct Reply checkbox. The dialog window darkens, indicating that it has become available for editing.
-
From the drop-down list of response type options, select Text.
-
Click the text field and compose the following message: "One last question, what's your email address?" When you are finished, exit the Bot Reply Settings window.
-
-
On the Email node, click the Node Settings button to open the Node Settings dialog window.
-
On the Node Settings dialog window, make sure that the "Wait for user input before advancing to the next node" checkbox is selected.
-
-
On the Email node, click the Add Branch button. A new branch appears. Double click the text reading "Branch 1" and rename the branch "Email Valid." When you are finished, click in the Authoring Area.
-
Connect the Email Ask node's "Yes" branch to the Email node's In branch.
-
-
Click the Add New Node button and select a Standard node. The new Standard node appears in the Authoring Area. Rename the node "Invalid Email."
-
On the Invalid Email node, click the Bot Reply Settings button to open the Bot Reply Settings dialog window.
-
Select the Send Direct Reply checkbox. The dialog window darkens, indicating that it has become available for editing.
-
From the drop-down list of response type options, select Text.
-
Click the text field and compose the following message: "I'm sorry, that doesn't appear to be a valid email address. Can you please try again?" When you are finished, exit the Bot Reply Settings window.
-
-
On the Invalid Email node, click the Node Settings button to open the Node Settings dialog window.
-
On the Node Setting dialog window, make sure that the "Wait for user input before advancing to the next node" checkbox is selected.
-
-
On the Invalid Email node, click the Add Branch button A new branch appears. Double click the text reading "Branch 1" and rename the branch "Email Valid." When you are finished, click the Authoring Area.
-
Connect the Email node's Out branch to the Invalid Email node's In branch.
-
Connect the Invalid Email node's Out branch to the Invalid Email node's In branch.
-
-
Click the Add New Node button and select a Standard node. The new Standard node appears in the Authoring Area. Rename the node "Store Email."
-
From the Conversation Flow toolbar, click the Flow Variables button. The Conversation Flow Variables drop-down menu appears.
-
On the drop-down menu, click the + Add Variable button. The New Variable pop-up menu appears.
-
On the pop-up menu, erase the content from the Name text field and enter "userInfo.email." Then, select String from the Type drop-down list and select the checkbox next to "Contains personally identifiable information."
-
When you are finished, click Apply. The new variable appears on the Conversation Flow Variables drop-down menu. Click the Authoring Area to exit.
-
-
On the Store Email node, click the Node Settings button to open the Node Settings dialog window.
-
On the Node Settings dialog window, select the "Apply variable modifications" checkbox, then click the Apply button. A new variable appears.
-
On the new variable, click the Edit button and configure it as follows:

-
When you are finished, click Apply, then exit the Node Settings window.
-
-
Connect the Invalid Email node's "Email Valid" branch to the Store Email node's In branch.
-
Hover over the path between the branches and click the Path Settings button to open the Path Settings window. Configure the following rule, then exit the Path Settings window.
.png?cb=f789efd17fe13dffc757c9e11043ea78)
-
Connect the Email node's "Email Valid" branch to the Store Email node's In branch.
-
Hover over the path between the branches and click the Path Settings button to open the Path Settings window.
-
Configure the above rule, then exit the Path Settings window.
-
-
-
-
Click the Add New Node button and select a Standard node. The new Standard node appears in the Authoring Area. Rename the node "No Email."
-
On the No Email node, click the Bot Reply Settings button to open the Bot Reply Settings dialog window.
-
Select the Send Direct Reply checkbox. The dialog window darkens, indicating that it has become available for editing.
-
From the drop-down list of response type options, select Text.
-
Click the text field and compose the following message: "Okay, thanks! Please wait while we transfer you to an agent." When you are finished, exit the Bot Reply Settings window.
-
-
Connect the Email Ask node's "No" branch to the No Email node's In branch.
-
-
Click the Add New Node button and select an Escalation node. The new Escalation node appears in the Authoring Area.
-
On the Escalation node, click the Node Settings button to open the Node Settings dialog window.
-
Open the "Escalate the conversation to:" drop-down list and select the agent group that should handle escalated user conversations.
-
Click the Settings button next to the selected agent group. The Agent Routing Settings window displays.
-
Select whether the escalation is routed to agents with the default skill, agents with a specific skill, or to a specific agent. When you are finished, click the X in the upper right corner to return to the Node Settings window. For more information about skills, see Setting Up Agents.
-
Select the checkboxes next to the escalation events that you would like the bot to update users about.
-
When you are finished configuring the Escalation node, exit the Node Settings window and return to the Authoring Area.
-
-
Connect the Store Email node's Out branch to the Escalation node's In branch.
-
Connect the No Email node's Out branch to the Escalation node's In branch.
-
Connect the Escalation node's Out branch to the Flow Exit node's In branch.
-
-
From the Conversation Flow toolbar, click the Save button.
