Set Up an SLA in Care
This article is for the users who have an account role with the “Supervisor” level of access to Care (that is, for Account Admins and the users who have a custom account role with the “Supervisor” permission in Care; see Account Roles).
For general information about a service-level agreement (SLA), see Set Up a Service-level Agreement (SLA) in Care.
To set up an SLA in Care, complete the following steps:
Set up SLA policies.
Set up one or multiple SLA policies to assign to Care cases. Depending on its configuration, an SLA policy may be assigned to a case when a certain condition is met (for example, a case is opened from a specific profile or the case message contains the predefined keywords) or to any case that is open in Care.Set up business hours and holidays.
Set up a timeframe when the SLA policies are applied (for example, nonstop or only during your company’s business hours) and holidays when the SLA policies are not applied.Create custom Care views.
Create views in Care to track cases based with a specific priority or a breached milestone.Configure SLA breach notifications.
Set up notifications to get notified if an SLA milestone is breached.
Set up SLA policies
Create and enable SLA policies, and then arrange them in the order in which they should be used to evaluate each new Care case. For more information about why the order of SLA policies is important, see “How a case gets an SLA policy assigned” in Set Up a Service-level Agreement (SLA) in Care.
SLA policies are not assigned retrospectively. An SLA policy can be assigned only to the cases that will be opened after you have created and enabled the SLA policy.
The cases that had been opened before the SLA policies were created are not going to get an SLA policy assigned.
Create an SLA policy
You can create as many SLA policies as you need.
A new SLA policy is created as disabled and is not assigned to any new case (see “Statuses” in Set Up a Service-level Agreement (SLA) in Care). When an SLA policy is ready, you can enable it at any time (see “Enable or disable an SLA policy” further in this article).
A newly created SLA policy is automatically placed at the end of the list of the existing policies on the SLA Policies page. You can then move it within the list (see “Reorder the SLA policies” further in this article). For more information about why the order of SLA policies is important, see “How a case gets an SLA policy assigned” in Set Up a Service-level Agreement (SLA) in Care.
Steps:
Go to Settings -> Care -> SLA Policies.
Click +Create SLA policy.
The SLA policy panel slides out.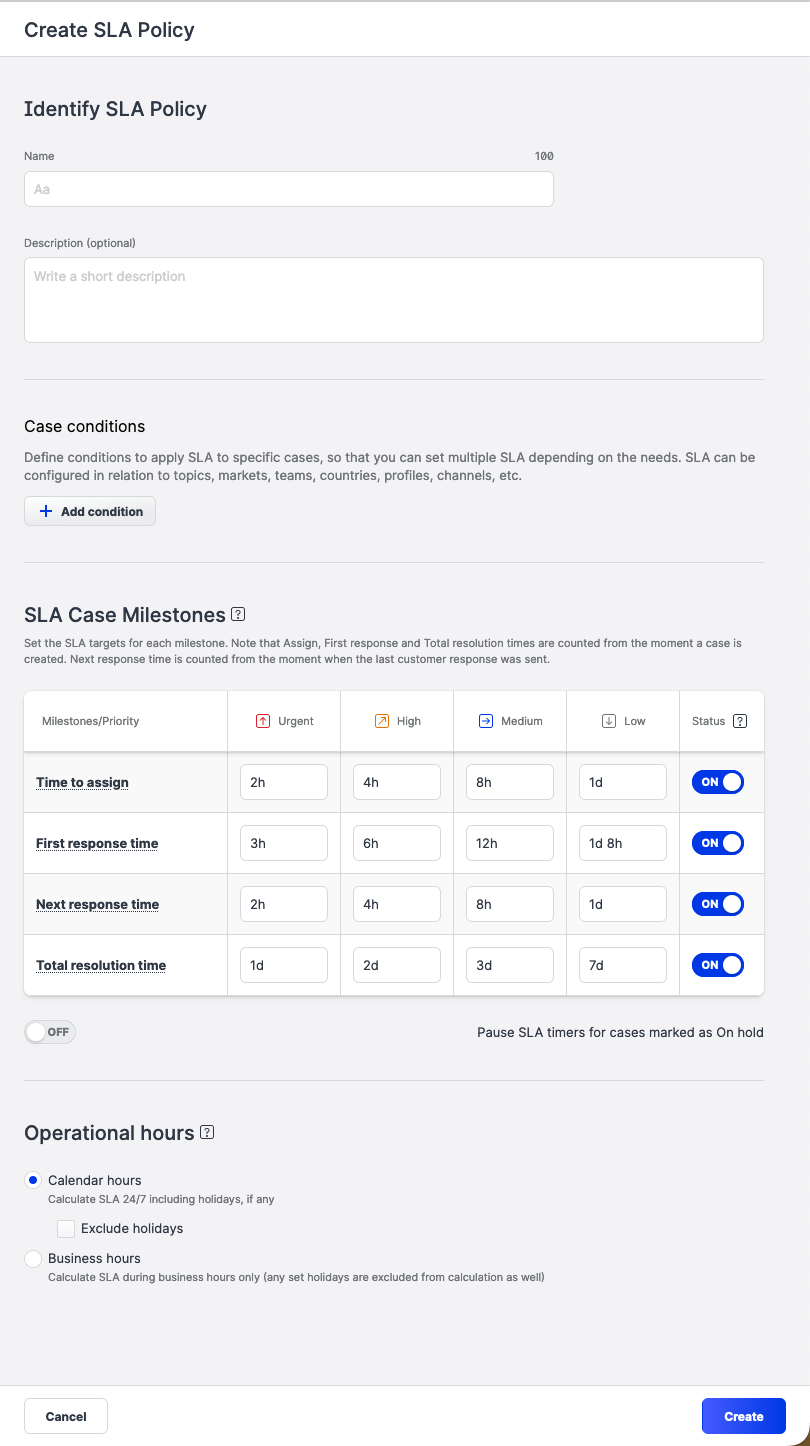
Enter the name of the SLA policy.
(Optional) Add the description for the SLA policy.
Click +Add condition to set up the first condition.
You can add as many conditions as you need. You can have an SLA policy with no conditions. For information when SLA policies with no conditions can be useful, see “Conditions” in Set Up a Service-level Agreement (SLA) in Care. If you want to create an SLA policy with no conditions, skip this step and go to Step 8.
In the dropdown, select the property that should be compared to the same property of a case.
Specify the value of the property and the
isoris notfunction, if available.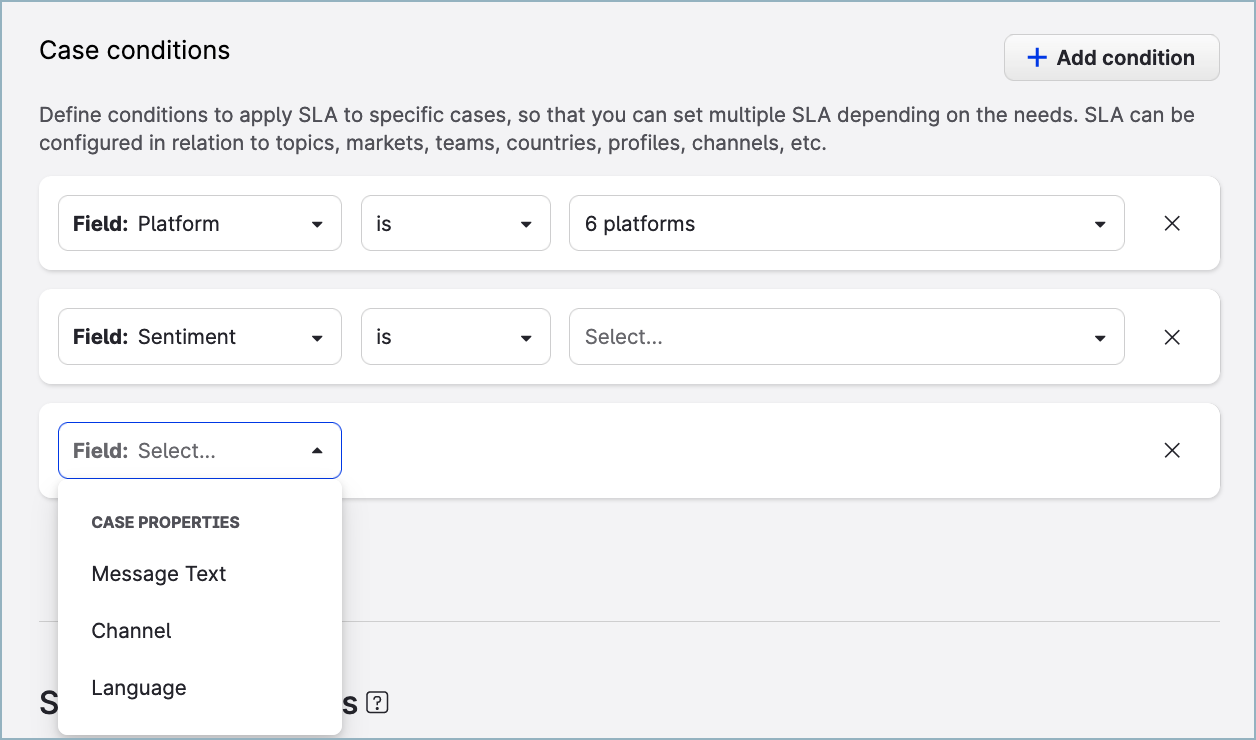
Review the default SLA milestones and update them if needed. Disable the ones that you do not need.
 You cannot disable all milestones at once. At least one milestone must always be enabled in the SLA policy.
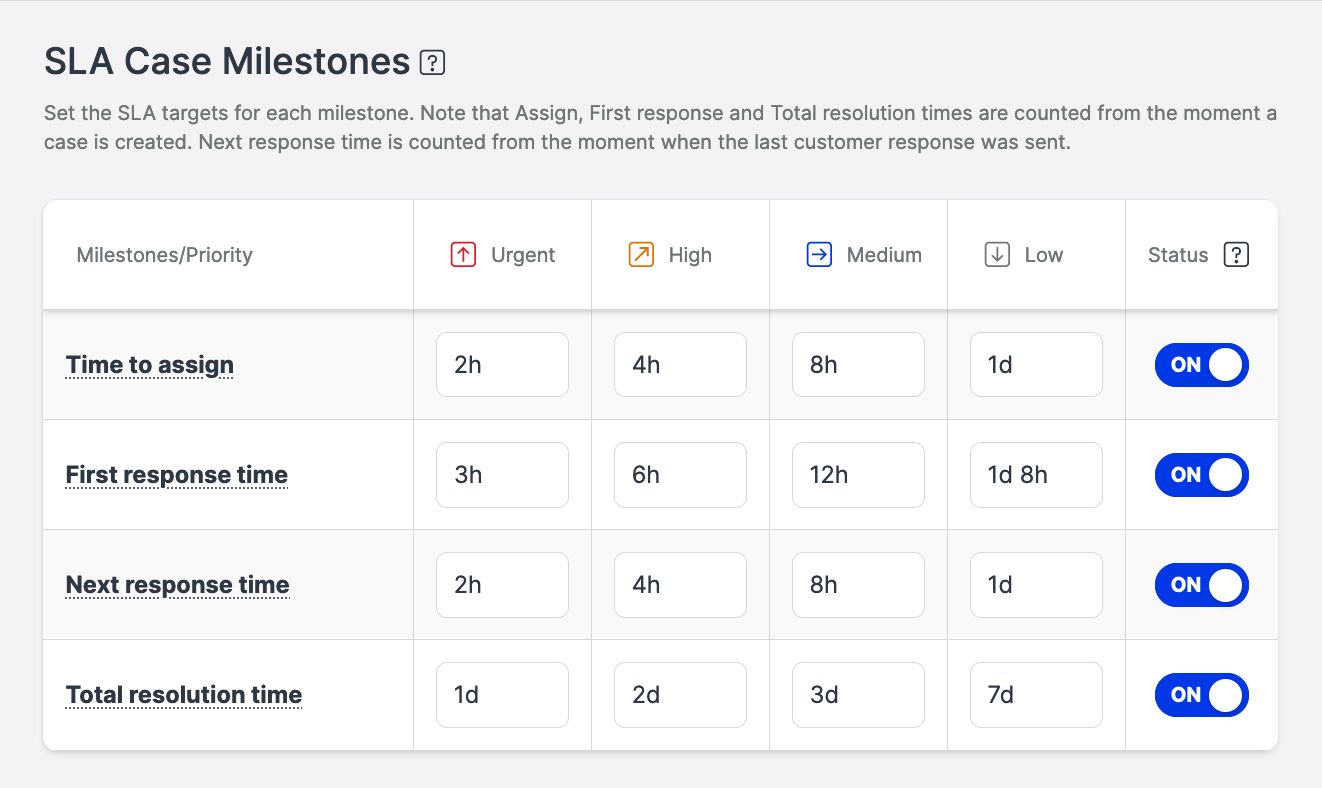
If you want to pause the SLA policy when a case is put on hold, toggle the switch next to the Pause SLA timers for cases marked as On hold option to ON.
Pausing the SLA policy while a case is on hold may be useful when you use the On holdstatus as an internal pause (while waiting for information from another department in the company). This is not to be confused with thePendingstatus (while waiting for a reply from the customer). For more information about case statuses, see Change the Status of a Care Case.Specify whether the SLA policy should run nonstop (with an option to exclude public holidays) or only during the business hours.
Click Create.
The SLA policy is created and is automatically placed at the end of the list of the existing policies. The policy status is set to OFF (the policy is disabled).
You can enable it or move within the list.
Enable or disable an SLA policy
You can enable or disable an SLA policy at any time. For more information about the SLA policy statuses, see “Statuses” in Set Up a Service-level Agreement (SLA) in Care.
Steps:
Go to Settings -> Care -> SLA Policies.
Locate the SLA policy that you want to enable or disable.
Toggle the switch in the Status column.
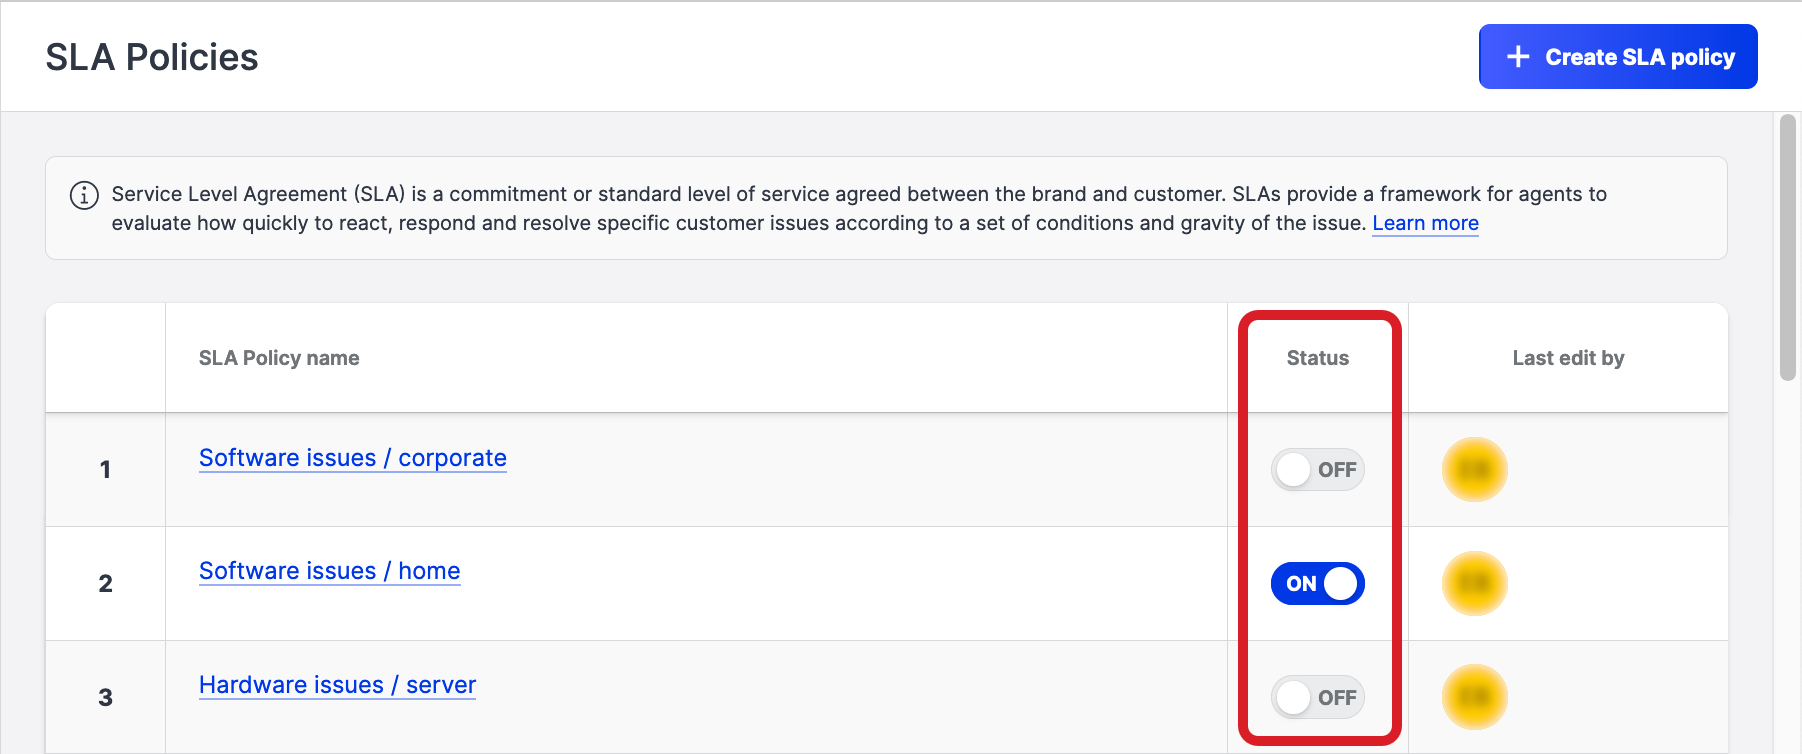
The status of the SLA policy changes.
Reorder the SLA policies
Each new case is evaluated against the existing enabled SLA policies in the order in which the SLA policies are listed on the SLA Policies page. A newly created SLA policy is automatically placed at the end of the list of the existing policies on the SLA Policies page.
As you create more SLA policies, make sure that their order is according to your business requirements. For more information about why the order of SLA policies is important, see “How a case gets an SLA policy assigned” in Set Up a Service-level Agreement (SLA) in Care.
Steps:
Go to Settings -> Care -> SLA Policies.
Locate the SLA policy that you want to move to a different position.
Hover over the number of the SLA policy, then drag and drop the SLA policy to the new position.
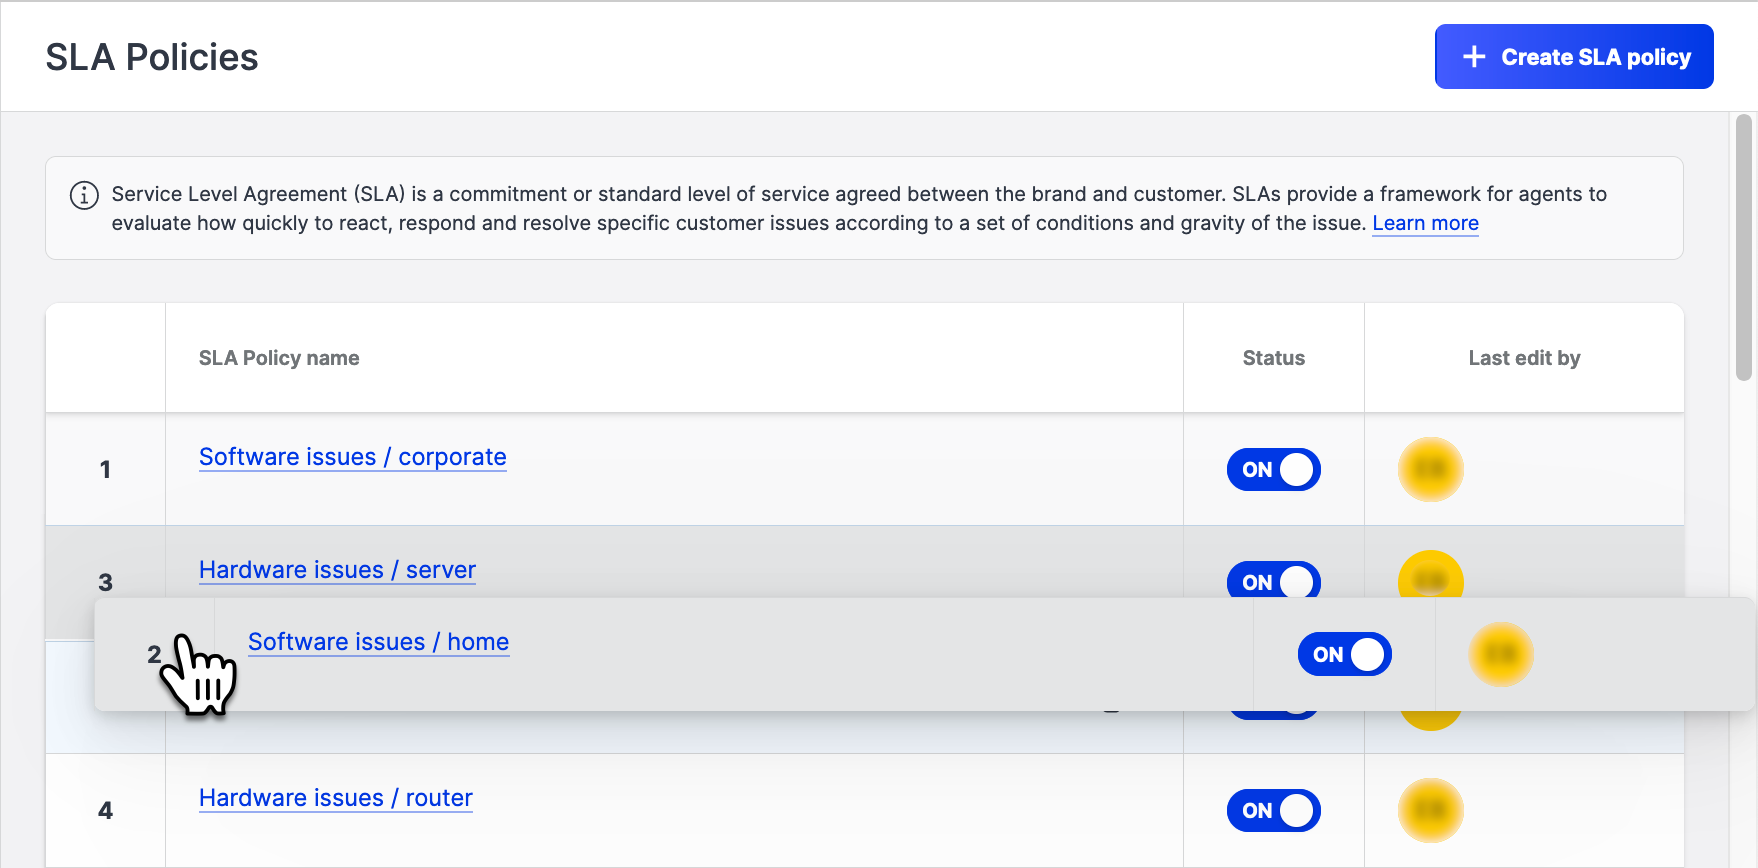
The SLA policy is moved to the new position in the list.
Keep moving the SLA policies within the list until the order is according to your business requirements.
Update an SLA policy
Before updating an SLA policy, learn how updating certain aspects of the SLA policy may impact the cases that this SLA policy is assigned to.
Updating the conditions
The SLA policy remains assigned to the cases even if these cases no longer match the updated conditions.Updating the milestones
Updating the times
The past milestones in the cases do not change.
The current and future milestones in the cases are refreshed immediately after you save the changes. The timers in the cases are recalculated and show the updated time remaining to complete the current milestone on time and the new time when the future milestones are due.
 Updating the milestone times, especially lowering them, may cause an immediate breach of the milestones in open cases. In this situation, SLA breach notifications will not be sent.
Disabling milestones
You cannot disable all milestones at once. At least one milestone must always be enabled in an SLA policy.
The disabled milestones are skipped, and a case is automatically moved to the next enabled milestone. The disabled milestones are not visible in the case’s details and are not included in Care widgets and metrics.
Steps:
Go to Settings -> Care -> SLA Policies.
Find and click the SLA policy that you want to edit.
The SLA policy panel slides out.Update the SLA policy as needed.
Once done, click Save.
The SLA policy is updated.
Delete an SLA policy
An SLA policy can be deleted only when it is not assigned to any open case. If an SLA policy is assigned to at least one case that it not closed, this SLA policy cannot be deleted.
To be able to delete an SLA policy assigned to not closed cases, disable the SLA policy (see “Enable or disable an SLA policy” earlier in this section) and then close all the open cases that this SLA policy is assigned to by marking them as done or as spam. After that, you can delete the SLA policy.
Once you delete an SLA policy, it is no longer visible anywhere on the Emplifi platform and will not be assigned to any case.
However, if a deleted SLA policy was previously assigned to some cases that have since been closed and one of those cases gets reopened (manually by a Care agent or automatically by a customer replying to the case after it was closed), this case will be reopened with no SLA policy assigned.
Steps:
Go to Settings -> Care -> SLA Policies.
Hover over the SLA policy you want to delete, and click the trash can icon that appears.
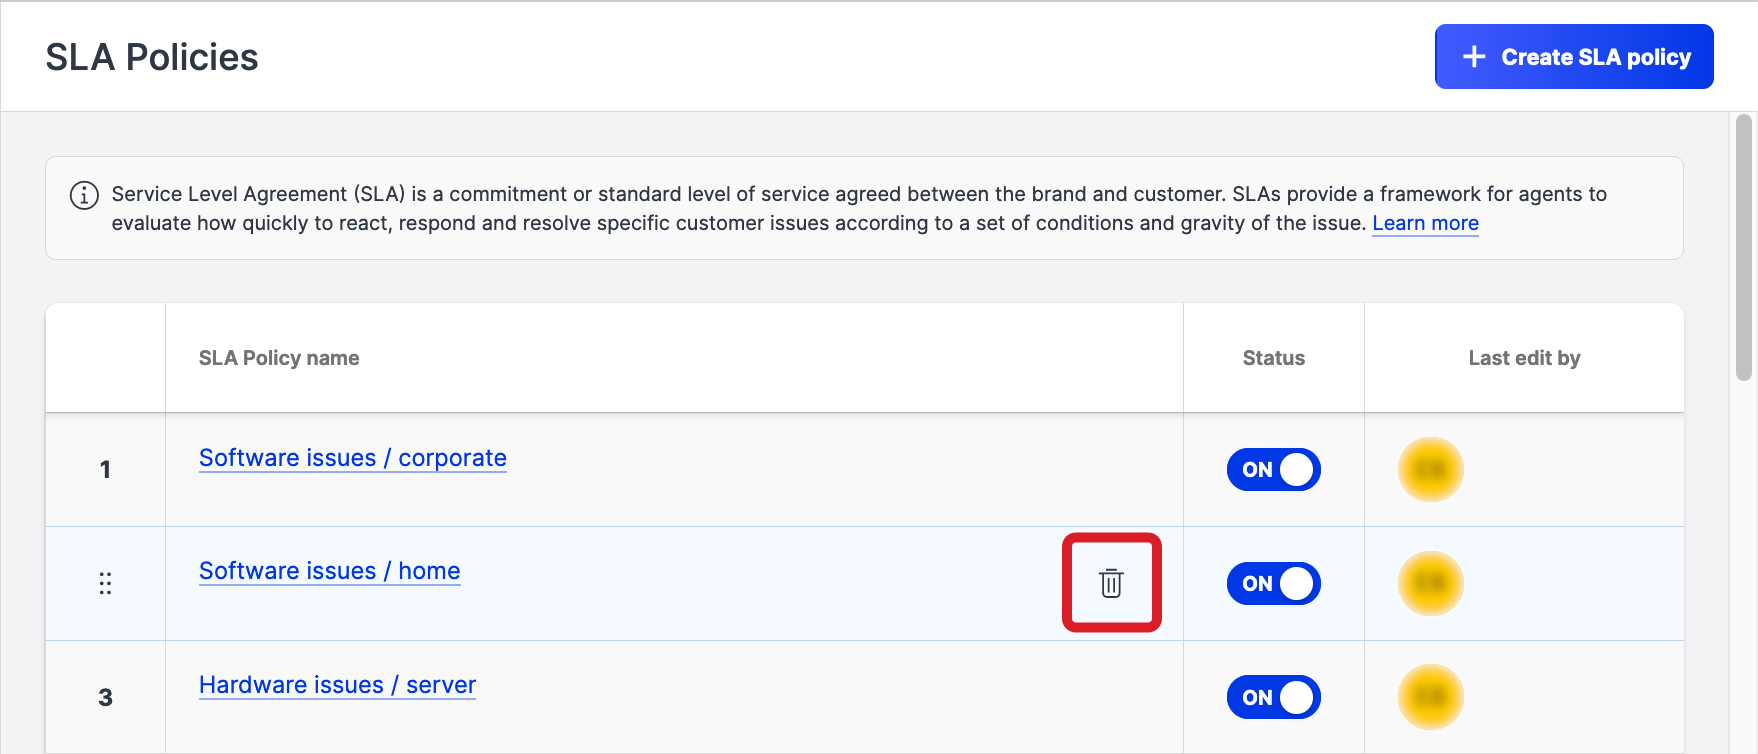
Confirm the deletion.
The SLA policy is deleted.
Set up business hours and holidays
For each SLA policy, you can set whether the policy should run nonstop (with an option to exclude public holidays) or only during the business hours (for example, from 8.00 till 16.00 local time).
Set up business hours
By default, there are no predefined business hours.
Set up business hours for each day of the week from Monday through Sunday. You can set up multiple time slots per day (for example, from 8.00 till 12.00 and then from 13.00 till 17.00). The time slots within one day must not overlap.
If an SLA policy is configured to run only during the business hours, its milestone timers will be running during the business hours and will pause outside of the business hours and on holidays if any exists.
Steps:
Go to Settings -> Care -> Business hours.
The Business hours screen opens.
In the Timezone, select the timezone where your business hours are observed.
Click +Add business hours.
The days of the week from Monday through Sunday appear.
Each day is enabled with the business hours set to from 8.00 till 17.00.Update the business hours as needed.
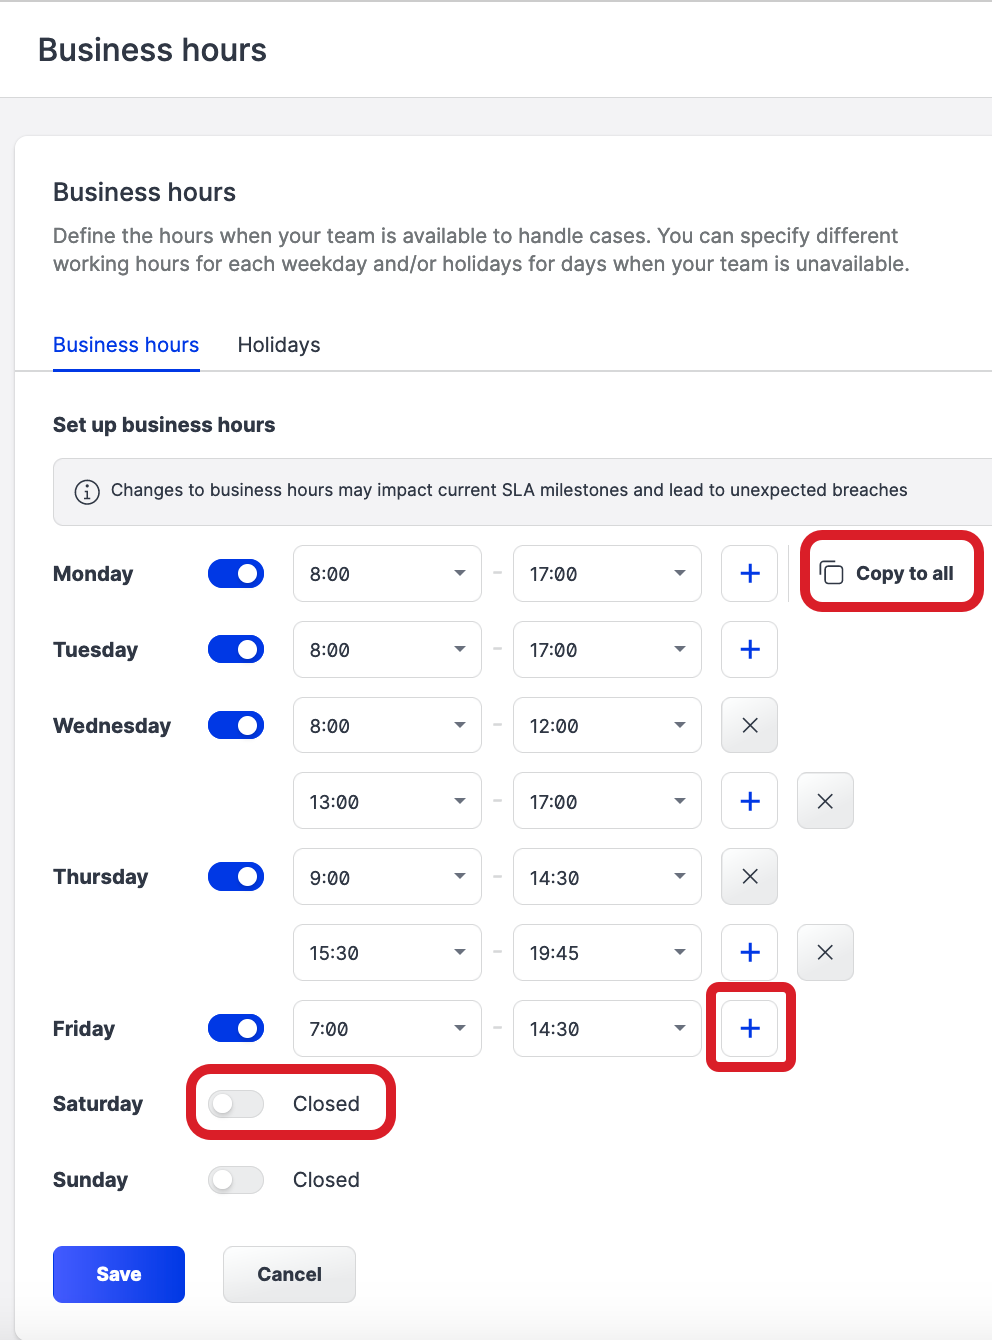
For each working day, set the start time and the end time of the business hours.
If your company is closed on some days of the week, disable these days.
If the business hours are the same for every day of the week, set up the hours only for Monday and click Copy to all to populate the same hours to all the other days of the week.
To set up more than one time slot within the same day, click + to add a time slot.
The time slots within one day must not overlap.
Once done, click Save.
The business hours are set up.
Create a holiday
By default, there are no predefined holidays. Every calendar day is considered a working day.
Once you add holidays, any SLA policy that is configured to run nonstop excluding public holidays or only during the business hours will pause on the holiday days.
When creating a holiday, you can create it as one-off or make it repeat annually.
A holiday can only be set to one day exactly. It cannot be shorter or longer than one day.
For a holiday that spans more than one day, create multiple holidays to cover each day of the holiday. For example, for a three-day holiday, create three holidays, each of which would cover one day out of the three.One date can be used in only one holiday. You cannot create more than one holiday with the same date.
Steps:
Go to Settings -> Care -> Business hours.
Click the Holiday tab.
Click +Add holiday.
The dialog for creating a new holiday pops up.
Enter the name of the holiday, and select the holiday date.
If the holiday occurs annually, toggle the switch next to the Repeated yearly option to ON.
Do one of the following:
If you need to create only this one holiday, click Save.
The dialog closes. The holiday is saved.If you need to create several holidays in a row, click Add & next.
The holiday is saved. The dialog remains open, and the fields are cleared so you can fill them in for the next holiday to create.
Delete a holiday
Steps:
Go to Settings -> Care -> Business hours.
Click the Holiday tab.
Hover over the holiday you want to delete, and click the trash can icon that appears.
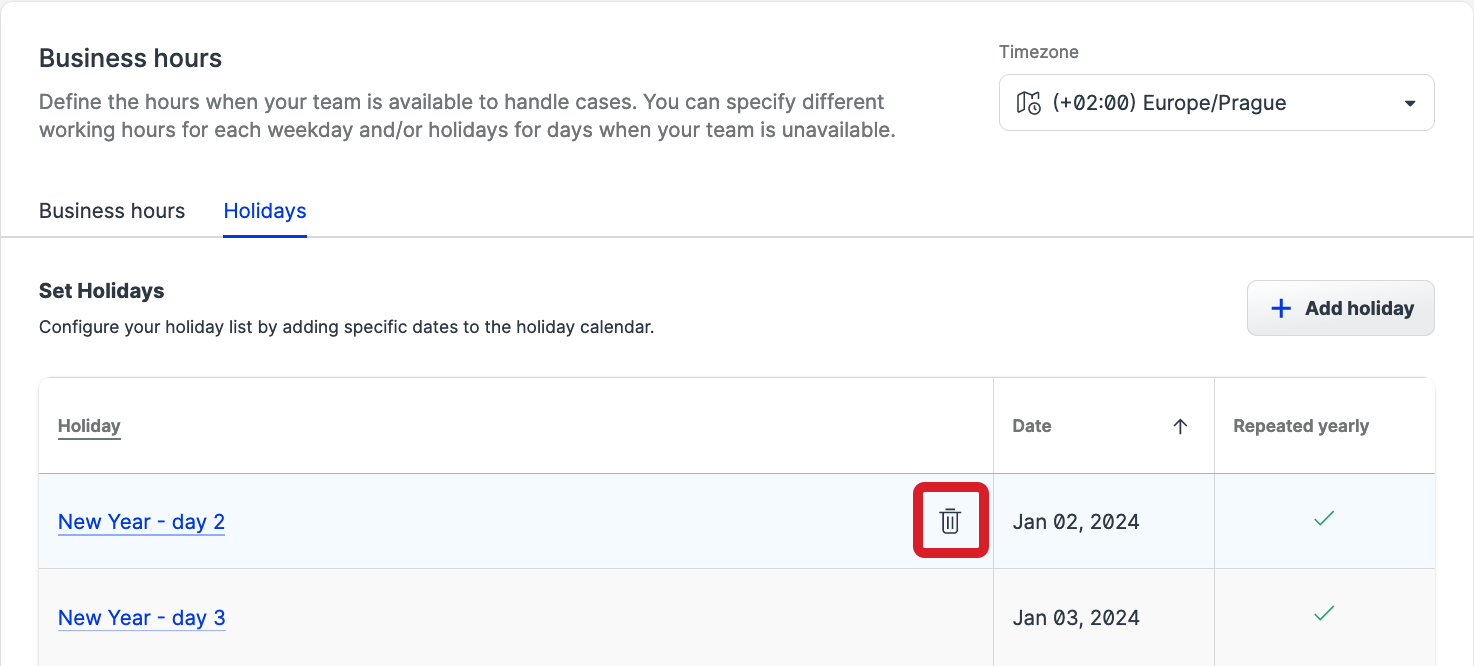
Confirm the deletion.
The holiday is deleted.
Create custom Care views
In addition to the default Care views (see Use Standard Care Settings), create one or more custom views to track the cases with a specific priority or a breached milestone. For more more information about views, see Create Case Views in Care.
Steps:
Go to Settings -> Care -> Views.
Click +Create view.
The new view panel slides out.Enter the name of the view.
(Optional) Set up various properties of the view (if you do not want to do it now, you can always do it later):
Customize the color and the icon that the view will be marked with in Care.
Add the description for the view.
Click the Groups dropdown, select one or more view groups to include the view in, and click Apply.
For more information about view groups, see Create Case Views in Care.
In the Visibility section, specify who should be able to view the cases in the view (anyone with access to Care or only specific users).
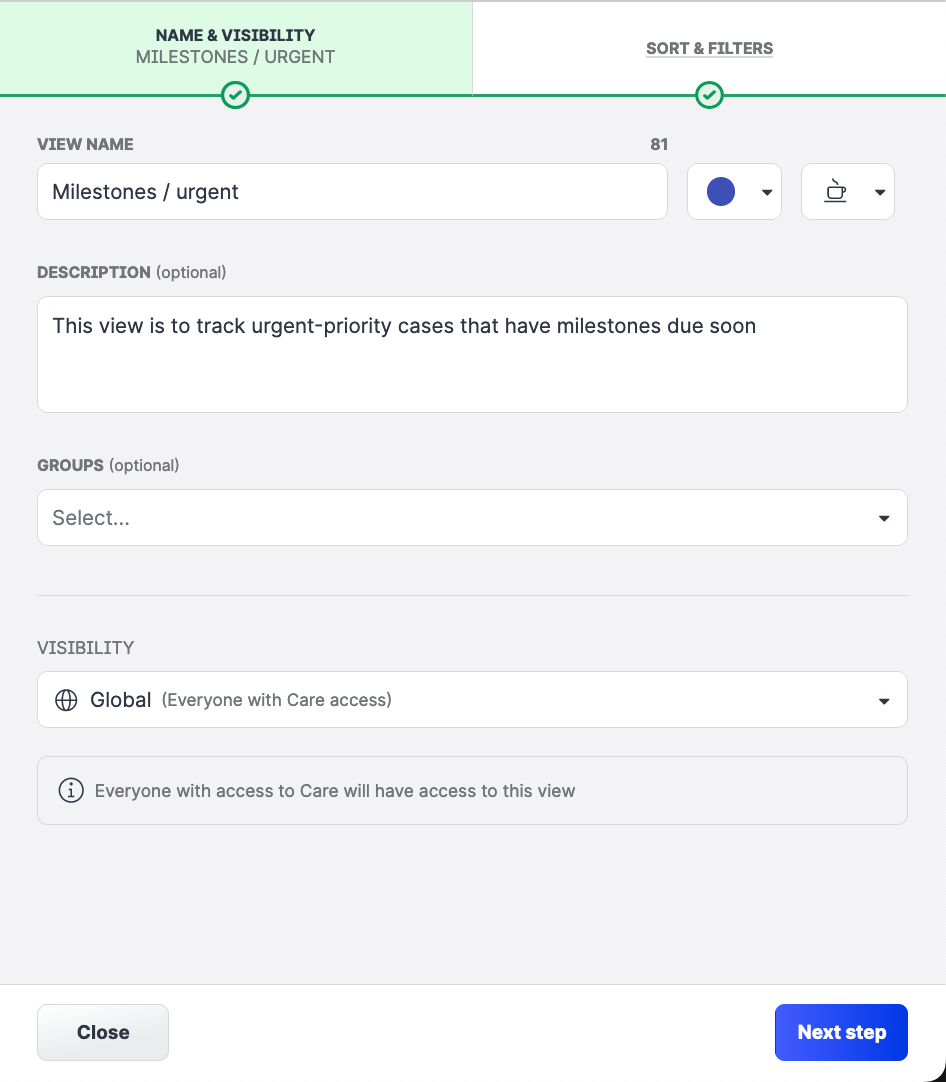
Click Next step.
Specify how the cases should be sorted in the view:
Chronologically (oldest/newest first)
Sorting from the oldest to the newest is the default.By time to breach (shortest/longest first)
By priority (highest/lowest first)
(Optional) Set up filters for the view.
For more information about available view filters, see Create Case Views in Care .
Once done, click Create.
The view is created and appears in the list of the views. The view is disabled by default and is not visible in Care.To enable the view and make it visible in Care, toggle the switch in the Status column to ON.

The view is enabled and visible in Care.
Configure SLA breach notifications
Set up notifications to get notified if an SLA milestone is breached.
In general, you can receive notifications to your email connected to Emplifi (the one you use to log in) and directly on the Emplifi platform (in-product notifications). If you miss an immediate in-product notification, you can find it in your notification center: click your name in the bottom left and then click Notifications.
By default, in-product SLA breach notifications are enabled and email SLA breach notifications are disabled for all the users who have an account role with the “Supervisor” level of access to Care (that is, for Account Admins and the users who have a custom account role with the “Supervisor” permission in Care; see Account Roles).
We recommend that you keep at least one notification channel enabled. However, you can disable both in-product and email notifications, if needed.
Steps:
Go to Settings -> Notifications.
Scroll down to the Care section.
For the SLA milestone breach notification, select and de-select the notifications to define which ones you want to receive.
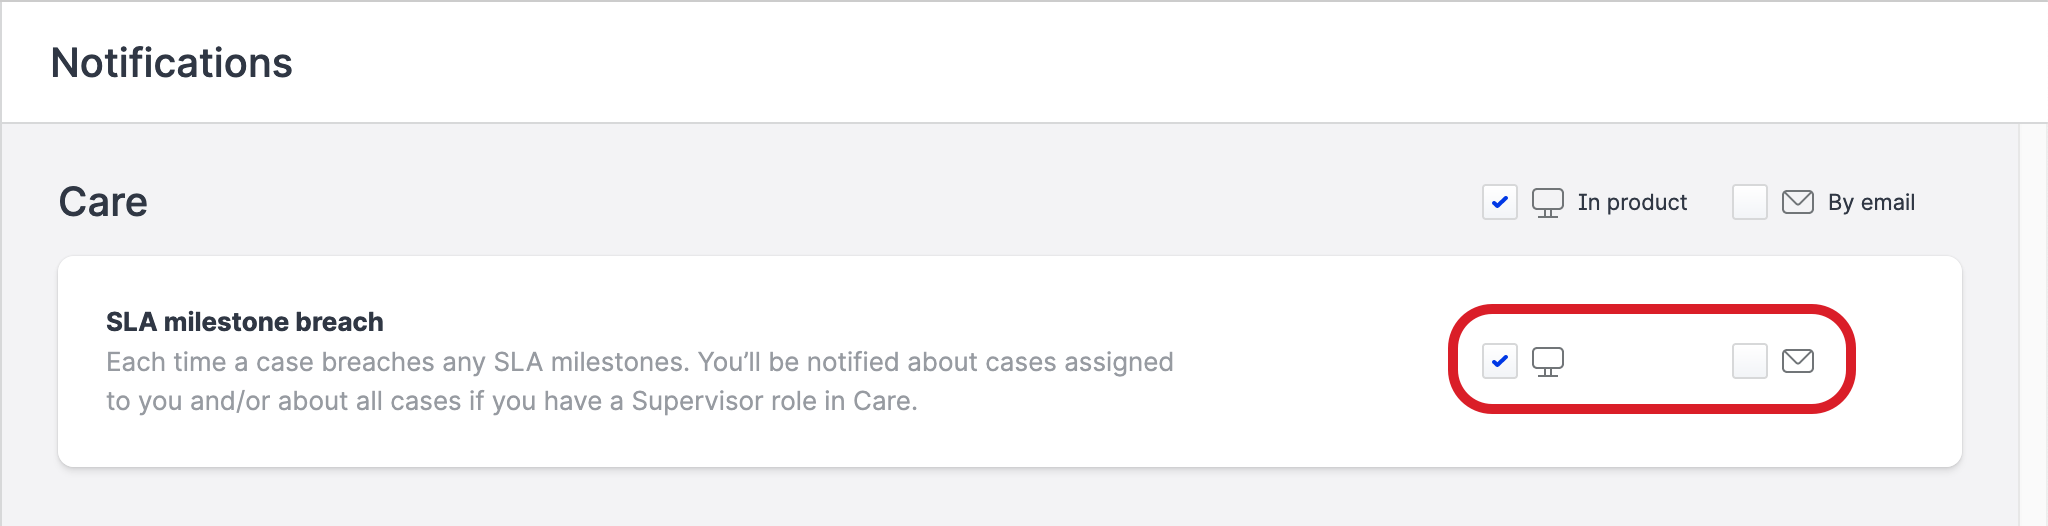
Click Save.
Your notification settings are saved.