In order to begin routing conversations to agents, you must establish which agent(s) will receive these conversations. To do so, you must first configure the appropriate Agent Groups on the Agents page, and then set up Escalation Nodes within conversations. When you have completed these steps, the chats will be routed to the appropriate groups.
Configuring Agents
-
On the Agents page, add a new Agent Group by clicking the + Add New Agent Group button at the top of the page.
-
Emplifi Bot automatically assigns a unique Access Token to the newly created Agent Group.
-
-
Hover over the Agent Group name to display the Rename button. Click the Rename button to change the name of the Agent Group.
-
Click the Edit button to set up the Agent Group.
You can also edit an existing group by clicking the Edit button next to it.
Tabs
After clicking the Edit button on an Agent Group, the Group's admin page displays. Here you will find four tabs, each containing different adjustable settings for the Group. See below for detailed descriptions of each tab and its settings.
General tab
.png?cb=44ae555a2d8da3657fa7fbf8c4a7cd91)
-
Default Skill: Select the default skill of the agent. The available options depend on the skills that you have configured in the Skills tab. For more information, see the "Skills Tab" section below.
-
Outbound Phone Number: Enter the phone number used for making outbound calls to customers.
-
-
-
Ring Type: You have two options:
-
Cycle: Each agent will be called individually until one "picks up"
-
All: Every agent is called at the same time until one "picks up"
-
-
Max Queue Seconds: Enter the number of seconds that a customer can sit in the queue before they are returned to the bot.
-
Max User Disconnected Seconds: Enter the number of seconds that Emplifi Bot should wait before considering a customer who has closed their web chat as disconnected.
-
-
-
Route by Language: Select this option if you want the chat to be routed to an agent that uses the same language indicated by the userinfo.language field.
-
SLA Seconds: Enter the average number of seconds that it should take agents to respond to customer messages.
The entered Service Level Agreement (SLA) value is used to calculate the agent group's Average Speed of Answer (ASA) and the percentage of the group's chats that are answered within the entered value.
-
Max Concurrent Conversations: Enter the maximum number of conversations that an agent can handle at once.
-
Max Ring Seconds: Enter the number of seconds that the chat should ring before ringing the next agent in the queue.
-
Set Agent Unavailable on Max Ring: Select this option to change the agent's status to Unavailable after the Max Ring Seconds has been reached.
Once the agent is set to Unavailable, they will not be rung again until they have manually set their status back to Available.
-
Set Agent Status on Max Ring: Use this drop-down menu to set the status that is displayed for the agent when the Max Ring Seconds has been reached. For more information, see the "Custom Status tab" section below.
-
Include Agent Avatar: Select this option to include agent avatars in the user interface.
Skills tab
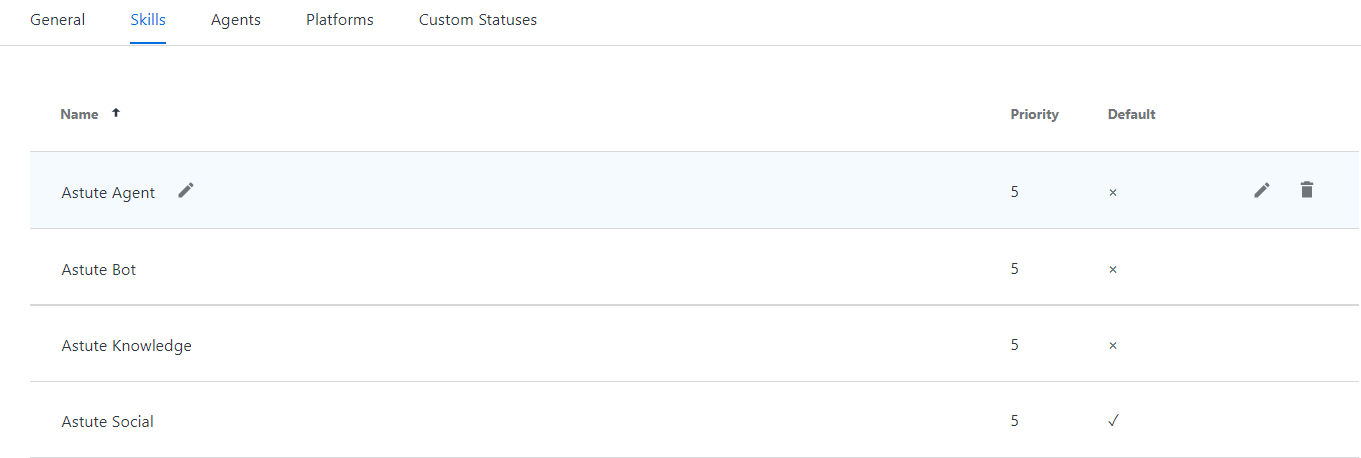
You can use the Skills tab to configure the skills available to the Agent Group. Skills route the chats to the appropriate agents.
Example: If the agent specializes in organic produce, and the chat is about organic produce, then add this as a skill for the agent.
Adding a Skill
-
On the Skills tab, click the Add button at the bottom of the page.
-
Once you have added the Skill, you can name it, assign it a priority, and indicate the default skill, which prioritizes a chat with that skill if two chats enter into the agent's queue at once.
Agents tab
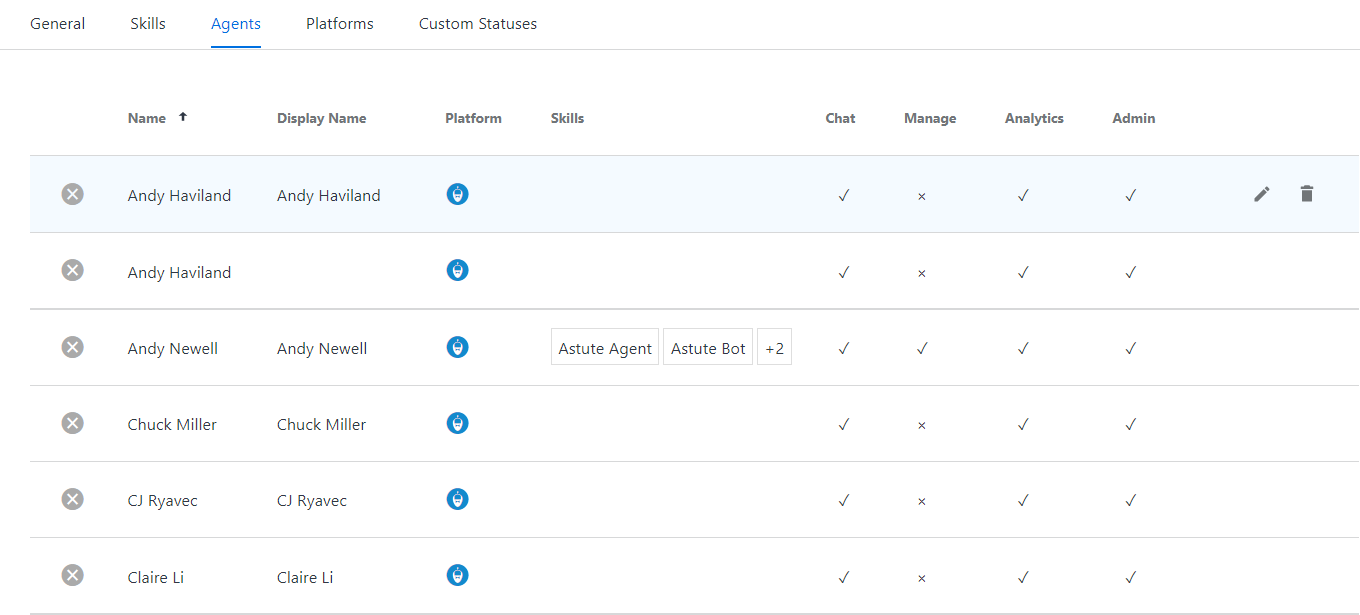
You can use the Agents tab to assign agents to the Agent Group.
Configuring Agents
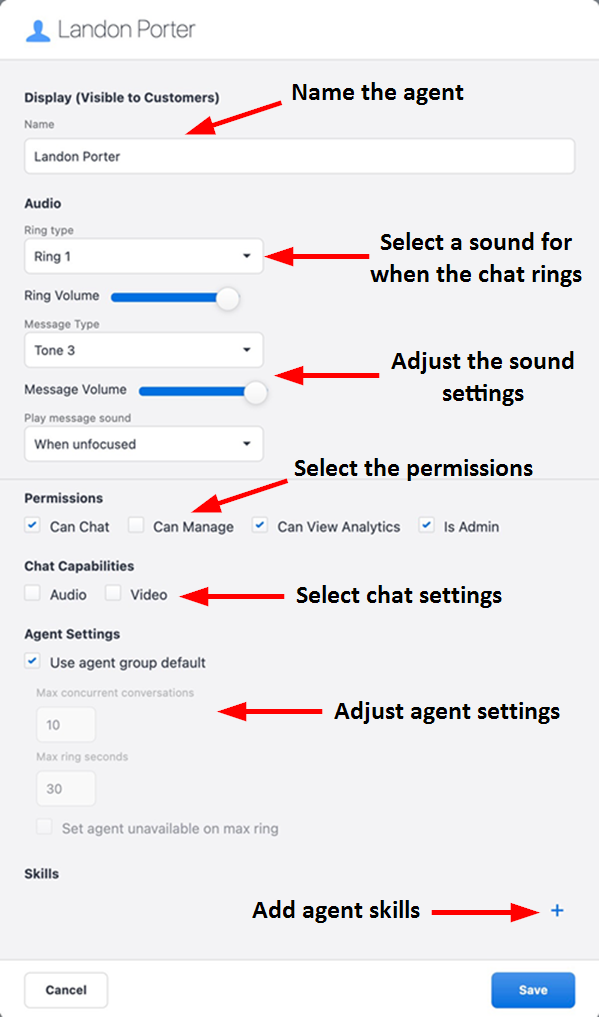
From the list of agents, select the agent that you would like to configure, then click the adjacent Edit button. The Agent Settings dialog window displays. When you are finished, click Save.
Platforms tab
You can use the Platforms tab to set up the context that Emplifi Bot will use to pass data to Emplifi Agent when escalating a conversation to a live agent. For more information on configuring this page, contact an Emplifi representative.
Custom statuses tab

Administrators can use the Custom Statuses tab to configure custom away statuses with associated icons for their agents. These statuses appear as options in the "Set Agent Status on Max Ring" drop-down menu on the General tab.
Agent Escalation Nodes
Once you have agents configured to receive escalated chats, you can add an Escalation Node to the conversation from the Bot Authoring page. For more information, see Bot Authoring and/or Conversation Flows.
Adding Agent Escalation Nodes
-
On the Bot Authoring page, find the chat conversation where you would like to add the Agent Escalation Node.
-
Add an Escalation Node to the correct place in the conversation.
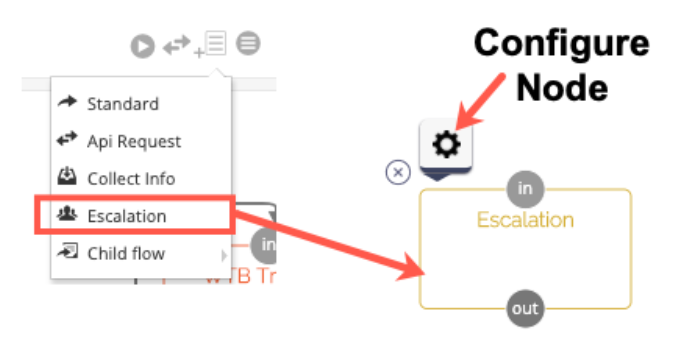
-
Click the Settings button to open settings and configure the node.
-
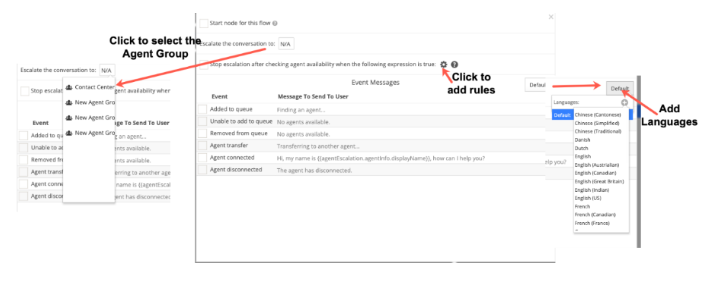
From the Escalate the conversation drop-down menu, choose an Agent Group.
-
Click the Settings button to add routing rules to the node.
-
Select the message you would like to send to the user when the chat is escalated.
-
Close the settings window when you are finished.