This article describes the setup for accounts that use the legacy governance model — where access is controlled through account roles and profile roles in Settings > Roles & permissions. If your account uses Teams instead, see Create Care-specific Team Roles . To learn more, see Govern Access to Account Resources Using Teams .
Before your organization can start handling cases and escalations in Care, you must create or modify existing account roles and profile roles to include Care-specific options.
For the account roles, choose from the following scenarios:
-
Create an account role with access only to Care.
-
Create a unique Care-specific account role.
-
Add access to Care to an existing custom account role.
After you create the account roles, create profile roles to establish connections between users and the profiles. This will allow individual users to interact with the specific profiles in Care.
To be able to create and assign account roles and profile roles, you must be an Account Admin (see Account Roles).
Account roles
A Care user's level of access is defined by a set of granular Care permissions on their account role. Each permission is an independent checkbox in the Care section of the role. For the full list of permissions and what each one grants, see Set up Care permissions.
The minimum permission a user needs to access Care is Access care. Without Access care, the user cannot open Care.
Create an account role with access only to Care
In this scenario, you want to create a dedicated Care-only account role, which grants access only to Care and no other module of the Emplifi platform.
This ensures that the users with this role will only handle Care cases and escalations. This may be useful if your Care users are contractors and you want to restrict their access to the rest of your Emplifi account.
Steps:
-
Go to Settings -> Roles & permissions.
The Account roles screen opens listing the existing account roles. -
Click + Add Account Role.
The account role panel slides out. -
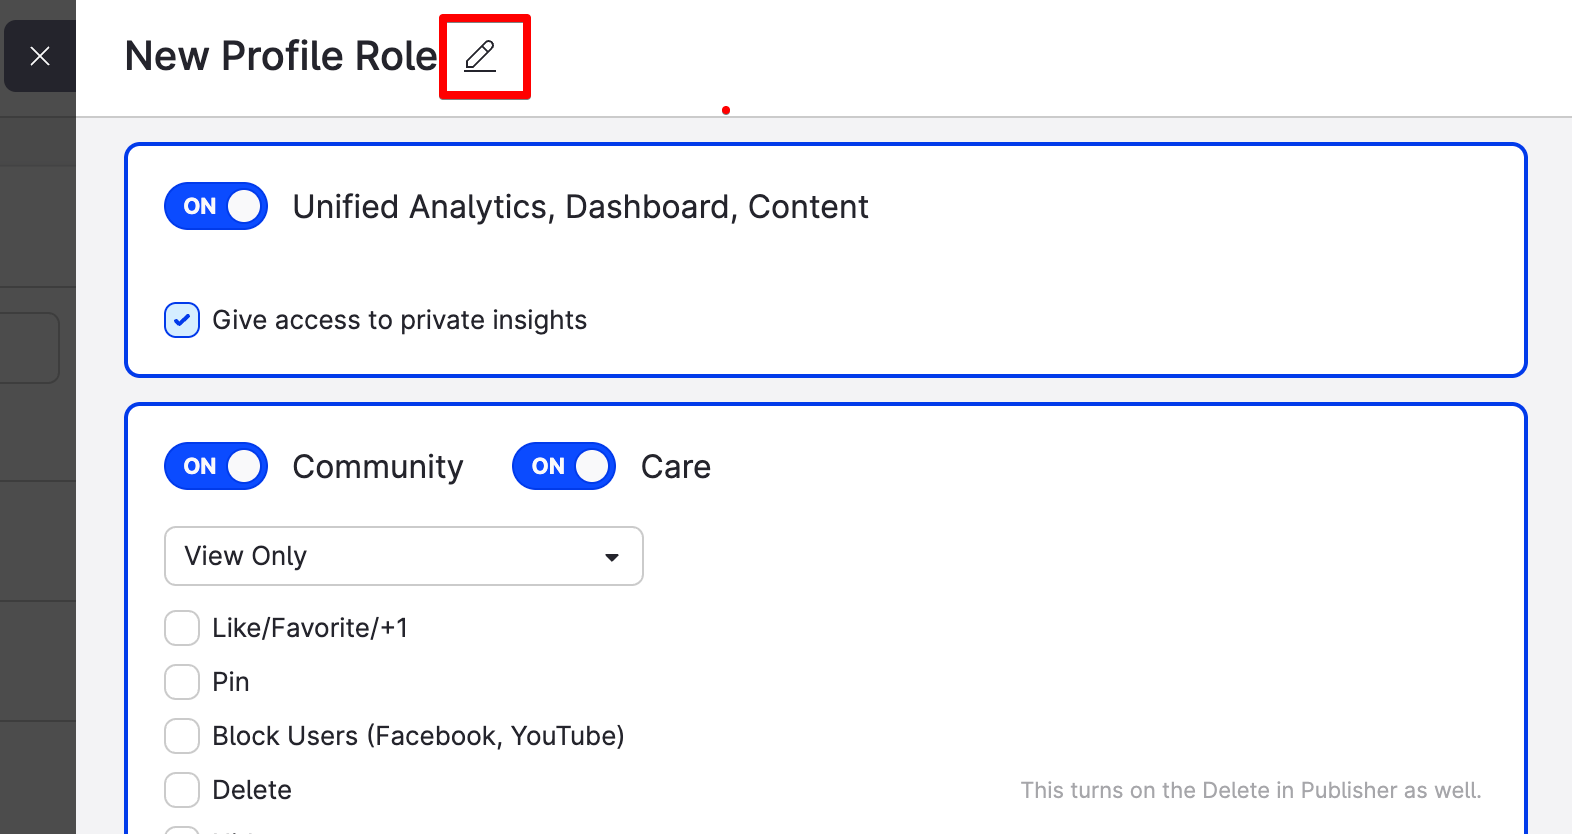
Click the pencil icon next to the placeholder role name, rename the role, and press Enter.

-
Click Care, and turn on the Care permissions that the role needs.
At minimum, turn on Access care so that users with this role can open Care. Add any other permissions that match the work this role is supposed to do.
For ideas on what to combine for common Care jobs, see "Build a role for a specific Care job" in Set up Care permissions .
-
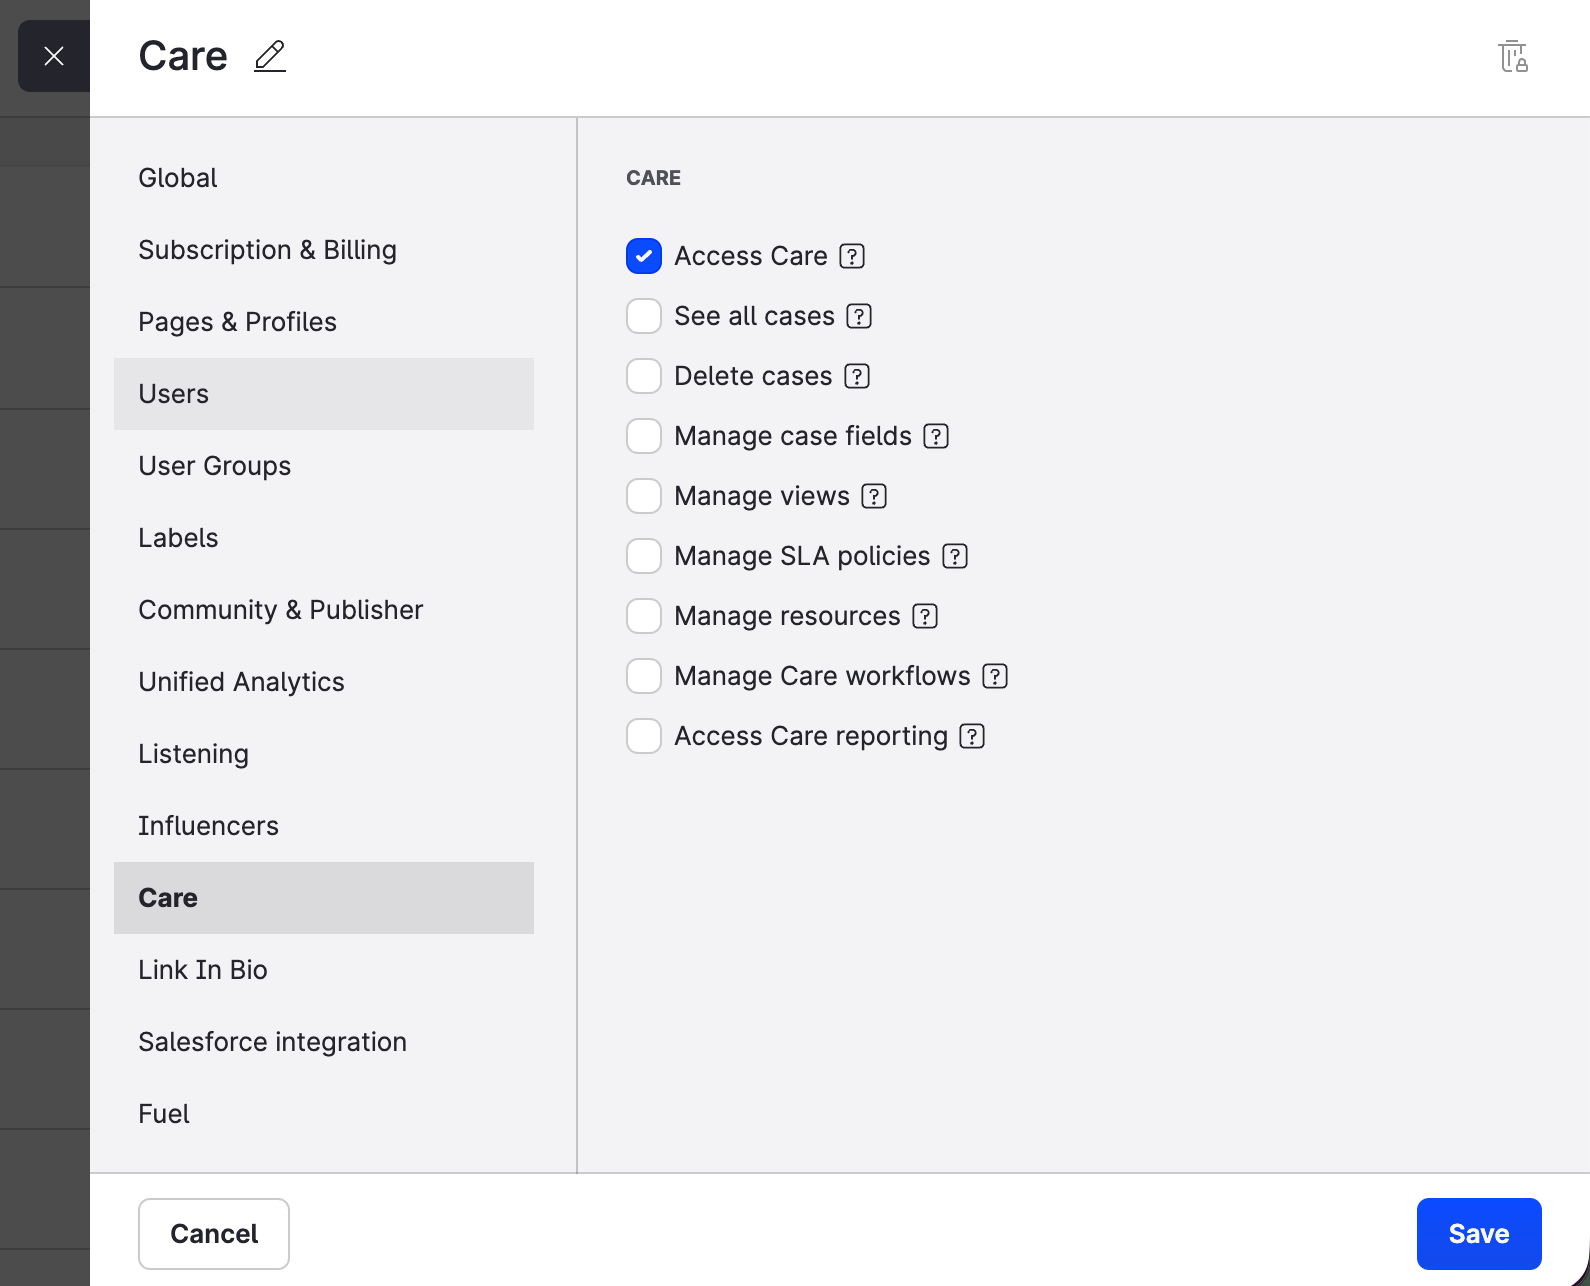
Click Save.
The role is created and appears in the list of the account roles. The new role is immediately available for assigning to users in the account. -
Assign the new account role to the users who are going to work in Care, as described in "Change a user's account role" in Account Roles.
Create a unique Care-specific account role
In this scenario, you want to create an account role that is tailored specifically for your team members who will deal with Care cases and escalations.
You have the following options:
-
Option 1: Create a new account role from scratch.
-
Option 2: Create a new account role by duplicating a predefined account role.
Option 1: Create a new account role from scratch
Steps:
-
Go to Settings -> Roles & permissions.
The Account roles screen opens listing the existing account roles. -
Click + Add Account Role.
The account role panel slides out. -
Click the pencil icon next to the placeholder role name, rename the role, and press Enter.
-
Click Care, and turn on the Care permissions that the role should have. For the full list, see Set up Care permissions.
-

Click through the list of sections, and select the other permissions that the account role should have.
-
Once done, click Save.
The role is created and appears in the list of the account roles. The new role is immediately available for assigning to users in the account. -
Assign the new account role to the users who are going to work in Care, as described in "Change a user's account role" in Account Roles.
Option 2: Create a new account role by duplicating a predefined account role
Steps:
-
Go to Settings -> Roles & permissions.
The Account roles screen opens listing the existing account roles. -
Hover over the predefined account role that you want to duplicate, and click Duplicate.
The predefined account roles are indicated with a padlock icon. We recommend:
- Duplicating the Account Admin role for users who need full Care administration.
- Duplicating the Account User or Client (External User) role for front-line Care work.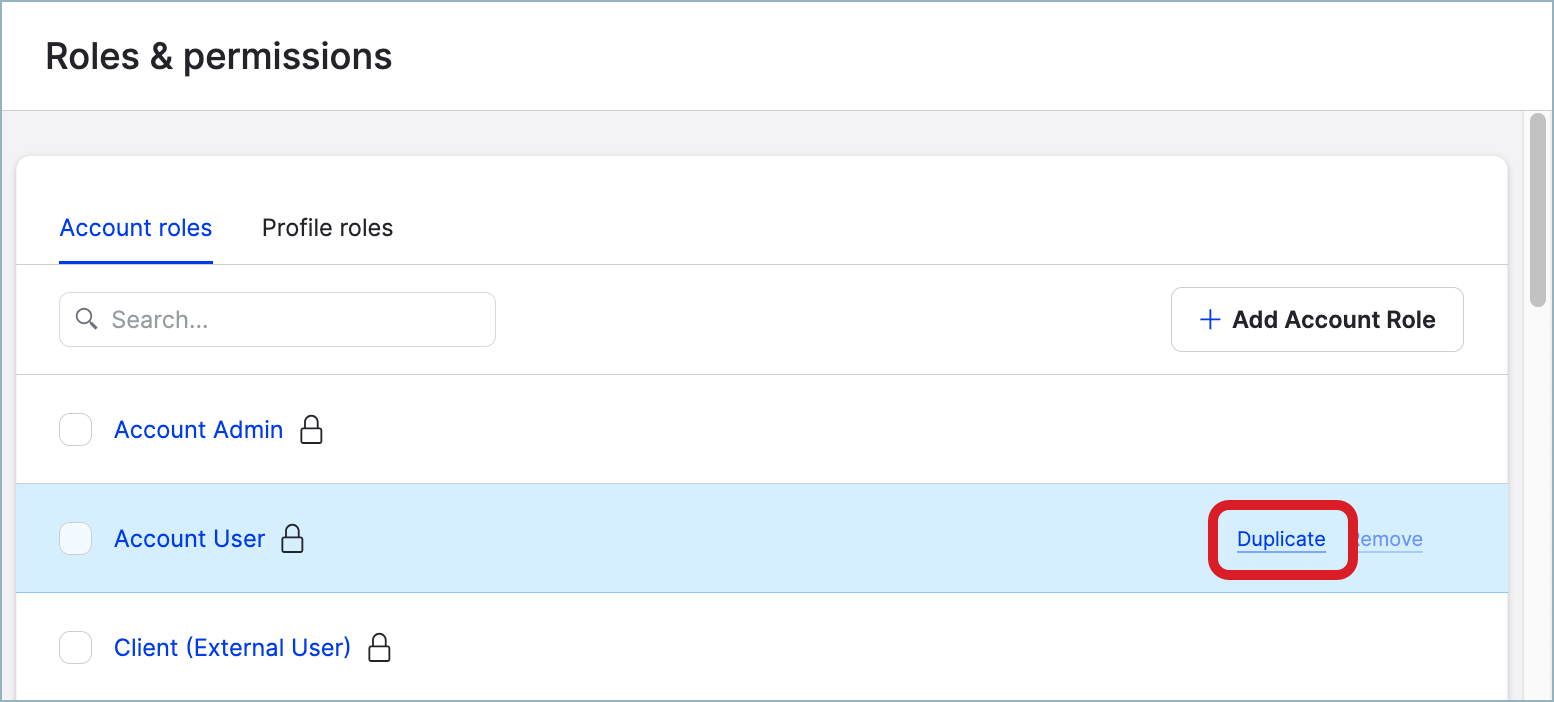
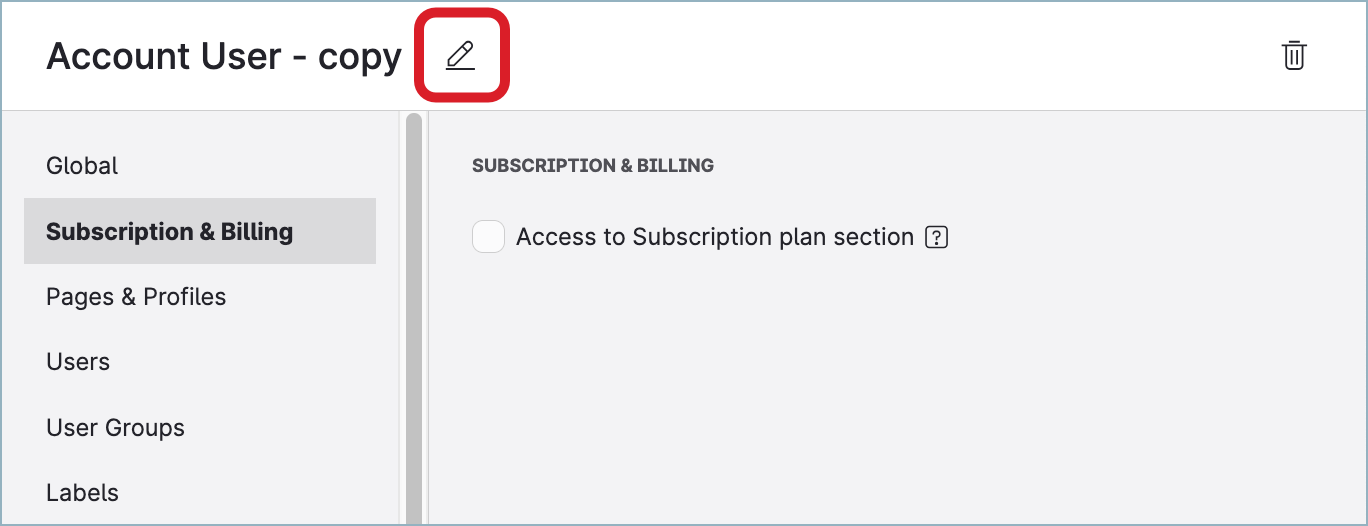
A new duplicate role is created and appears in the list of the account roles.
The new role gets the same name as the original account role plus the- copysuffix. For example, if you duplicated the account role "Account User", the new account role will be titled "Account User - copy". -
Click the newly created role.
The role permission panel slides out. -
Click the pencil icon next to the placeholder role name, rename the role, and press Enter.
-
Click Care, and adjust the Care permissions. Turn off the permissions that the role should not have, and turn on the ones it should.
-

Click through the list of sections, and select and de-select the other permissions to define the scope of permissions that the new account role should have.
-
Once done, click Save.
The role is saved with the defined permissions. The new role is immediately available for assigning to users in the account. -
Assign the new account role to the users who are going to work in Care, as described in "Change a user's account role" in Account Roles.
Add access to Care to an existing custom account role
In this scenario, you already have a custom account role and you want to expand it to include access to Care.
Steps:
-
Go to Settings -> Roles & permissions.
The Account roles screen opens listing the existing account roles. -
Click the role that you want to add access to Care to.
The account role panel slides out. -
Click Care, and turn on the Care permissions that the role should have. At minimum, turn on Access care.
-

Click Save.
The account role is saved. The change takes effect immediately: the users with this account role immediately get access to Care at the level that you set up.
Profile roles
Profile roles connect users to specific social profiles and determine what they can do with those profiles. Profile roles also control which cases a user can see and manage in Care: a user without a profile role for a given profile cannot see cases originating from that profile, regardless of their account role permissions.
To ensure that your Care agents can interact with a specific profile in Care, you must create a profile role and connect it with the specific profile and the user.
Create a profile role
Steps:
-
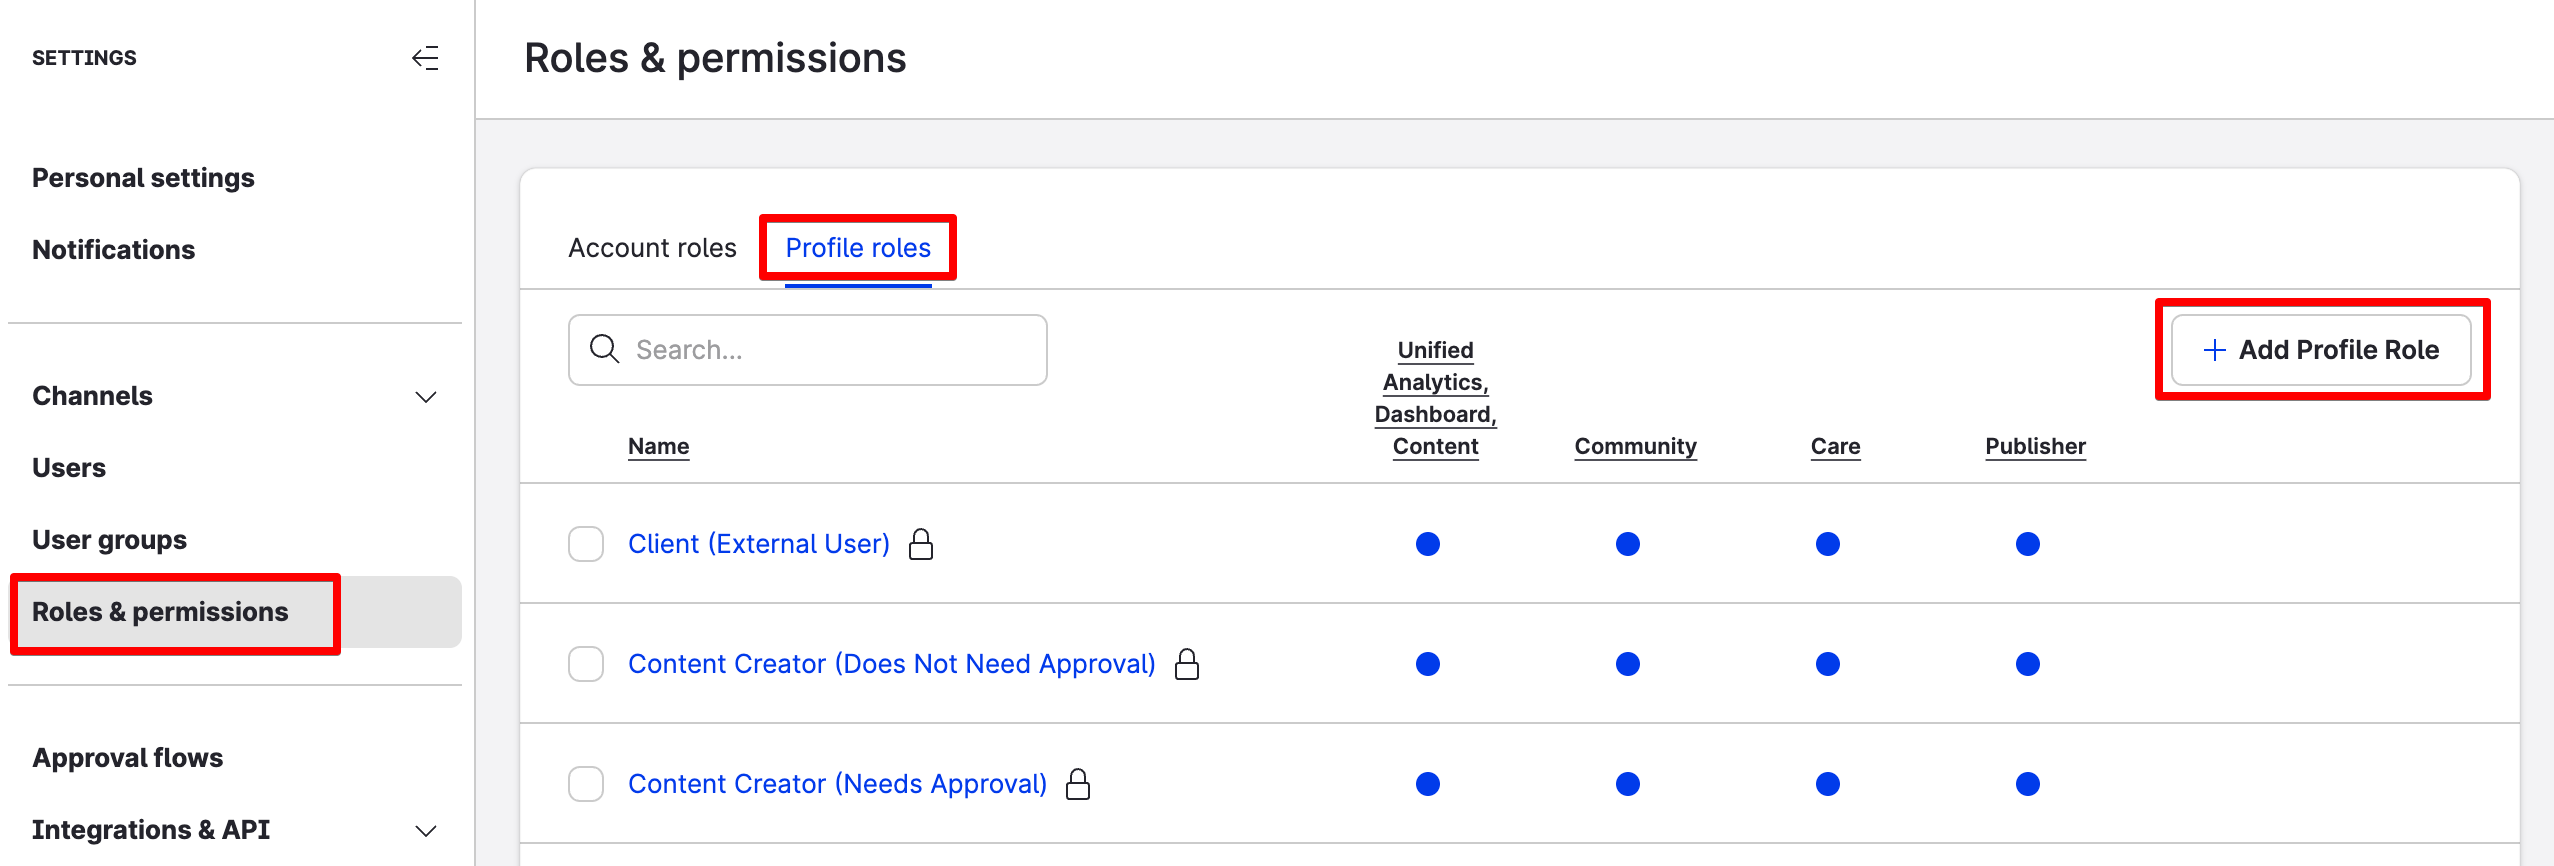
Go to Settings -> Roles & permissions.
-
Click the Profile roles tab.
-
Click +Add Profile Role.
The role permission panel slides out.
-
Click the pencil icon next to the placeholder role name, rename the role, and press Enter.
-
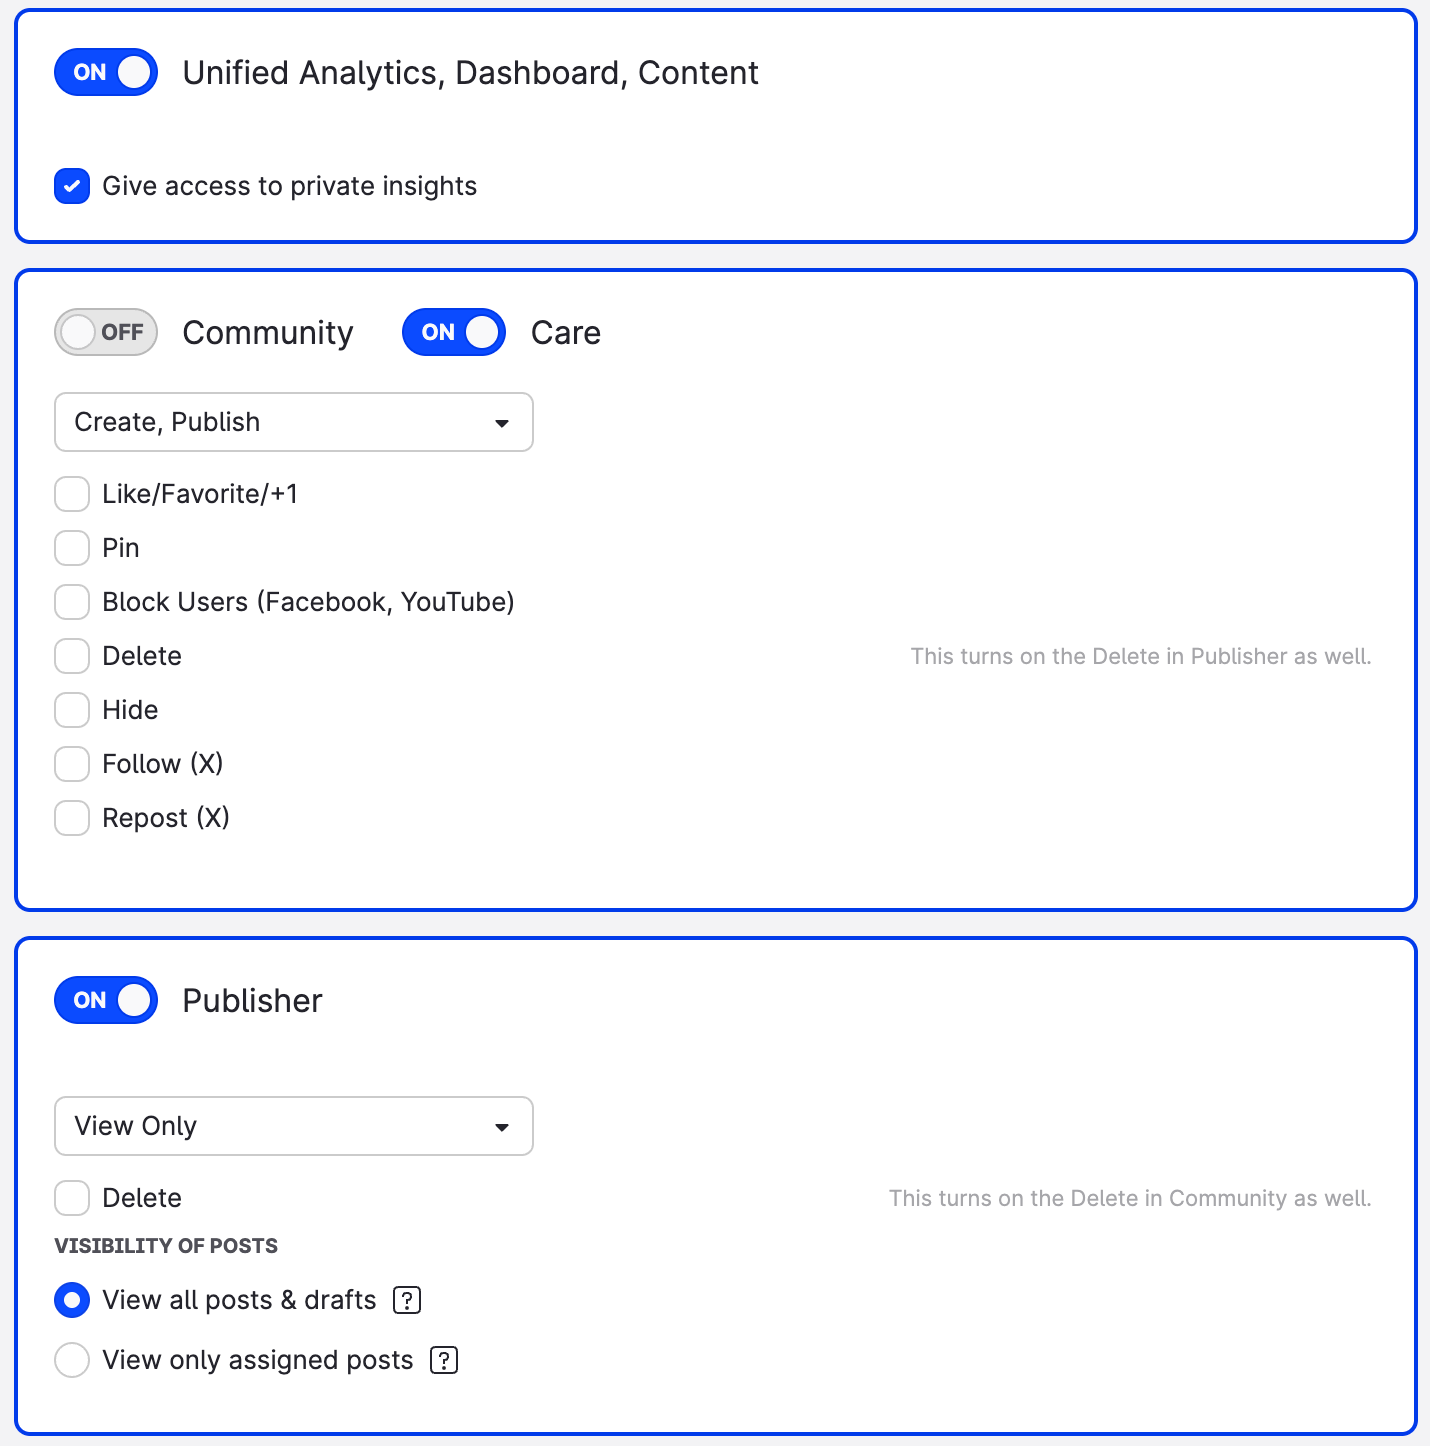
Enable the Care toggle to allow users with this profile role to see and manage cases from the profile in Care and select Create, Publish option to allow users to reply and interact with customers in Care.
-
Select the other permissions that the profile role should have (like or delete messages, block users, and so on). For more information about possible reactions to messages and what permissions they require, see Respond to a Care Case.
-
Once done, click Save.
The role is created and appears in the list of the profile roles. The new role is immediately available for assigning to users in the account.
Assign a profile role to a specific user
After you create a profile role, you must assign it to a specific user for a specific profile. This creates a relationship between the user and the profile with the profile role determining the permissions.
Steps:
-
Go to Settings -> Users.
-
Find and click the user.
-
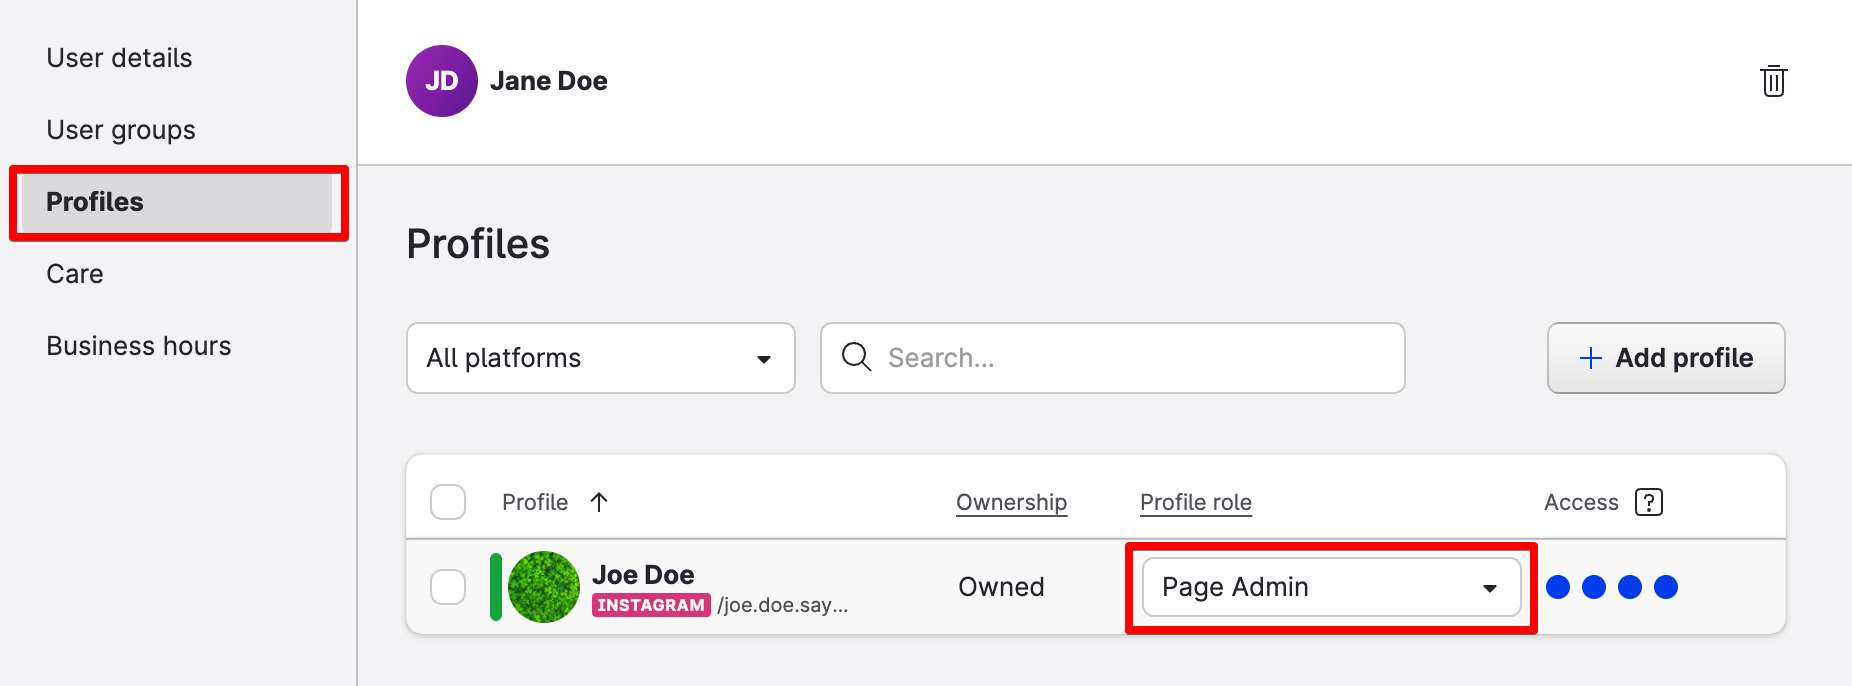
Click the Profiles tab.
-
Find the profile to which you want to assign the profile role.
-
In the drop down menu in the Profile role column, select the profile role.
The change is applied and automatically saved.
Dealing with deleted users
When you remove a user's access to Care or you delete a user from your Emplifi account, the user will remain assigned to the cases and custom views:
-
Deleted users appear in Care as
Deleted users. -
Users who lost access to Care are highlighted.