Set Up Labels
With labels, you can categorize and organize the profiles and content in your account. You can also set permissions for each label and label group to ensure that only the right people have access to the right labels.
Labeling in Emplifi allows brands to:
Take an organized approach to labeling by bundling Labels into Label groups.
Govern the use and visibility of Labels with custom permissions and shared visibility options.
Designate required label groups so that users who can see the group must select at least one label from each required group before they can schedule or publish a post.
Set advanced permissions for existing and future rule-based Labels. Check How to Integrate Advanced Permissions with Rule-Based Labeling if you want to know how to integrate advanced permissions with automated labeling.
This guide will help you with the steps needed to create a solid Labeling structure.
To get the most out of Emplifi, we heavily recommend you use labels in your workflow.
Process overview
How to Create Labels
How to Assign Content Labels to Label Group
How to Control Label Visibility & Set Permissions:
Default Labels Permissions Setup - Account Role
Account Role - How to Set Label Permissions
How to Define Label Permissions for the Specific Users Visibility
Visibility Review
How to Create Labels
If you go into Settings → Labels, you will notice that the menu is subdivided into three sections:
Profile Labels - Labels that are assigned to a profile.
Content Labels - Labels that are assigned to content posts and Calendar notes
Content Label Groups - Labels that are used to group Content Labels.
To create a new Profile Label, Content Label, or Content Label Group go to the Account Settings → Labels. Select one of the three submenus at the top according to the type of Label you’re creating, and then press the “Create Profile Label/Content Label/Label Group” button.

Creating Profile Labels
Go to the Account Settings → Labels → Profile Labels. Press the Create Profile Label button.
Choose a name for your Label(s)
Labels bulk creation
Users can create multiple Labels at once. To separate multiple Labels, press Enter on your keyboard.Select the visibility of the Label(s).
Global - Everyone in the account can see this profile Label(s).
Specific Users - select specific users and/or user groups (see Organize Users into User Groups) that should have visibility of the Label(s).
Private - Only visible to the user who creates these Label(s).
More info can be found below in the section ‘How to Control Label Visibility & Set Permissions’.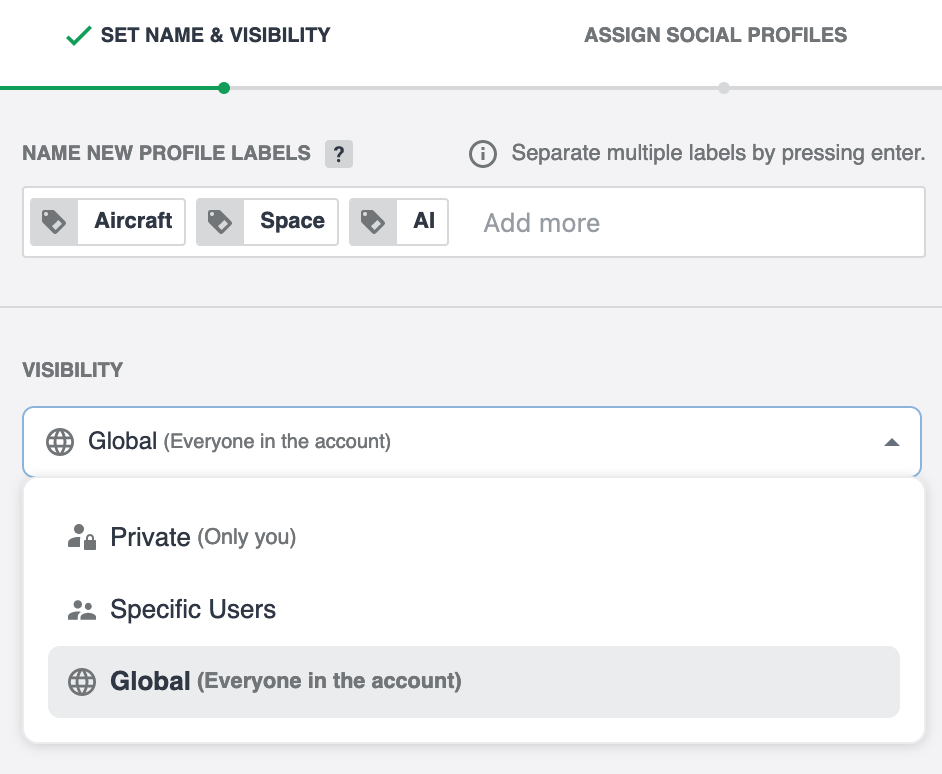
Assign Social Profiles - users can select any monitored profile in the account (whether it’s a public or an owned profile).
During the initial Label creation, this step is optional. Users can also assign profiles later on, if they have the permissions.Click Finish once you’re done. The Label(s) are immediately created and added to the list.
Creating Content Labels
Go to the Account Settings → Labels → Content Labels. Press the Create Content Label button.
Choose a name for your Label(s)
Labels Bulk Creation
Users can create multiple Labels at once - To do so, separate multiple Labels by pressing Enter.Select the visibility of the Label(s).
Global - Everyone in the account;
Specific Users - Select specific users and/or user groups (see Organize Users into User Groups) that should have visibility of the Label(s).
Private - Only visible to the user who creates these Label(s).
Further info can be found below in the section ‘How to Control Label Visibility & Set Permissions’.
(Optional) Assign to Label Groups
If a Label group is not yet created, the user can create it during this step, by pressing the + New Label Group button. Please note that you can only create one Label group at a time using this method, and the visibility will be automatically set to private. Once created, the Label group is automatically assigned.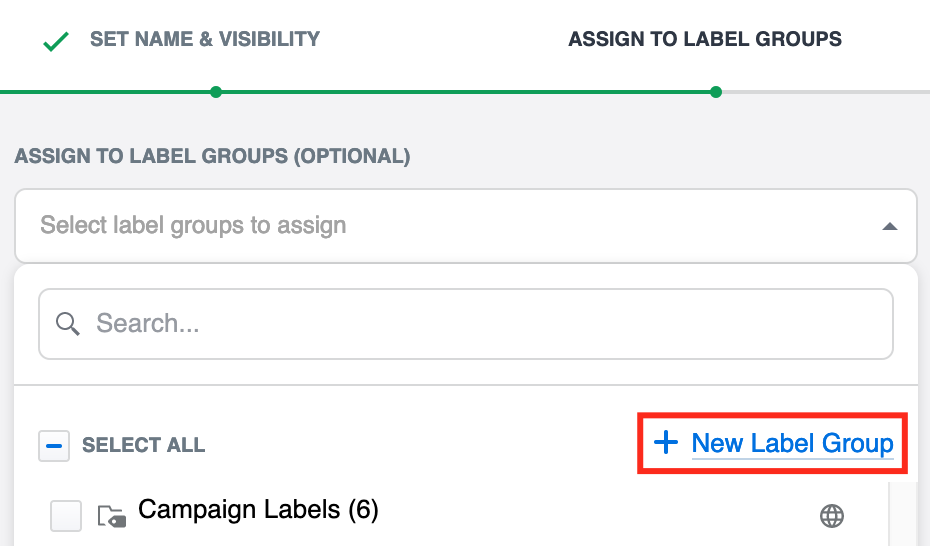
During the Content Label creation, this step is optional. Users can assign Content Labels to Label groups later if they have the permissions, and visibility over the Label(s).
Click Finish once you’re done, to create the Label(s). The Label(s) are immediately added to the list.
Creating Content Label Groups
Go to the Account Settings → Labels → Content Label Groups. Press the Create Label Group button.
Choose a name for your Label group(s)
Labels Bulk Creation
Users can create multiple Label groups at once - To do so, separate multiple Label groups by pressing Enter.(Optional) Choose whether or not to enable Required for publishing.
 When a label group is required for publishing, users that have the group visible must select at least one label from the label group before scheduling or publishing a post.
Select the visibility of the Label groups
Global - Everyone in the account;
Specific Users - select specific users and/or user groups (see Organize Users into User Groups) that should have visibility of the Label group(s).
Private - Only visible to the user who creates these Label group(s).
Further info can be found below in the section ‘How to Control Label Visibility & Set Permissions’.
Assign Content Labels:
You can add existing Content Labels to the Content Label Group;
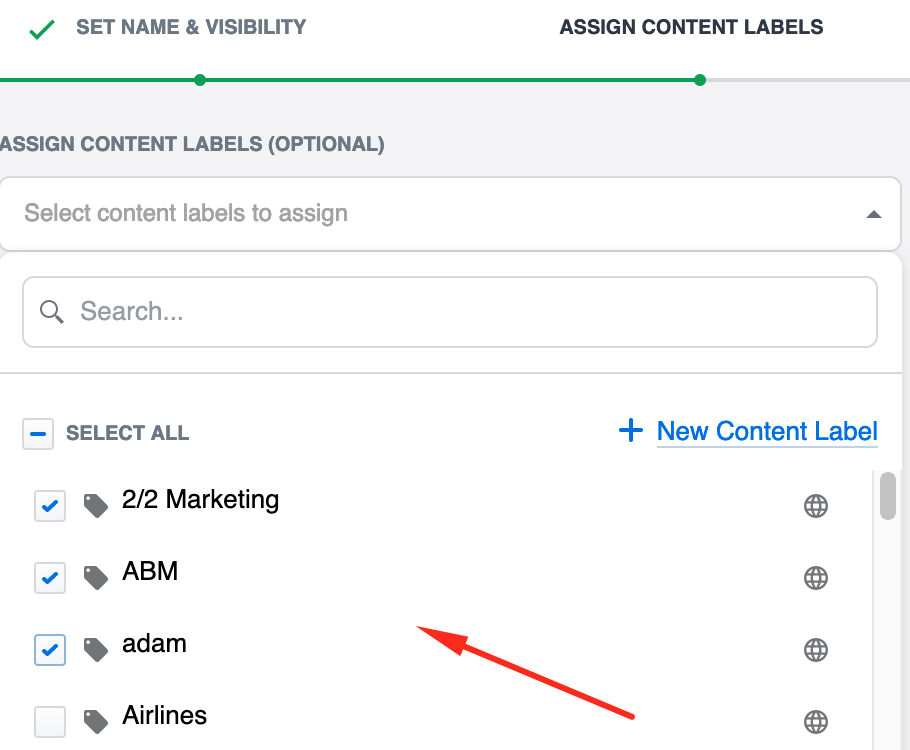
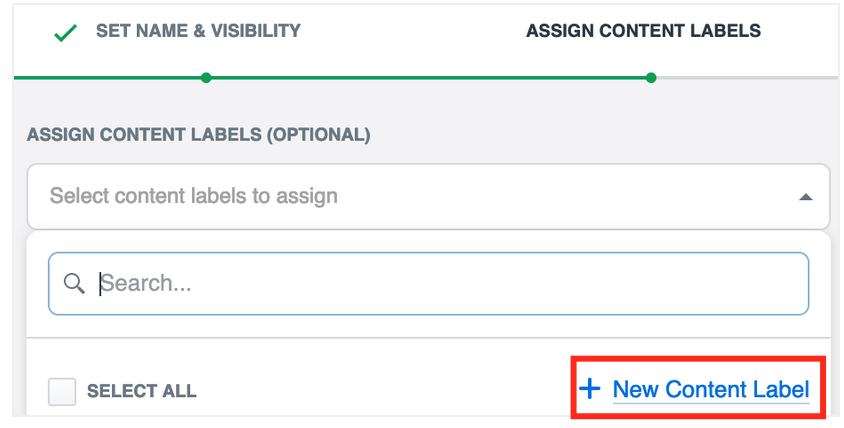
You can create a new Content Label during this step, by pressing the + New Content Label button.
Please note that you can only create one Content Label at a time using this method, and the Label will be private. Once created, the Content Label is automatically assigned to this Content Label Group.
Once you’re done, click Finish to create the Content Label Group(s).
How to Assign Content Labels to Content Label Groups
There are four ways of assigning Content Labels to Content Label Groups. Two of them are already explained in the sub-sections above: ‘Creating Content Labels’, and ‘Creating Content Label Groups’.
You can choose between the following two methods any time after the creation of a label or label group:
Via the Content Labels Editor
Via the Content Label Group Editor
Assigning Content Labels to Label Groups via the Content Labels Editor
Go to Account Settings → Labels → Content Labels.
Press on a Content Label from the list. A new window with the Content Label Editor is displayed.
Under the Label Groups Section, Click the ‘Assign to Label Groups’ button.

A new window appears with a list of Content Label Groups possible to be assigned to.
Select the Content Label Group(s) from the list.
Press ‘Assign’. The window closes.The Content Label has now been assigned to the chosen Content Label Group(s) as shown in the image below:
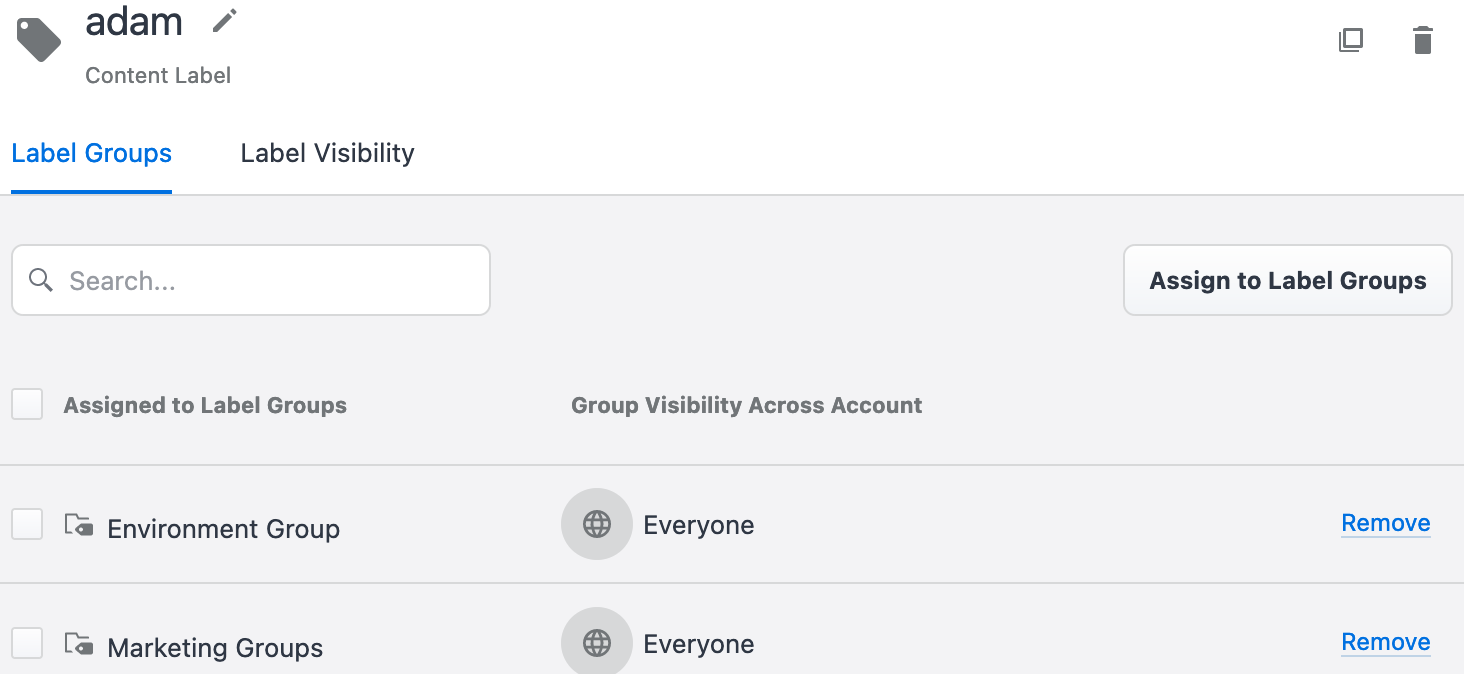
Press ‘Save’, otherwise the changes to the Content Label won’t be applied.
Assigning Content Labels to Label Groups via the Label Groups Editor
Go to Account Settings → Labels → Content Label Groups.
Select a Label Group from the list. A new window with the Label Group Editor is displayed.
Under the Content Labels Section, Click the ‘Assign Content Labels’ button.
A new window appears with a list of Content Labels that can be assigned to this Label Group.Select the Content Label(s) from the list.
Press ‘Assign’. The window closes.
The Content Label(s) are now assigned to this Label Group.Press ‘Save’, otherwise the changes won’t be applied.
How to Control Label Visibility & Set Permissions
For large teams, it’s crucial to define who has visibility of Labels in order to avoid unauthorized changes and other mishaps. Setting up Label visibility & permissions is straightforward, but make sure to understand the basics, before you get started.
There are three different visibility options:
Global
Everyone in the account can see this Label, depending on the users’ Account Role. To check and set who can manage them, review Roles & Permissions in Account Settings (see User Roles and Permissions).Private
Only visible to the user who creates these LabelsSpecific Users
Manual selection of the users who can edit, apply or view the Label (only edit, or view in the case of Content Label Groups) - Check the sections below for more information
Default Labels Permissions Setup - Account Role
User permissions control what users can and cannot do with labels.
All users can create, apply, and remove their own private labels.
All users can see global labels across the account.
All users can share their private labels with specific users. This means the label will no longer be private but will be accessible only by the chosen users.
Users with Account Admin role (see Account Roles) have the ability to:
Edit shared labels and label groups of other users.
Edit global labels and label groups.
Edit all automated labeling rules.
Let’s go into further detail about setting up Label Permissions in the section below.
Account Role - How to Set Label Permissions
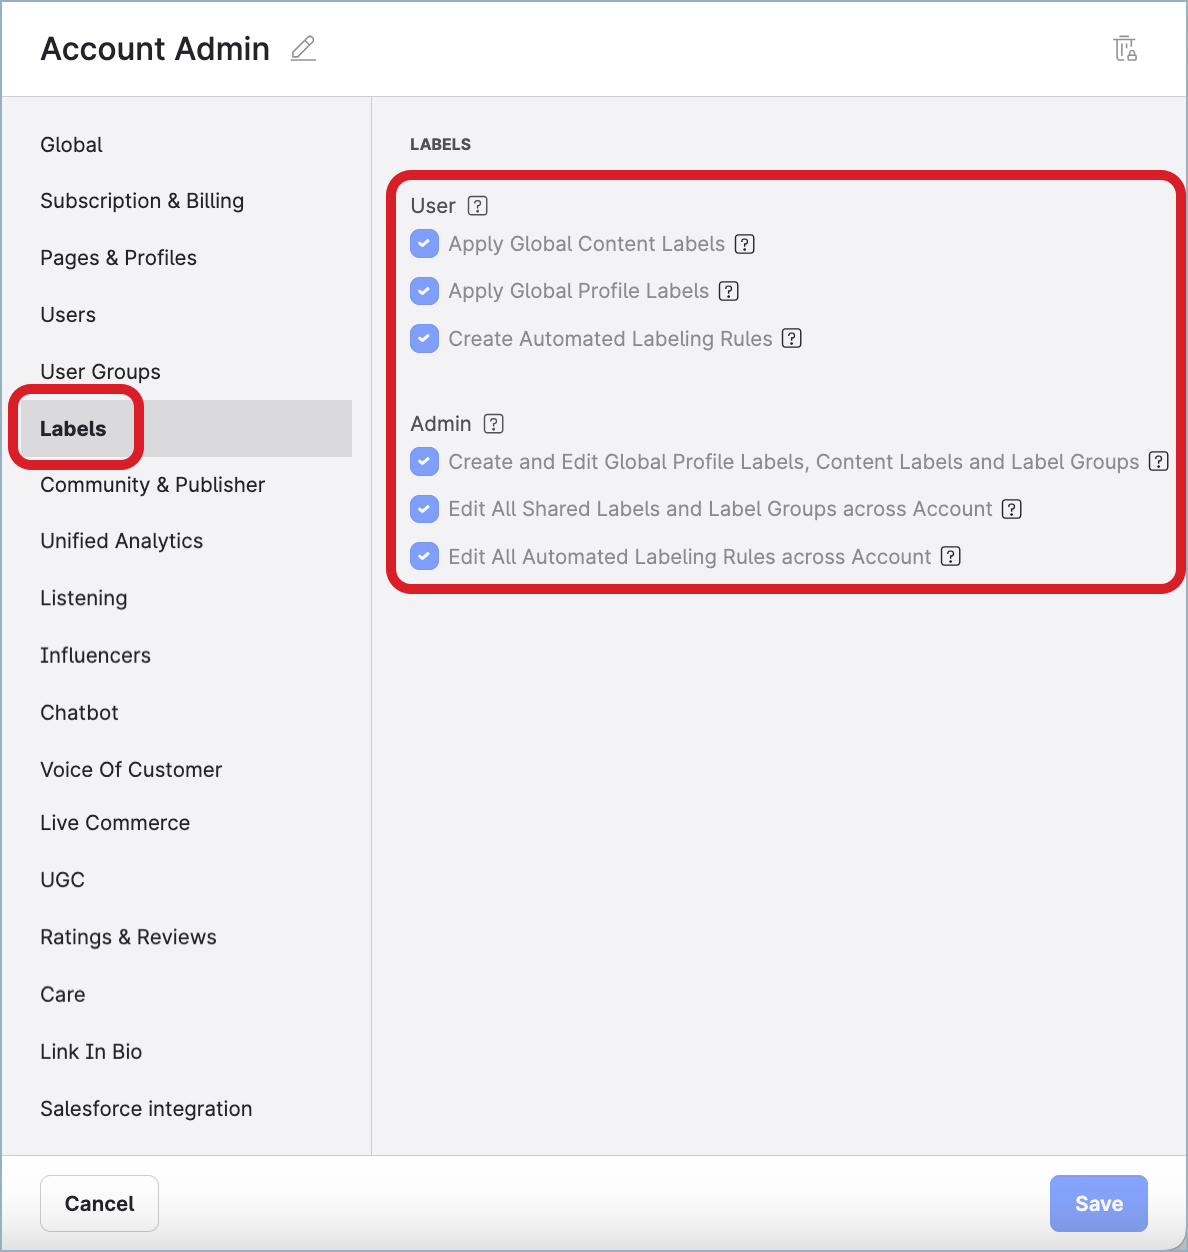
Go to Account Settings → Roles & Permissions → Account Roles
Press an account role from the list to adjust it, or create a new one
The Account Role settings window opens. Find the Labels section
Check/uncheck the Labels permissions fields accordingly
Click Save once you’re done
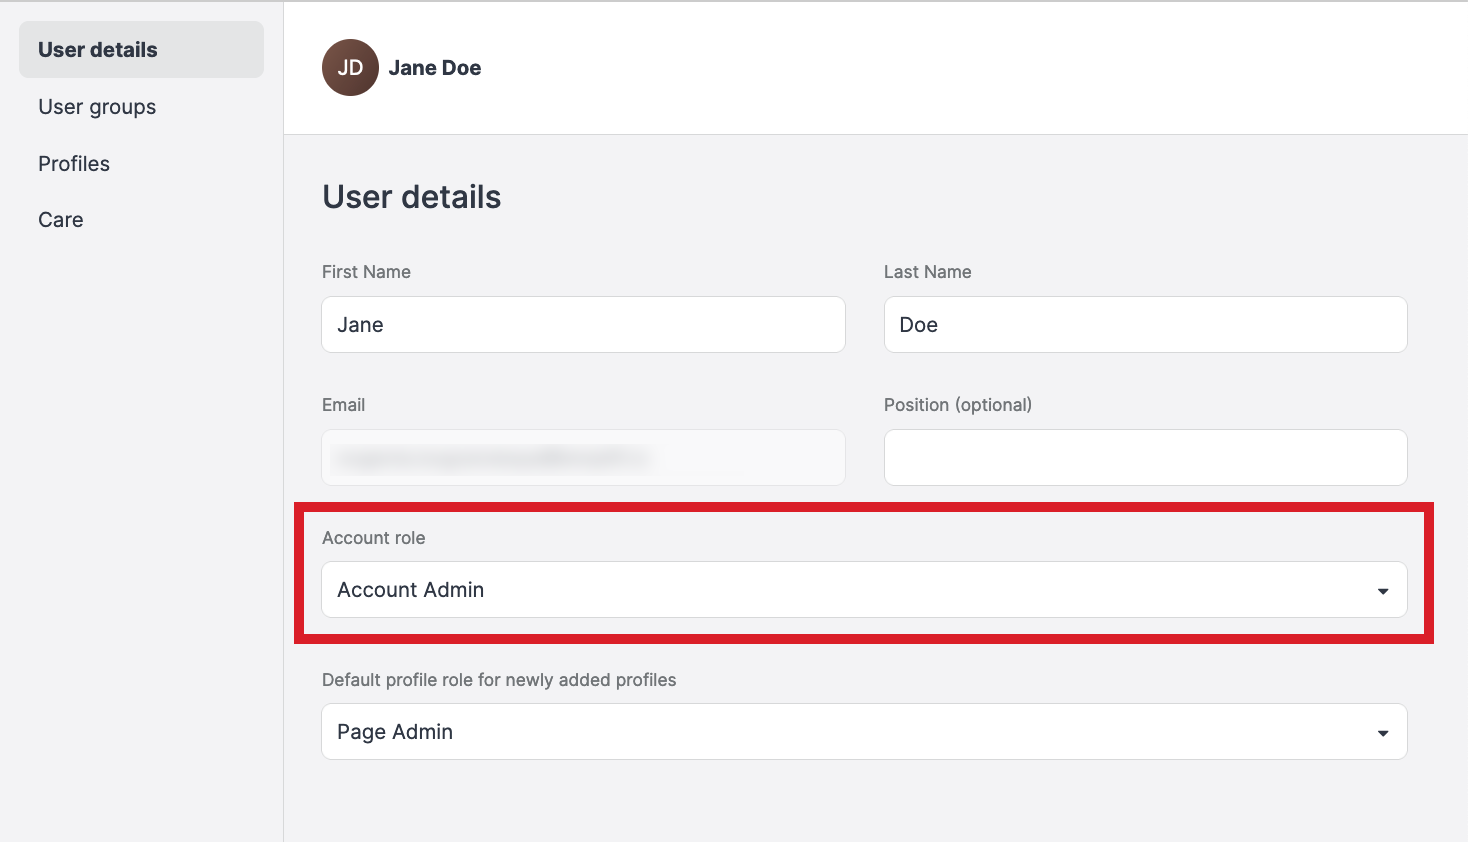
Now you need to assign the adjusted or newly created account role to the user(s), so the Label permissions adjustments will take effect
Go to Settings → Users
Select the user
Under User Details, change the Account Role if needed.
How to Set User-Permissions for Shared Labels
Define which users can view, apply, or edit profile Labels and Content Labels in the details section of the specific Label. In the case of the Content Label Groups, the only options available are view, or edit.
You can achieve this by following the steps below:
Go to the Labels Settings and select the Label, as shown in the image below.
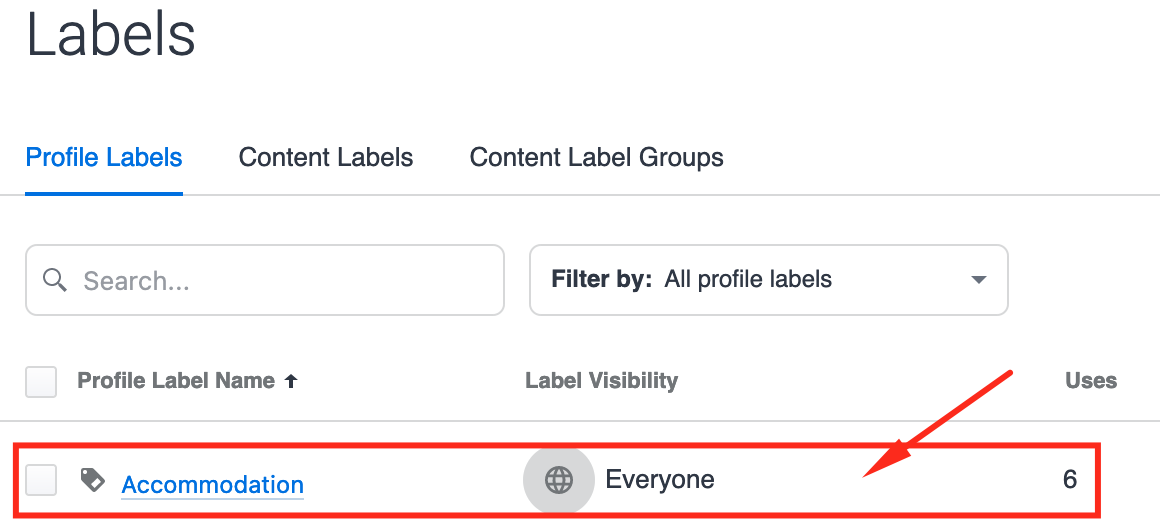
The Label details window appears. Switch to the Label Visibility section.
Here you can define which users can view, apply, or edit profile and Content LabelsSet the Visibility to Specific Users.
Select the Label permission for each user.
For Content Label Groups, only the edit, or view options are available.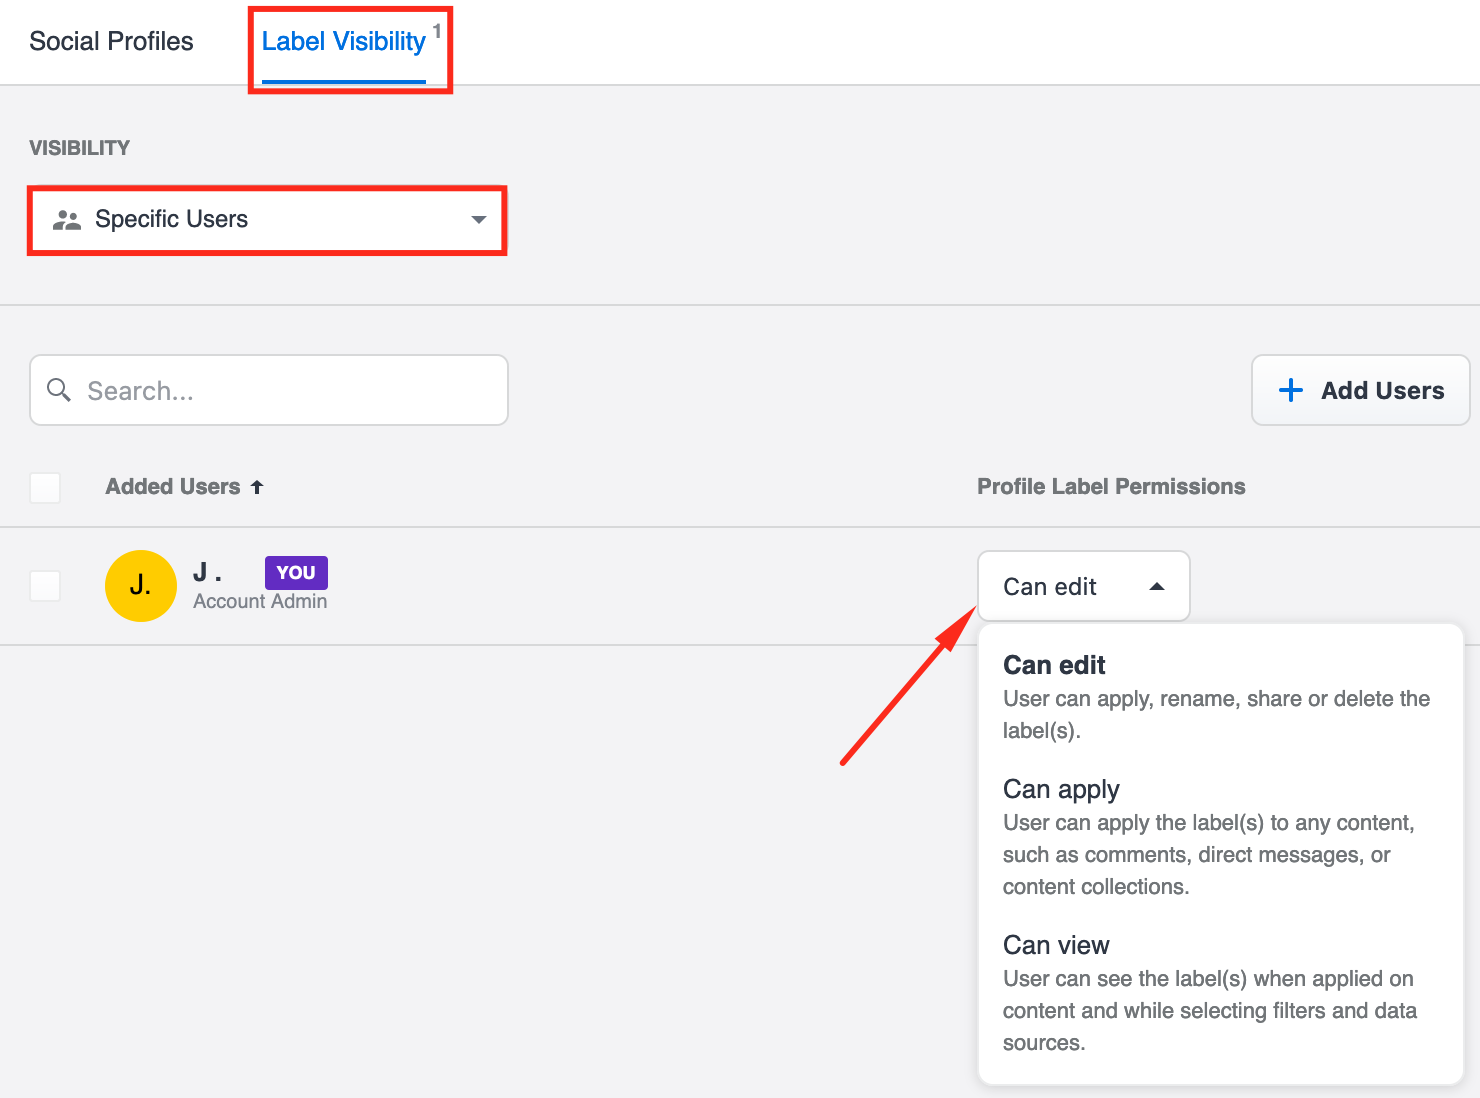
Visibility Review
As the visibility for Labels and Label groups can be set up individually, there might be times where inconsistencies occur.
To avoid any unintended inconsistencies, the Visibility Review will help you identify and resolve conflicting permissions with a few clicks.
The visibility review column appears only when a user has access to a label group but does not have access to one or more labels that are part of that label group.
Follow these steps if the inconsistent permissions are NOT on purpose:
Example
I have a ‘Halloween’ Label Group that I want to be visible to Team A, Bob, and Adam. This Group has three Labels in it, however, Bob, Adam, and Team A are all missing the visibility to one or several Labels in the 'Halloween' Label Group.
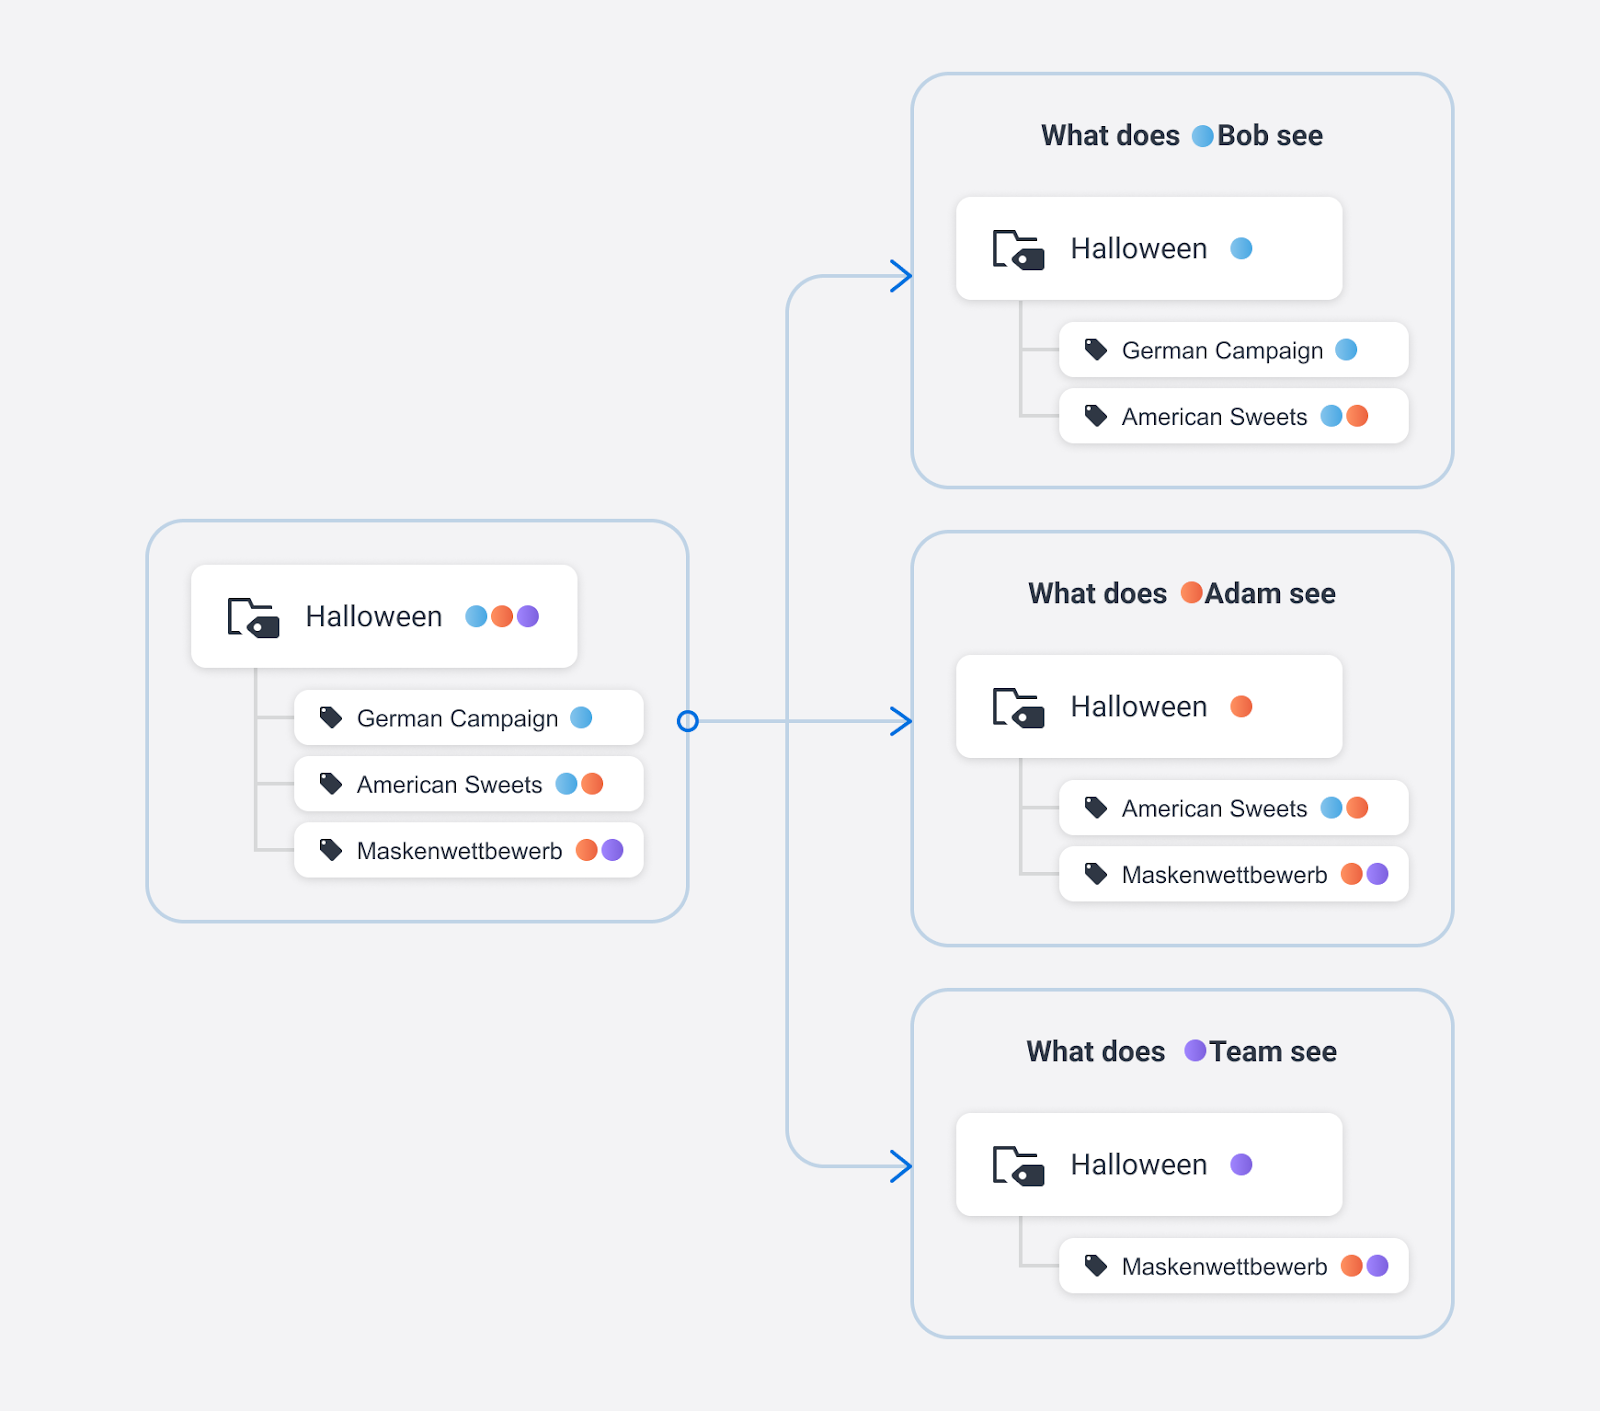
To sort out these inconsistencies, the Visibility Review informs you about any inconsistencies in permissions in the detail section of the Label/Label Group.