On the Bot Authoring page, you can create and configure routing rules, which allow your bot to perform rule-based actions if the interaction between it and the user meets certain conditions. These actions can be triggered at any point during a conversation, rather than being tied to one particular node or path in a conversation flow.
In a routing rule definition window, you'll be able to choose from several different conditions and resulting actions in order to make very specific rules for your bot to follow.
Routing rules are unavailable on the Social Chatbot interface.
Authoring routing rules
Accessing the Bot authoring page
-
On the Bots page, find the card with the name of the bot that you want to author content for.
-
On the bot card, click the Authoring button.
Adding a new routing rule
-
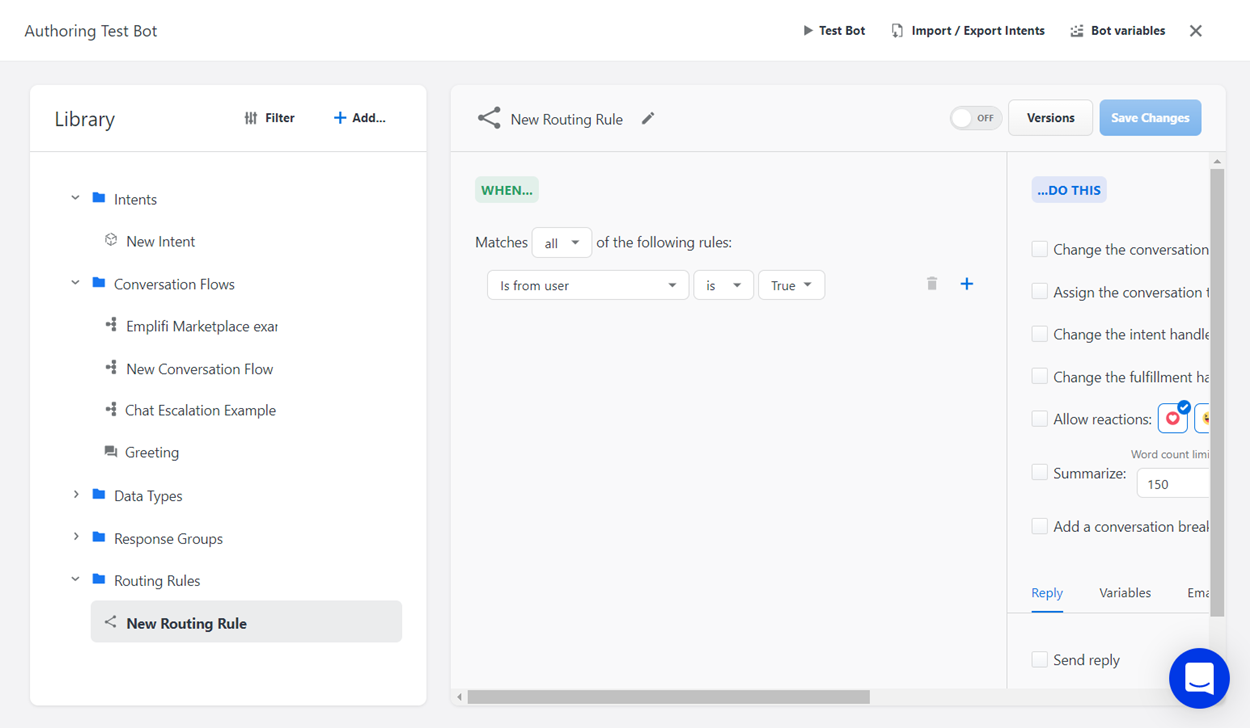
From the Library section of the Bot Authoring page, click the Add button either in the upper right corner of the Library or next to the folder that you would like to add the routing rule to.
If there is a folder titled "Routing Rules" in your library, using the upper Add button will automatically store the new routing rule in that folder (if no such folder exists, the new routing rule will be stored in the general Library). Alternatively, using the Add button next to a specific folder's name will store the routing rule in that folder.
-
From the drop-down menu, select Routing Rule. The settings for the new routing rule display in the Authoring Area.
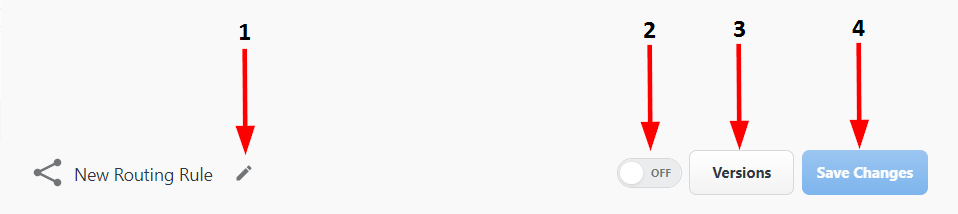
Routing rules toolbar
|
Number |
Name |
Description |
|---|---|---|
|
1 |
Rename |
Click here to enter a new name for the routing rule. When you are finished typing, click Enter to save the name. |
|
2 |
Turn Rule On/Off |
Click here to activate or deactivate the routing rule for your bot. |
|
3 |
Versions |
Click here to view a history of the previous authored versions of the routing rule. |
|
4 |
Save |
Click here to save the changes you have made to the routing rule. |
Configuring routing rules
-
From the Routing Rule Settings page in the Authoring area, use the Matches drop-down menu to select how the rules should be followed. Choose from:
-
any to require a match for any of the listed rules.
-
all to require a match for all listed rules.
-
none to require no matches for the listed rules.
-
-
Define the condition by choosing the condition category, the operator, and the value. The operator and value options available to you will change based on the condition category you select. For more information, see the Condition, Operator, and Value table below.
-
Optional: Click the Add button to add a new condition. If you need to remove a condition, click the Delete button.
-
Then, enter information in the available fields to establish what the bot should do when the conditions are met. For more information, see the Fields table below.
-
Once you are finished configuring your routing rule settings, click Save.
Condition, Operator, and Value Table
|
Condition Category |
Operator |
Value |
|---|---|---|
|
Matches |
Select the Matches condition to nest multiple conditions in one rule. |
Select the condition type and match comparison for the condition. |
|
Active |
Select is to search for records that contain the specified value. Select is not to ignore records that contain the specified value. |
Select True if the agent escalation is active. Otherwise, select False. |
|
Initiator |
Select is to search for records that contain the specified value. Select is not to ignore records that contain the specified value. |
Select User if the escalation was initiated by the user. Select Agent if the escalation was initiated by the agent. |
|
Active Fulfillment Handler |
Select is to search for records that contain the specified value. Select is not to ignore records that contain the specified value. |
From the list, select an active fulfillment handler. |
|
Total Hours Since Previous Message |
Choose from the standard mathematical operators for comparing numeric values. |
In the text box, enter the total number of hours. |
|
Platform |
Select is to search for records that contain the specified value. Select is not to ignore records that contain the specified value. |
From the list, select a platform. |
|
Content |
Choose from the following options:
|
In the text box, enter the content for the condition. |
|
Postback |
Choose from the following options:
|
In the text box, enter the content for the condition. |
|
Postbacks |
Choose from the following options:
|
In the text box, enter the content for the condition. |
|
Content Type |
Select is to search for records that contain the specified value. Select is not to ignore records that contain the specified value. |
From the list, select Text or Image. |
|
Reaction Type |
Select is to search for records that contain the specified value. Select is not to ignore records that contain the specified value. |
From the list, select a reaction. |
|
Event Type |
Select is to search for records that contain the specified value. Select is not to ignore records that contain the specified value. |
From the list, select an event. |
|
Sticker |
Select is to search for records that contain the specified value. Select is not to ignore records that contain the specified value. |
Select None or Thumbs up. |
|
Is from User |
Select is to search for records that contain the specified value. Select is not to ignore records that contain the specified value. |
Select True if the record is from the user. Otherwise, select False. |
|
Is Initial User Contact event |
Select is to search for records that contain the specified value. Select is not to ignore records that contain the specified value. |
Select True if the record was initial user contact. Otherwise, select False. |
|
Time of Day |
Choose from the following options:
|
n the text box, enter a time, or click the Clock icon to adjust the time in five-minute intervals. From the list, select a time zone. |
|
Day of Week |
Select is to search for records that contain the specified value. Select is not to ignore records that contain the specified value. |
From the lists, select a day and a time zone. |
|
Matches Conversation Flow Edge |
Select is to search for records that contain the specified value. Select is not to ignore records that contain the specified value. |
Select True if the record traversed a conversation flow edge. Otherwise, select False. |
|
Confidence Label |
Select is to search for records that contain the specified value. Select is not to ignore records that contain the specified value. |
Select one of the confidence label options: High, Medium, or Low. |
|
Name |
Select is to search for records that contain the specified value. Select is not to ignore records that contain the specified value. |
From the list, select a topic name. |
|
Suggested Intents |
Choose from the following options:
|
In the text box, enter the content for the condition. |
|
userInfo.[Variable] |
Choose from the following options:
|
In the text box, enter the content for the condition. |
Fields Table
|
Field |
Description |
|---|---|
|
Change the Conversation Flow to |
Select the conversation flow from the drop-down list. Then, select the check box in front of the field to activate it. |
|
Assign the Conversation to |
Select the fulfillment handler from the drop-down list. Then, select the check box in front of the field to activate it. |
|
Change the Intent Handler to |
Select an intent handler from the drop-down list. Then, select the check box in front of the field to activate it. |
|
Change the Fulfillment Handler to |
Select a fulfillment handler for this response. For example, if your fulfillment handler is currently a knowledge base and the user asks to shop for an item, you can switch the fulfillment handler to the company shopping website. Select the check box in front of the field to activate it. |
|
Allow Reactions |
Select the reactions from the adjacent row of options. Then, select the check box in front of the field to activate them. |
|
Summarize Reply When Word Count Exceeds |
Enter the word limit on a large text reply. When a reply exceeds the number of words that you enter, the bot will summarize the response. Select the check box in front of the field to activate it. |
|
Add a Conversation Break |
Select this box to add a conversation break, which inserts endpoints within conversations taking place on "persistent" platforms, like Facebook or SMS, where the conversation with the user never truly ends. This divides the conversation into more manageable chunks when transcripts of it are generated. |
|
Send Direct Reply |
Under the Reply tab, select this check box to send a direct reply to the user. |
|
Reply Type |
Click the icon shown below the Send direct reply field. The following reply options will display:
|
|
Apply Variable Modifications |
Under the Variables tab, select this check box to create and store variable modifications. For more information, see Variables. |
|
Send Email |
Under the Email tab, select this check box to send an email to the user. Enter the appropriate information in the text boxes and add any attachments that you would like to include in the email. |
|
Conversation Handler Changes |
Under the Conversation Handler tab, click the button to create a Conversation Handler Change. Select a conversation handler from the drop-down menu and use the ON/OFF toggle to designate whether it will be activated or deactivated if the routing rule's conditions are met. To delete a Conversation Handler Change, click the Delete button next to it. |
Routing rule example
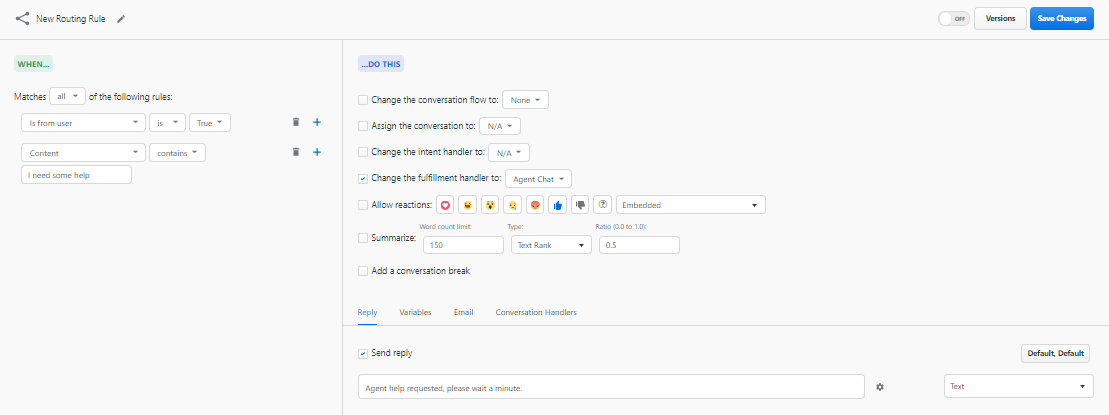
Suppose you want to create a routing rule that directs users to a live agent for help.
First, define when the bot should follow the rule. On the Routing Rules Settings page shown below, the settings show that all matches to content from the user containing "I need some help" will trigger an action by the bot.
Second, define what the bot should do when a user needs help. In this example, the bot will change the fulfillment handler to an "Agent Chat." A direct reply is sent to the user that says, "Agent help requested, please wait a minute."