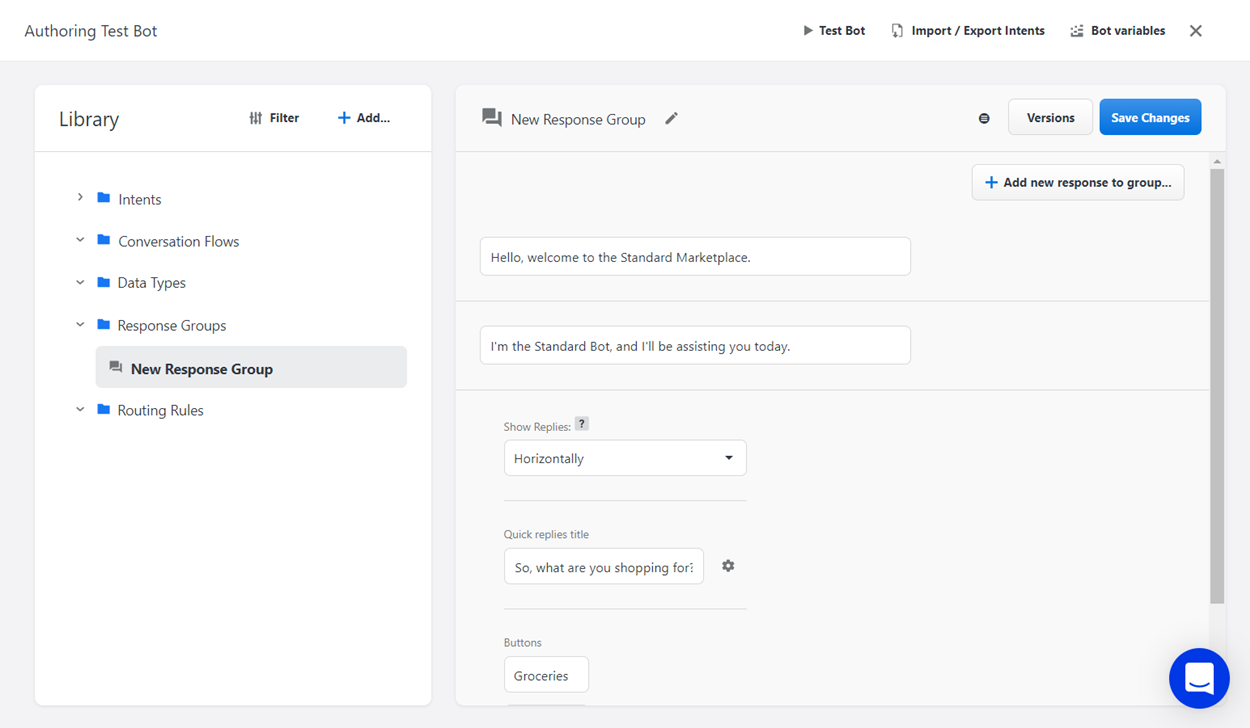
On the Bot Authoring page, you can create and configure response groups, which allow you to author multiple replies for one node. This means that your bot will return stacked replies to the user, mimicking the way humans tend to message each other and providing a more natural engagement for the user.
Authoring Response Groups
Accessing the Bot authoring page
-
On the Bots page, find the card with the name of the bot that you want to author content for.
-
On the bot card, click the Authoring button.
Adding a new response group
-
From the Library section of the Bot Authoring page, click the Add button either in the upper right corner of the Library or next to the folder that you would like to add the response group to.
If there is a folder titled "Response Groups" in your library, using the upper Add button will automatically store the new response group in that folder (if no such folder exists, the new response group will be stored in the general Library). Alternatively, using the Add button next to a specific folder's name will store the response group in that folder.
-
From the drop-down menu, select Response Group. The settings for the new response group display in the Authoring area.
-
Click the + Add New Response to Group button to add a new response to the response group.
-
Select the type of response. For more information, see the “Types of Responses” section of https://emplifi-docs.atlassian.net/wiki/pages/resumedraft.action?draftId=61112403.
Response group toolbar
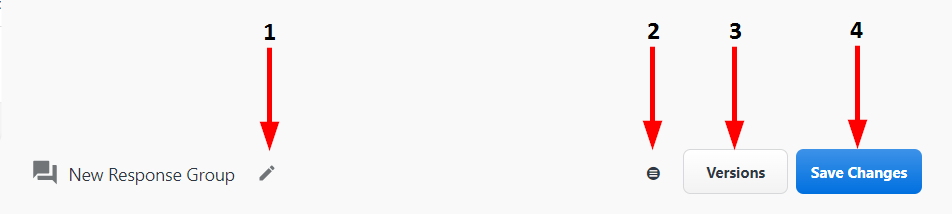
|
Number |
Name |
Description |
|---|---|---|
|
1 |
Rename |
Click here to enter a new name for the response group. When you are finished typing, click Enter to save the name. |
|
2 |
Output Type |
Click here to select the order in which the response group's responses are sent. You can choose from:
|
|
3 |
Versions |
Click here to view a history of the previous authored versions of the response group. |
|
4 |
Save |
Click here to save the changes you have made to the response group. |
Configuring response groups
Adding responses
-
In the Authoring Area, click the + Add New Response to Group button to add a new response to the response group.
-
Select the type of response. You can choose from:
-
Text
-
Card
-
Quick Replies
-
Multi Replies
-
Image
-
Carousel
-
Custom Payload
-
Response Groups
-
Location
-
Locations
-
Event
-
For more information, see the “Types of Responses” section of https://emplifi-docs.atlassian.net/wiki/pages/resumedraft.action?draftId=61112403.
Reordering responses
-
Hover over the response that you would like to move. Buttons will display to the right of the response.
-
Click either the Move Response Up arrow or the Move Response Down arrow.
Deleting a response
-
Hover over the response that you would like to delete. Buttons will display to the right of the response.
-
Click the Delete button. The response will be immediately deleted.
Types of responses
There are eleven types of responses that you can add to your bot's conversation flow.
Text
A Text response is a body of text capable of containing letters, numbers, and special characters.
-
To enter the text, click the text field. To save the text, click outside the text field.
Card
A Card response is a card containing an image, a title, a subtitle/description, and a configurable amount of custom buttons.
-
To add an image, paste the URL at which the image is hosted into the text field labeled "Image URL". In the text field labeled "Image Alt Text", enter the text that appears when the user hovers over the image.
-
To change the card type, use the Card Type drop-down menu.
-
To configure a custom button's type, text, payload, and other elements, click the adjacent Edit button. When you are finished, click Enter on your keyboard.
-
To prevent user-selected responses from activating an intent, select Skip Intent Processing.
-
-
To remove a button, click the adjacent Delete button.
-
To create a new button, click the + Add New Button button.
Quick Replies
A Quick Replies response is short body of text accompanied by a configurable amount of custom buttons.
-
To enter the text, click the text field. To save the text, click outside the text field.
-
To configure a custom button's type, label, payload, and other elements, click the adjacent Edit button. When you are finished, click Enter on your keyboard.
-
The two most important elements of a button are its label (i.e. the text displayed to the user on the button) and its payload/postback (i.e. the underlying command which is received by the bot's logic and which sends the user down the corresponding branch of the conversation flow). In most cases, it is recommended that the label and the payload match, although this is not strictly necessary to ensure bot functionality.
-
You can also select the button's type.
-
Text: The button displays a brief text option.
-
URL: The button contains a link to a webpage. In the button settings drop-down, the payload text field is replaced with a URL text field. Enter the webpage's URL here.
-
-
-
To remove a button, click the adjacent Delete button.
-
To create a new button, click the + Add Button button.
Multi Replies
A Multi Replies response is a short body of text accompanied by a configurable amount of custom buttons. Unlike Quick Replies, users can select multiple button options at once.
This response type is unavailable on the Social Chatbot interface.
-
To enter the title introducing the available replies, click the text field. To save the title, click outside the text field.
-
To configure a custom button's label, payload, and other elements, click the adjacent Edit button. When you are finished, click Enter on your keyboard.
-
To move the button up or down in the sequence, click the adjacent Arrow buttons.
-
To remove a button, click the adjacent Delete button.
-
To create a new button, click the + Add Button button.
Image
An Image response is an image hosted at a specific URL.
-
To add an image, paste the URL at which the image is hosted into the text field labeled "Image URL". In the text field labeled "Image Alt Text", enter the text that appears when the user hovers over the image.
Carousel
A Carousel response is a carousel of multiple cards, each containing an image, a title, a subtitle/description, and a configurable amount of custom buttons.
-
To enter a title for the carousel, click the text field. To save the title, click outside the text field.
-
To add an image, paste the URL at which the image is hosted into the text field labeled "Image URL". In the text field labeled "Image Alt Text", enter the text that appears when the user hovers over the image.
-
To list the carousel cards dynamically, click the Context List button. In the text field that appears, enter the name of the bot object variable containing the data that will determine the order in which the cards are displayed.
-
To configure a custom button's type, text, payload, and other elements, click the adjacent Edit button. When you are finished, click Enter on your keyboard.
-
To prevent user-selected responses from activating an intent, select Skip Intent Processing.
-
-
To remove a button, click the adjacent Delete button.
-
To create a new button, click the + Add New Button button.
Custom Payload
A Custom Payload response is a custom response written in the syntax of the interface on which the response is sent.
-
To select an interface, click on one of the several options displayed above the text field.
-
To configure a custom response, enter it in the text field using the syntax appropriate to the selected interface.
Response Groups
A Response Groups response is a series of multiple responses, each of which can be of any type. The responses can be sent as a sequential group, or as a single response randomly selected from the group.
-
To create a new response group, click the Add button. In the text field that appears, type the name of the response group and click OK.
-
To configure a response group, click the Edit button. The Response Group Settings window displays.
-
To create new responses within the response group, click the + Add New Response to Group button on the Response Group Settings window. Select a response type from the options that appear.
-
To move a response up or down in the sequence, click the adjacent Arrow buttons.
-
To change a response's type, click the adjacent button displaying its current type and select another type from the options that appear.
-
To delete a response, click the adjacent Delete button.
-
To change whether the responses are sent as a sequential group or as a single randomly selected response, click the Output Type button, then select Sequential or Random in the upper right corner of the Response Group Settings window.
-
When you are finished configuring the response group, click the Save button.
-
-
To select another response group, click the blue bubble containing the name of the currently select group. From the list that appears, select a response group and click OK.
Location
A Location response is information about a specific location, including geographic coordinates and (optionally) an address and phone number.
This response type is unavailable on the Social Chatbot interface.
Locations
A Locations response is information about multiple specific locations, including their geographic coordinates and (optionally) their addresses and phone numbers.
This response type is unavailable on the Social Chatbot interface.
-
To create a new location, click the + Add Locations button.
-
To configure the information for a location, click the adjacent Edit button. When you are finished, click Enter on your keyboard.
-
To delete a location, click the adjacent Delete button.
Event
An Event response is a command to the bot's logic, triggering the performance of a certain action by the bot.
This response type is unavailable on the Social Chatbot interface.