Single Sign-on (SSO)
Emplifi is fully committed to the security and protection of our users and provides the ability to log in to the platform via single sign-on providers.
The single sign-on (SSO) Authentication is an efficient login process in which users can log in to several applications with a single set of credentials. It is useful for organizations that use multiple applications, either daily or occasionally. The SSO allows organizations to control the strength of their employees’ passwords and eliminates the need for them to remember a set of usernames and passwords.
Compatibility
Emplifi uses the XML-based Security Assertion Markup Language (SAML) protocol for SSO. The Emplifi SSO authenticator will work with all identity providers (IdP) that support the SAML 2.0 protocol, including Okta, OneLogin, Google, Microsoft Entra ID (formerly Azure Active Directory), Shibboleth, and many others.
Why use SSO to log in to the Emplifi platform?
The benefits are many, namely, for example:
Your IT department will have control over the password strength required for your applications.
Minimizing the possibility of a security breach
Easy off-boarding
No more forgotten passwords
No need to remember multiple sets of credentials
Session duration
The SSO session timeout is seven days since the last activity (every time a user performs an action in the Emplifi account, their session timeout is reset to seven days).
The identity provider can still log the user out at different time intervals based on its own rules and practices.
Activating SSO for the Emplifi Platform
To activate the SSO:
contact your customer success manager
orrequest the integration through the Integrations & API section in Settings in your Emplifi account:
Go to Settings.
Click Integrations & API.
Find the SSO integration option and click Request.
Your customer success manager will be notified about your request and they will get back to you as soon as they can.
Once the SSO is activated for your account, you need to set it up.
Setting up SSO for the Emplifi Platform
The SSO configuration is only available for users with admin rights and only after the SSO option has been activated in your Emplifi account.
Setting up SSO is a complex technical task. We advise that you involve your IT department or your identity provider (IdP) administrator in the process.
Steps:
Go to Settings -> Single sign on.
Click Set up SSO.
Choose or set up your SSO provider.
Emplifi is listed in the Microsoft Entra ID (formerly Azure Active Directory), onelogin and Okta catalogs. If you are using on of the listed providers, click its icon.
Many other providers are compatible with the Emplifi SSO integration if they use the SAML 2.0 protocol. If this is your case, click Other and enter your provider's name.
Enter your domain name.
The domain name will be used to construct the login domain URL, a unique URL address that your users will use to log in to Emplifi.
For example, if you enter the domain nameacme-org, the login domain URL will beacme-org.account.emplifi.io.Click Next.
Check and set up your SSO parameters and attributes.
If you are using one of the cataloged identity providers (Okta, OneLogin, Microsoft Entra ID (formerly Azure Active Directory)), see Setting up Emplifi SSO with Catalog Login Providers for a detailed description of how to set up Emplifi SSO integration in the respective SSO environment.
If you selected Other for the identity provider in Step 3, you need to set up various parameters and attributes on your SSO provider's side.
 The configuration options and attribute names vary from provider to provider. We are using the most common names. For more detailed descriptions please see the SSO Parameters & Attributes below.
Use the Emplifi metadata URL that is generated for your selected domain, to configure the Emplifi Platform in your SSO provider.
After you finalize the configuration in your SSO provider, you should be able to generate your identity provider’s metadata for Emplifi.
Depending on your IdP, the data can be in the format of XML URL, or you may need to enter the parameters manually. In that case, switch to Manual configuration and copy-paste your Login URL, Certificate, and Optional Logout URL. For easier configuration, use the metadata’s URL whenever possible.After you enter all details, you can activate your SSO.
You can activate the SSO immediately (proceed to the next step)
You can defer activation for a later date by clicking Save & activate later.
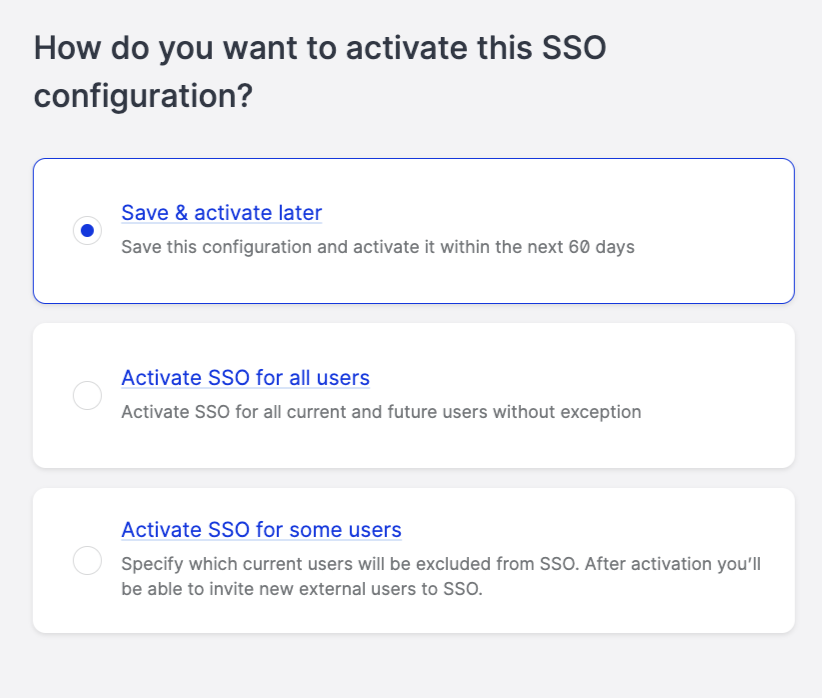
 If you decide to activate SSO later, Emplifi will keep your SSO setup pending for the next 60 days. If you do not activate the SSO within 60 days, Emplifi will release the domain. If at this time, you still want to set up an SSO, you will have to start the process from the beginning.
When you decide to activate your SSO you can select from two options.

If you click Activate SSO for all users, you will switch all users to use the SSO login for the Emplifi platform. With this option, nobody from your account will be able to use their own credentials to log in and you will not be able to add any user outside your SSO provider.
If you click Activate SSO for some users, you will have the option to select which already existing users in your Emplifi platform can continue using their current login credentials. You will be also able to add a new user outside of your SSO provider.
Select the users you would like to exclude from the migration to the SSO login.

Testing the configuration before activating the SSO
Before we activate the SSO for your Emplifi account, we need to test that the setup is correct
Test sequence
Step 1 - Checking for potential user conflict in other Emplifi accounts.
A conflict can occur if you have several Emplifi accounts and some users are in more than one of them.
In such a case, you will be asked to remove the problematic users. You can ask the Emplifi Support Team for help. The situation is displayed in the following screenshot.

Step 2 - Confirming all users are using the same email to log in to your SSO and Emplifi accounts.
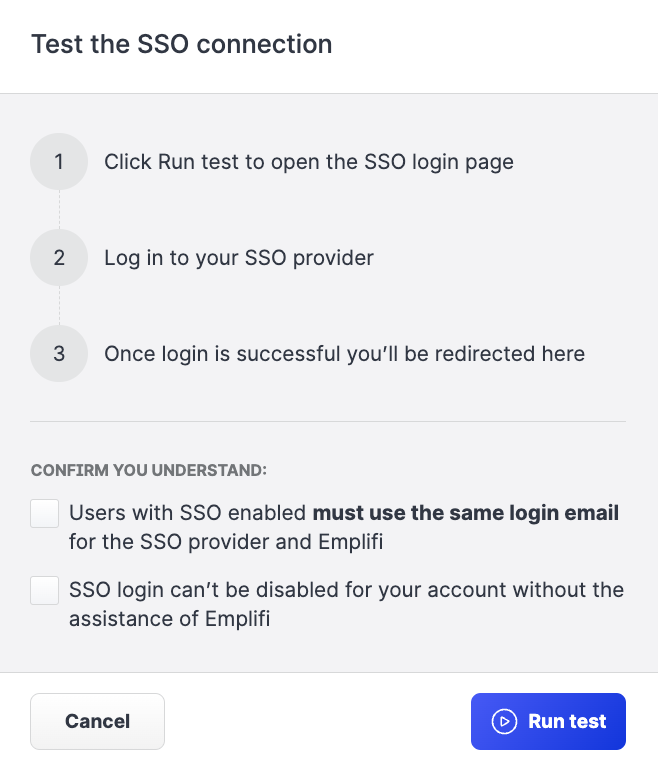
Step 3- Confirming you finished the SSO setup with the identity provider.
Step 4 - Checking the connection to your SSO.
Ensure that you are logged in to the Emplifi Platform with the same email address that you use in your SSO.
In a new tab (window), your SSO login page will open. Log in the same way you are used to for any other application already in your SSO.
If everything is checked and confirmed, you should see one of the following messages, depending whether you decided to activate the SSO immediately
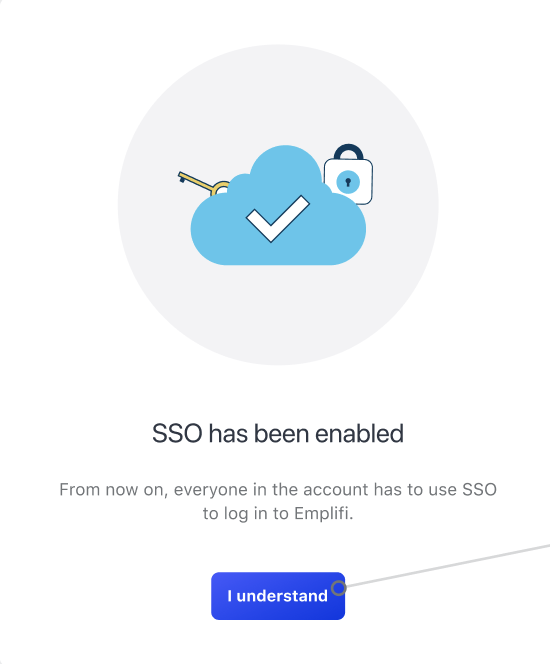
or at a later time.

Logging in when the SSO is activated
When the migration is complete, you can bookmark your new login page.
If you are used to logging in through the Emplifi login page, do not forget to switch to the SSO login next time when you want to log in.

Editing and maintaining the SSO configuration
To edit an existing SSO configuration (or a pending configuration):
Go to Settings.
Click Single sign-on.
Click Edit.
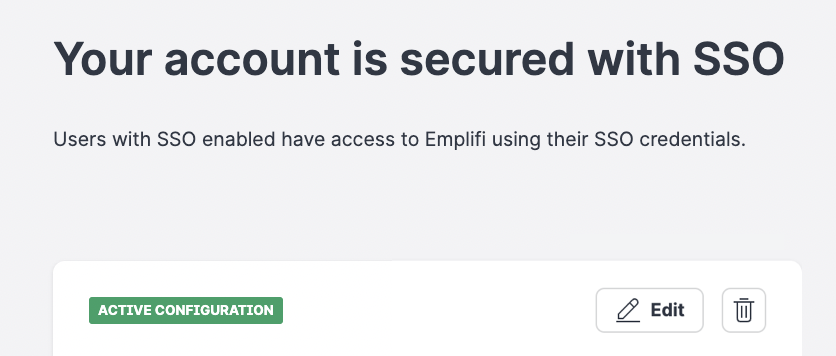
Renewing the certification
After some time your SSO certification will expire. You can easily enter new certification details under the Connection tab. You can either enter the new Metadata URL or update your certificate manually.
Allow non-SSO to your Emplifi account
You can allow external users (users outside your SSO organization) to be added to your Emplifi account.
You have probably set up your Emplifi account as strictly SSO account and only users using your organization's SSO can be added and logged in.
However, you can also enable access for users outside your organization.
Click the Summary tab and select Activate SSO for some users.
With this new setup, all users that were already migrated to use SSO login to the Emplifi account will continue using their SSO login, but you will be able to add new users who will set up their email password to log in.
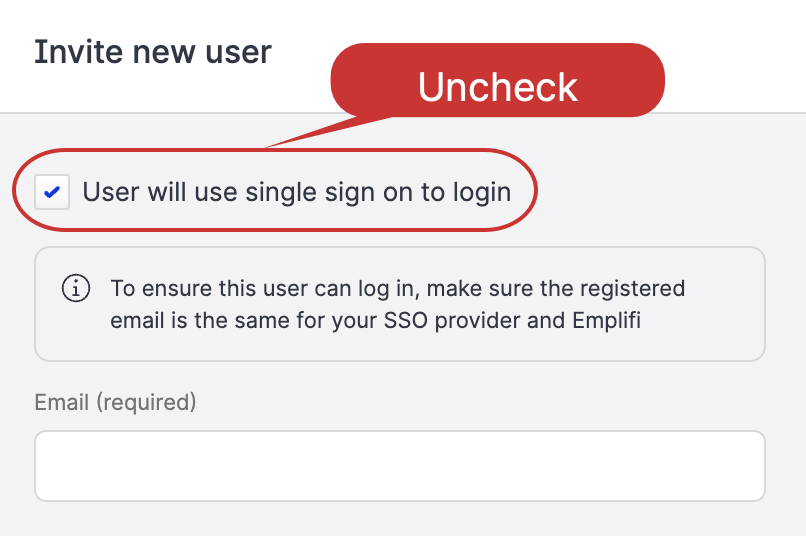
In the Invite new user dialog window, un-check the default settings, so that the user will not use the single sign-on to log in.
You can switch an SSO user to a non-SSO user in the User detail section but ONLY before the user logs in with their SSO.
Users
Each user is recognized by an Identifier (nameId), which must be the company email (email set on the IdP side).
Ensure that all users have the correct Identifier filled in the Emplifi account so they are recognized when attempting to log in via the SSO provider. Otherwise, their access will be denied.
If a user has access on the SSO IdP side but doesn’t have the access set up in the Emplifi account, the verification/authentication will fail.
Deprovisioning a User
Deprovisioning a user on the IdP side is immediate and will prevent the user from logging in to the Emplifi account. However, they will still be listed as a user in the Emplifi account until manually removed by the admin.
Login
The user can log in via companyname.app.emplifi.io and will be redirected to the external SSO provider login page for authentication (for example, companyname.onelogin.com/login).
If the user is set up properly in both the SSO provider and Emplifi account, they will be redirected to the Emplifi account and will be able to log in successfully.
Log out
Any user can log out by pressing the Log out button in the Emplifi app.
SSO Parameters & Attributes
During the process, you may come across various parameters and attributes you need to set up in your IdP. Those parameters are highly specific for each provider and it’s hard to list all of them. Below we try to list and define the most important or common terms and their variations in different providers, to understand when setting up your SSO.
Always consult the setup with the IdP representatives or check the guidelines of your SSO provider.
Identifier/Entity ID/Client ID:
This is the unique public identifier that is assigned to the client application. It is the value of the “entityID” keyword in the XML file with the metadata.
Redirect URL/Reply URL/Assertion Consumer Service (ACS) URL:
The URL address to which the user is redirected once they’re authenticated and authorized. The URL specifies where the application expects to receive the SAML token. The authorization server sends the code or token to this URL, so you must register the correct location as part of the app registration process. You can use the additional Redirect URL fields to specify multiple Redirect URLs.
Login URL/Sign-in URL/Application URL:
The single sign-on initialization URL that needs to be used to log in. When a user opens this URL, the service provider redirects the user to the IdP to authenticate and sign in.
(Optional) Logout URL/Sign-out URL:
A URL you configure in your Identity Provider to log a user out from Emplifi when the Identity Provider initiates Single Logout (SLO).
Name ID format:
Defines the name identifier formats supported by the identity provider. Name identifiers are a way for providers to communicate with each other regarding a user. Single sign-on interactions support the following types of identifiers:
urn:oasis:names:tc:SAML:2.0:nameid-format:persistent
urn:oasis:names:tc:SAML:2.0:nameid-format:transient
urn:oasis:names:tc:SAML:1.1:nameid-format:emailAddress
urn:oasis:names:tc:SAML:1.1:nameid-format:unspecified
urn:oasis:names:tc:SAML:1.1:nameid-format:X509SubjectName
urn:oasis:names:tc:SAML:1.1:nameid-format:WindowsDomainQualifiedName
urn:oasis:names:tc:SAML:2.0:nameid-format:kerberos
urn:oasis:names:tc:SAML:2.0:nameid-format:entity
In Emplifi SSO integration we use Name ID = user.email or similar.
Recipient
The recipient is associated with the Subject element of SAML Assertion, which is about the user or subject for which the authentication is performed. IdP awards subject data to a particular recipient (the service provider), who can act on the Assertion.
Audience
Specify the targets that are the recipients of the token.
The audience is associated with the Condition element of SAML Assertion that tells you under which security conditions or context, the assertion is valid. It provides terms and conditions relating to such validity (for example, time validity of assertion, who can consume the assertion, etc).
Typically, the Audience will be the EntityID of the Service Provider.
RelayState
RelayState is a URL parameter that can be used to redirect the user to a different application after the authentication flow finishes.
Attributes that should be added to SAML assertion:
UserEmail = user’s email
FirstName = user’s given name
LastName = user’s surname
If attributes are present in the SAML response, we set up and update the user each time they log in. If missing, the user is visible only by their email address which must be a unique nameID identifier of the user.
